
TL;DR
- Earthquakes don’t kill — unpreparedness does: The overwhelming majority of earthquake deaths result from collapsing structures, falling objects, and post-quake fires — all preventable through preparation done long before the shaking starts.
- “Drop, Cover, and Hold On” is the only scientifically validated survival response: Forget doorways, forget running outside, forget the Triangle of Life — decades of casualty data confirm one correct action, and it takes less than five seconds.
- What you do before the earthquake determines what happens during it: Securing furniture, reinforcing your home, stockpiling supplies, and practicing your response account for roughly 80% of survivability — the shaking itself is just the test.
- Post-earthquake hazards kill people who survived the shaking: Gas leaks, structural aftershock collapse, electrical fires, and contaminated water are responsible for a significant percentage of earthquake-related deaths — and most people are completely unprepared for them.
- Every household, school, and community needs a drilled earthquake plan: A plan pinned to a fridge that nobody has practiced is a piece of paper — not protection.
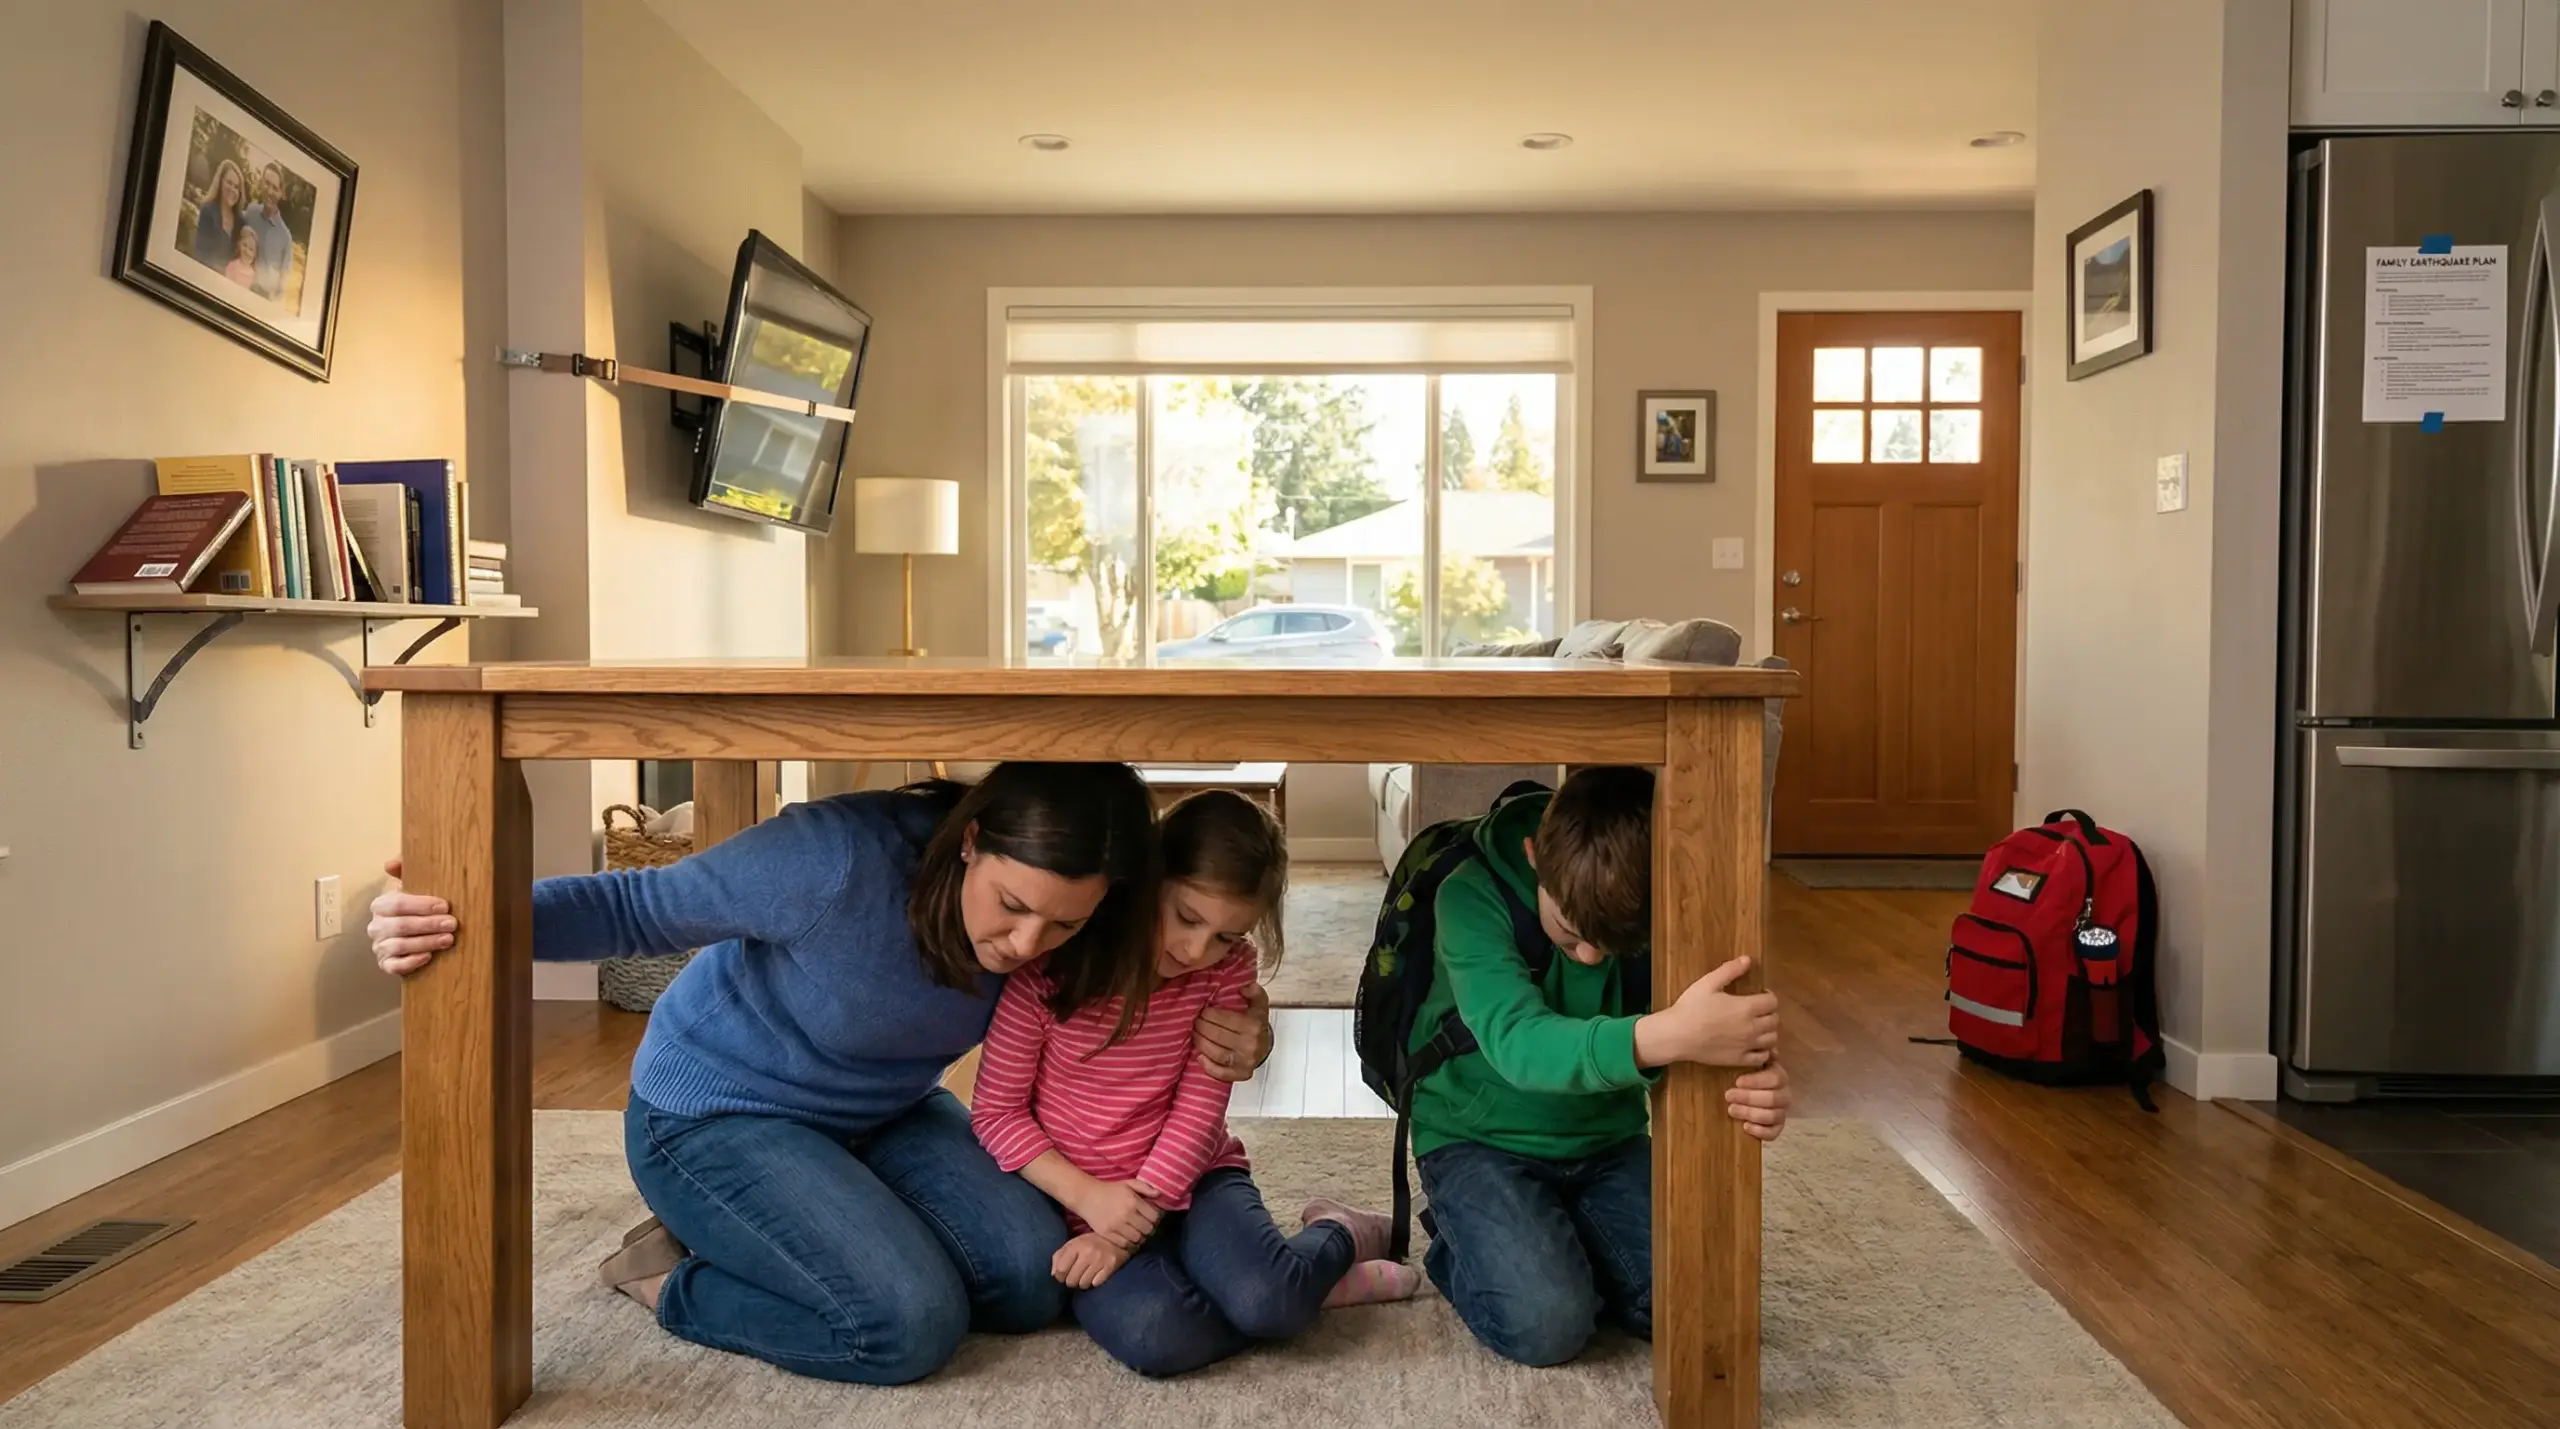
I was helping a friend’s family assess their home after a magnitude 5.8 earthquake struck a coastal city in Southern Europe. The house was still standing — structurally, it performed fine. But inside, the damage told a different story. A solid oak bookshelf had toppled face-down across the hallway, blocking the path to the children’s bedroom. The kitchen was ankle-deep in broken glass from unsecured cabinet doors that had swung open and launched dishes across the tile floor. A wall-mounted flat-screen television had torn free from a bracket rated for static weight but never tested for lateral force, shattering across a sofa where their teenage son had been sitting twenty minutes before the quake. The water heater in the garage had shifted off its base, shearing the gas line and filling the enclosed space with mercaptan-scented natural gas. Nobody was injured — by sheer luck, not by preparation. Every hazard in that house was preventable with under two hours of work and less than fifty dollars in hardware.
Earthquake safety tips are searched by millions of people every year — yet most of what people find online is either too vague to act on or too focused on industrial settings to apply at home. This article is different. It covers practical, tested earthquake safety for everyone — families, students, renters, homeowners, travelers, and communities — across the three phases that determine outcomes: before, during, and after the earthquake. Whether you live in a high-rise apartment in a seismic zone or a suburban house near a fault line, the steps here are drawn from real post-earthquake assessments, emergency response operations, and casualty investigations across multiple continents. The ground shakes without warning. What you do right now — today, before it happens — is the only variable you control.

What Actually Kills and Injures People in Earthquakes
An earthquake is a sudden, rapid shaking of the ground caused by the release of accumulated stress along geological faults. But understanding the geology matters far less for survival than understanding what actually causes casualties. Most people picture the ground splitting open and swallowing buildings. The reality is far more mundane — and far more preventable.
Post-earthquake casualty studies consistently identify the same mechanisms of injury and death. These are the real killers, and every one of them is addressable through preparation:
- Structural collapse of unreinforced buildings: Unreinforced masonry — brick, stone, and concrete block construction without steel reinforcement — is the single greatest killer in earthquakes globally. These buildings shatter under lateral forces that reinforced structures absorb. Entire neighborhoods built in this style have been leveled in seconds.
- Falling objects inside structurally sound buildings: In modern, code-compliant buildings, the structure usually holds. What injures and kills occupants are the things inside — televisions, bookshelves, mirrors, ceiling fans, light fixtures, refrigerators, and unsecured cabinetry. The 1994 Northridge earthquake in California caused the majority of its injuries from non-structural falling objects, not building collapse.
- Shattered glass: Windows, glass doors, mirrors, and picture frames produce razor-sharp debris fields during shaking. Lacerations from broken glass are among the most common earthquake injuries treated in emergency departments.
- Post-earthquake fires: Ruptured gas lines combined with damaged electrical wiring or toppled appliances ignite fires that spread rapidly through earthquake-damaged structures. After the 1906 San Francisco earthquake and the 1995 Kobe earthquake, fire destroyed more buildings than the shaking itself.
- Stampede and panic injuries: In crowded spaces — malls, theaters, stadiums, schools — untrained crowds rushing for exits cause trampling injuries that can be as severe as the earthquake effects themselves.
According to the U.S. Geological Survey (USGS), most earthquake-related injuries are caused by falling objects and debris, partial building collapses, and fires — not by ground rupture. Individual protective action and pre-event preparation are the most effective injury prevention measures available.
Pro Tip: Stand in your living room right now and look at everything above knee height. Every unsecured shelf, every wall-mounted screen, every framed picture with glass, every top-heavy dresser — those are not furniture during an earthquake. They are projectiles. Mentally tag each one. Then secure them. That ten-minute exercise could save someone in your home from a fractured skull.
Earthquake Safety Tips Before an Earthquake: The Preparation Phase
If there is one message I could carve into every door frame in every seismically active region on earth, it would be this: what you do before the earthquake is everything. During the shaking, you have seconds and almost zero control. After the shaking, you are dealing with consequences. Before the shaking is the only phase where you have full agency, unlimited time, and complete control over your environment. Everything in this section is about using that time wisely.
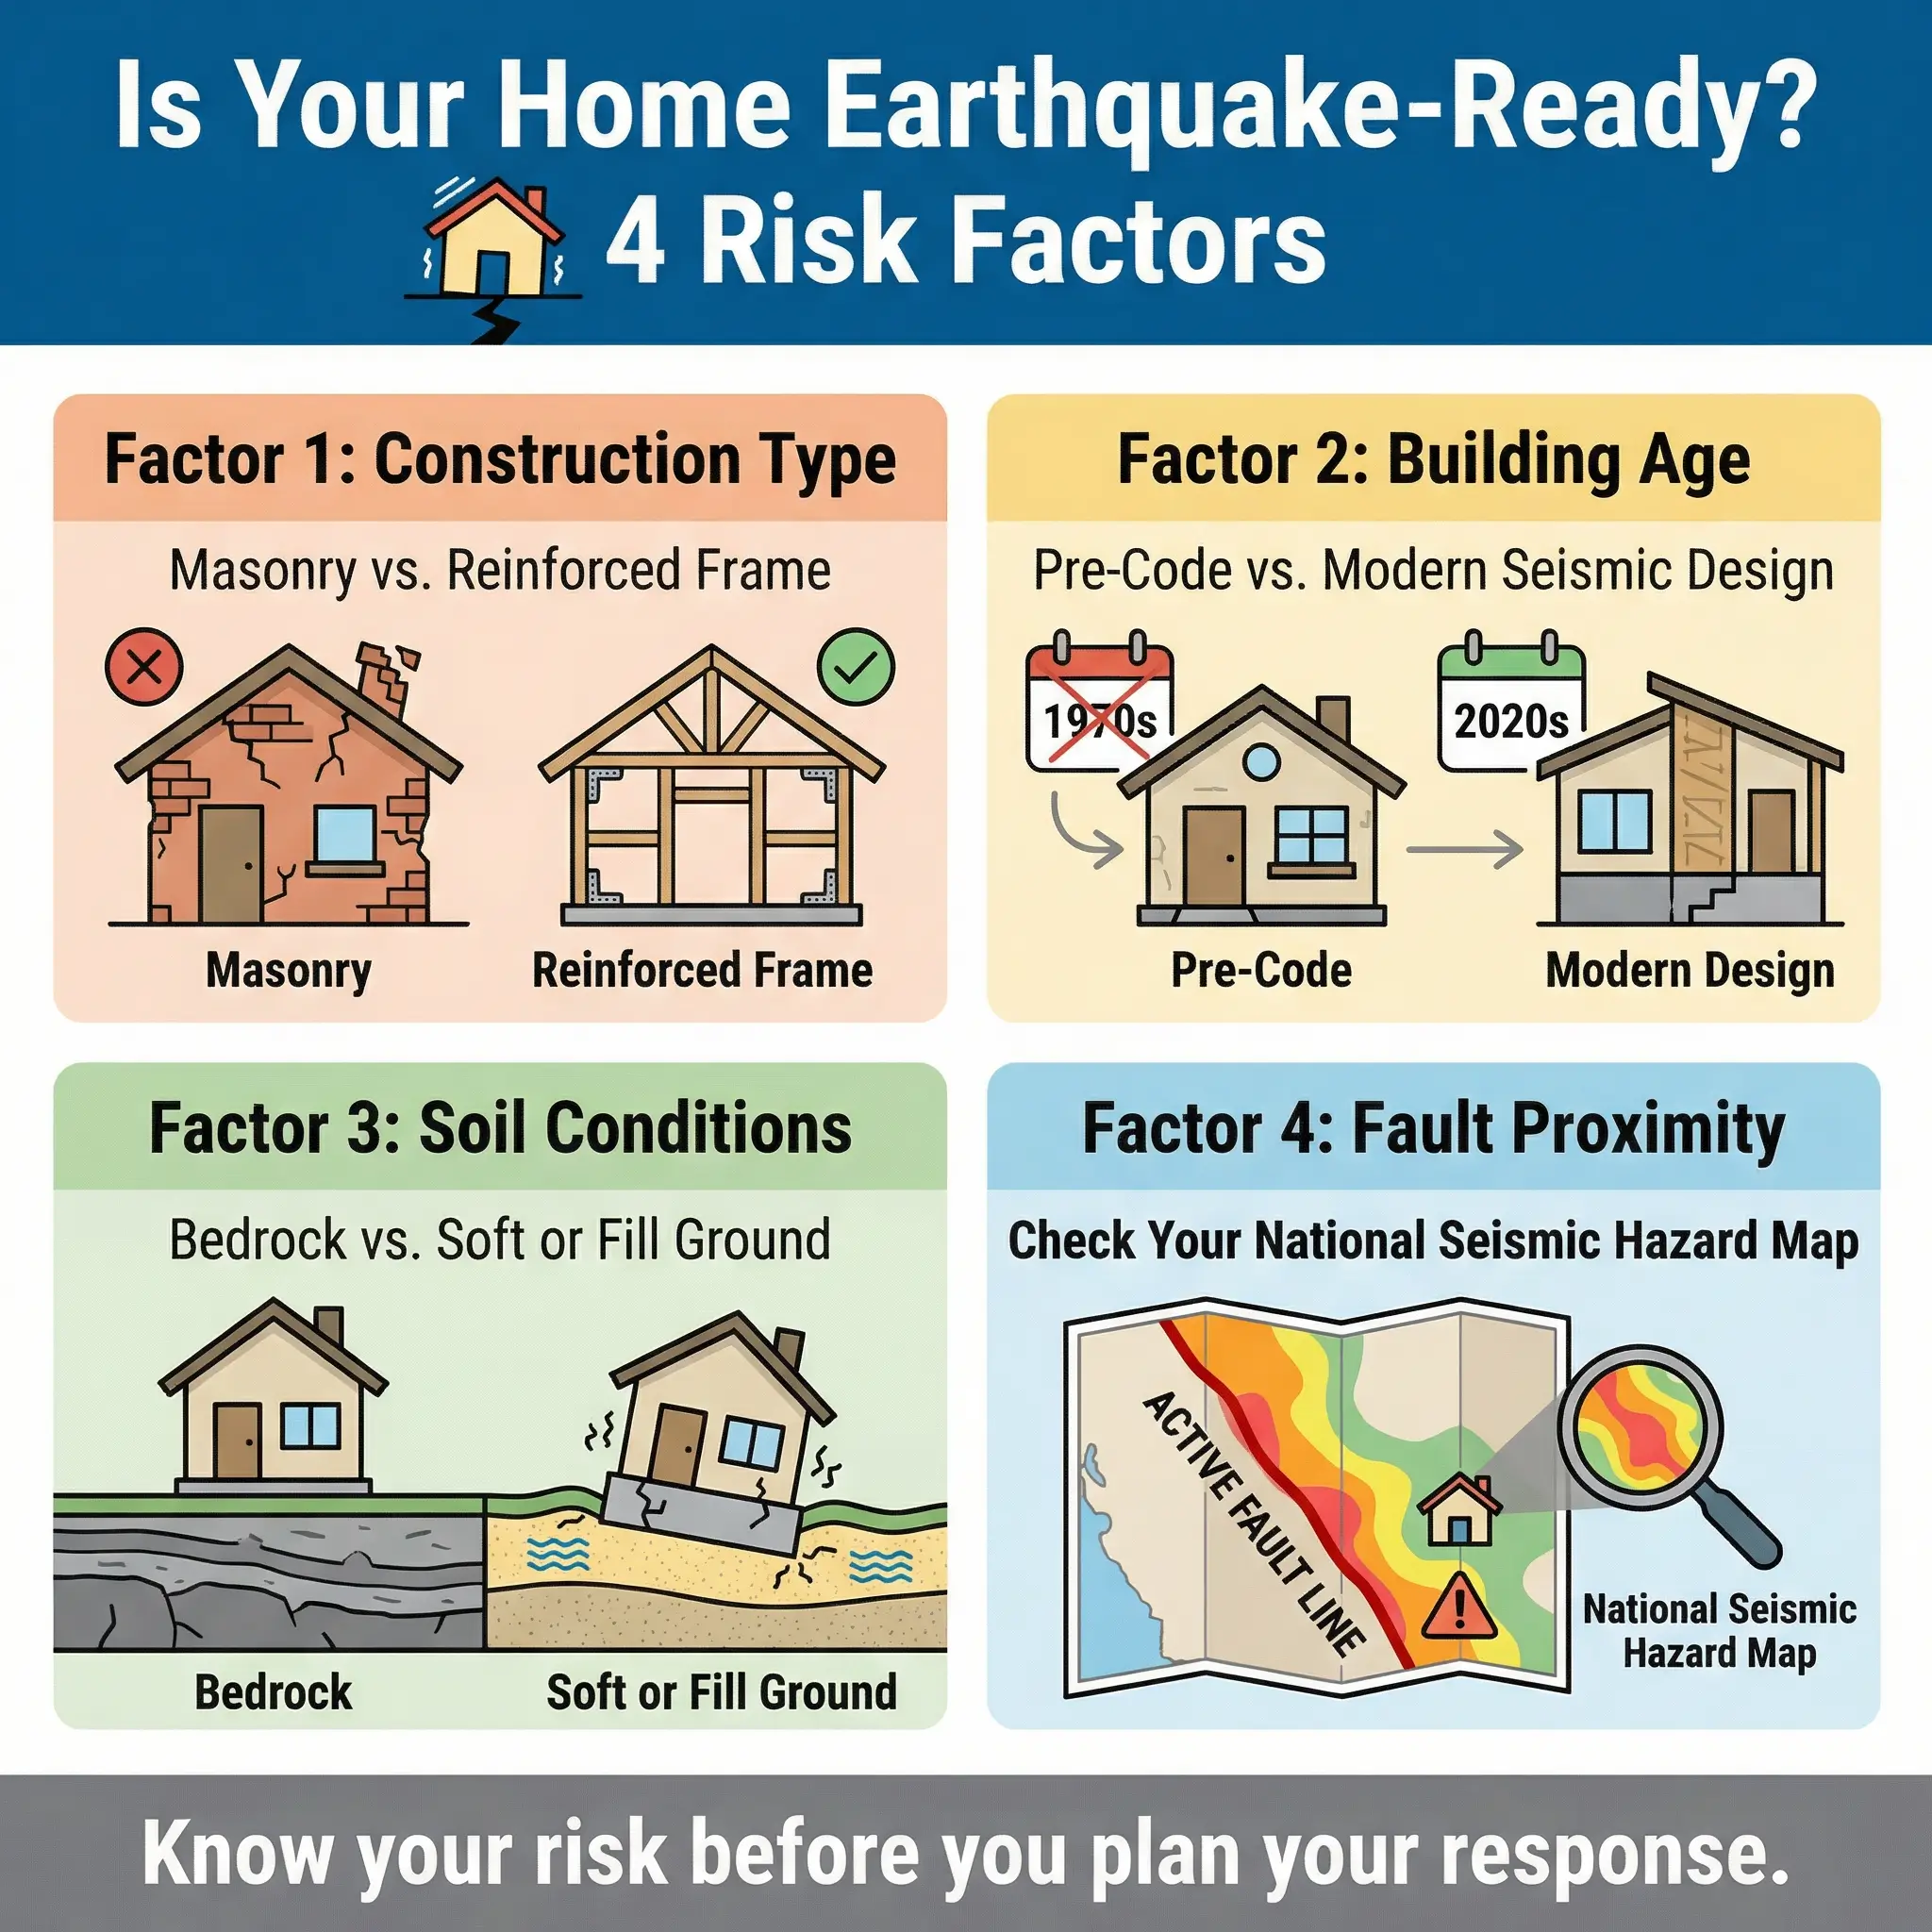
Know Your Risk — Is Your Home or Building Vulnerable?
Before you can prepare, you need to understand what you are preparing for. Not all buildings respond to earthquakes equally, and not all locations carry the same seismic risk. A few minutes of honest assessment can reveal whether you are living or working in a high-risk environment.
These factors determine your vulnerability and should be evaluated honestly:
- Building construction type: Reinforced concrete and steel-framed buildings perform dramatically better than unreinforced masonry. Wood-frame houses, common in North America and Japan, generally perform well due to their flexibility — but older ones may lack foundation bolting or cripple wall bracing. Know what your structure is built from.
- Building age and code era: Seismic building codes have improved enormously since the 1970s. A building constructed in 1960 in a seismic zone was almost certainly designed to lower — or zero — seismic standards compared to current codes. Age alone is a meaningful risk indicator.
- Soil type beneath your foundation: Soft soils, reclaimed land, and filled ground amplify seismic waves dramatically. The same earthquake produces far stronger shaking on soft ground than on bedrock. Liquefaction — where saturated soil loses its strength and behaves like liquid — can cause buildings to sink, tilt, or collapse even if structurally sound.
- Your proximity to known faults: Seismic hazard maps published by national geological surveys (USGS, GeoNet, INGV, and others) show fault lines and historical seismicity. Knowing whether you live 5 kilometers or 50 kilometers from an active fault changes your risk profile substantially.
I reviewed a family’s home in a hillside neighborhood overlooking a Pacific coastal city. Beautiful house, well-maintained, excellent views. Built in 1972 on fill soil, unreinforced masonry lower story, with a steep slope behind the retaining wall. That home sat in the overlap of three risk factors — old construction, poor soil, and landslide exposure. The family had lived there for twelve years without ever considering earthquake risk. A fifteen-minute conversation changed their entire approach to preparedness.
Secure Your Home — Room by Room
Securing your home against earthquake damage is the single highest-return investment in earthquake safety. It requires no professional help for most tasks, costs very little, and directly prevents the injuries that fill emergency rooms after every moderate-to-large earthquake.
The room-by-room approach ensures nothing gets overlooked. Each area of your home has specific vulnerabilities:
Living Room and Bedrooms:
- Bookshelves and tall furniture: Anchor to wall studs using L-brackets or anti-tip straps. A six-foot bookshelf loaded with hardcovers weighs 90+ kilograms and generates lethal force when it topples.
- Televisions and monitors: Wall-mounted screens must use brackets rated for dynamic (not just static) load. Freestanding TVs on stands should be secured with furniture straps or Velcro-style mounts.
- Mirrors and framed art above beds: Rehang heavy items away from beds and seating areas, or replace glass with acrylic. A falling mirror directly above a pillow is one of the most common — and most preventable — earthquake injury scenarios.
- Ceiling fans and light fixtures: Ensure ceiling fixtures are secured to structural framing, not just drywall. Add safety cables as secondary retention on heavy fixtures.
Kitchen:
- Cabinet doors: Install positive-latch closures (child-proof latches work effectively) on all upper cabinets. Without them, doors swing open during shaking and eject heavy dishware, glasses, and appliances onto the floor — and anyone standing below.
- Refrigerator: Strap the refrigerator to the wall. An unsecured refrigerator can slide or topple across the kitchen during strong shaking, blocking exits and crushing anything in its path.
- Heavy items on high shelves: Move heavy pots, cast iron, and small appliances to lower cabinets. Store glassware and breakables on lower shelves with non-slip liner underneath.
Garage, Utility Room, and Storage Areas:
- Water heater: Strap to the wall with approved seismic straps at both the upper third and lower third. An unsecured water heater that shifts off its base can shear the gas line — the number one cause of post-earthquake residential gas leaks.
- Stored chemicals and flammables: Gasoline, paint thinner, cleaning chemicals — store on low shelves in secondary containment. Never store flammables above waist height.
- Tool shelves and heavy storage: Anchor freestanding metal shelving to the wall. Top-heavy loaded shelves topple first and block evacuation routes in garages — often the primary exit from a home.
Pro Tip: The bedroom is statistically the most dangerous room during a nighttime earthquake — because you are horizontal, disoriented, barefoot, and surrounded by furniture in the dark. Keep closed-toe shoes and a flashlight under your bed, within arm’s reach, at all times. That single habit prevents the laceration injuries that are the most common nighttime earthquake casualty.
Build a Household Earthquake Emergency Kit
After a significant earthquake, normal services — water, electricity, gas, transportation, grocery stores, pharmacies — may be disrupted for 72 hours or longer. Emergency responders prioritize life-threatening situations first, which means you and your family may be entirely self-sufficient for the first three days.
Your earthquake emergency kit should sustain every member of your household for at least 72 hours. Store it in an accessible location — not buried in a basement closet behind holiday decorations:
- Water: One gallon (approximately 4 liters) per person per day, minimum 72-hour supply. For a family of four, that means 12 gallons. Store in commercially sealed containers and rotate every 12 months.
- Food: Non-perishable, ready-to-eat items — canned goods with a manual can opener, energy bars, dried fruit, peanut butter, crackers. No items requiring cooking, refrigeration, or significant water to prepare.
- First aid kit: Stock beyond the standard bandage kit. Include pressure dressings, triangular bandages for slings, adhesive wound closure strips, antiseptic solution, pain relievers, any prescription medications for household members (30-day rotating supply), and a basic first aid instruction card.
- Lighting: LED flashlights and headlamps with extra batteries. Headlamps are far more practical than handheld flashlights — they free both hands for navigating debris, carrying children, or administering first aid. Avoid candles entirely — post-earthquake gas leaks make open flame extremely dangerous.
- Communication: Battery-powered or hand-crank AM/FM radio for emergency broadcasts. Fully charged portable phone battery bank. Write down critical phone numbers on paper — your phone may die, break, or lose service.
- Whistle: One per family member. If trapped under debris, a whistle carries further than a voice, requires far less energy, and does not increase dust inhalation. Attach it to the kit, to a keychain, or to a bedpost.
- Dust protection: N95 masks or equivalent for each family member. Collapsed drywall, concrete, and insulation generate hazardous particulate. Small children and individuals with asthma or respiratory conditions are especially vulnerable.
- Sanitation supplies: Plastic bags, ties, hand sanitizer, moist towelettes, and toilet paper. If water and sewage systems are disrupted, basic sanitation prevents disease outbreaks that follow many earthquakes.
- Cash: Small bills. ATMs and card readers do not function without power. In the days after a major earthquake, cash is the only reliable transaction method.
- Important documents: Copies (physical or on a USB drive) of identification, insurance policies, medical records, and emergency contacts in a waterproof bag.
| Kit Category | Items | Per Person Quantity (72 hrs) | Key Notes |
|---|---|---|---|
| Water | Sealed containers | 1 gallon/day (12 gal for family of 4) | Rotate every 12 months |
| Food | Non-perishable, no-cook items | 3 days’ supply | Include manual can opener |
| First Aid | Trauma-focused kit | 1 kit per household | Include 30-day prescription supply |
| Lighting | LED headlamps + batteries | 1 headlamp per person | No candles — gas leak risk |
| Communication | Crank radio + phone charger | 1 radio, 1 charger per household | Paper list of phone numbers |
| Signaling | Whistle | 1 per person | Attach to kit or bedpost |
| Respiratory | N95 masks | 2–3 per person | Critical for children and asthmatics |
| Sanitation | Bags, sanitizer, wipes | Full kit per household | Prevents post-quake disease |
| Cash | Small bills | $200–$500 per household | ATMs require power |
| Documents | ID, insurance, medical copies | 1 waterproof set | USB drive backup recommended |
Create a Family Earthquake Plan — Then Practice It
An earthquake plan that exists only in someone’s head — or worse, only on paper — is not a plan. It is an intention. Intentions do not save lives during violent shaking. Drilled, rehearsed, reflexive actions do.
Every household, regardless of size, needs a plan that covers these elements and is practiced at least twice per year:
- Each person’s protective action: Every family member — including children old enough to understand — must know to Drop, Cover, and Hold On within seconds of feeling shaking. This means identifying the nearest sturdy cover point from every room in the house. Children should practice this as a physical drill, not just a verbal instruction.
- Reunion points: Designate two meeting locations — one immediately outside the home (front yard, end of driveway) and one outside the neighborhood (a park, a school, a community center) in case the neighborhood is evacuated or inaccessible.
- Out-of-area emergency contact: Choose a friend or relative who lives far from your seismic zone as the central communication point. After an earthquake, local phone networks overload within minutes, but long-distance calls and text messages to an out-of-area number often connect. Every family member should have this number memorized — not just saved in a phone.
- School and childcare pickup plan: Know your children’s school earthquake procedures. Who picks up the children if roads are blocked? What is the school’s reunification policy? Have this documented and updated every school year.
- Pet plan: Pets cannot be left behind in a damaged structure. Include pet food, water, leash, carrier, and vaccination records in your emergency kit. Know which emergency shelters accept animals — most do not.
- Utility shut-off knowledge: Every capable household member should know the location of the gas shut-off valve, the electrical main breaker, and the water main valve — and have the tools to operate them. A single crescent wrench kept wired to the gas meter can prevent a house fire.
The American Red Cross recommends practicing Drop, Cover, and Hold On drills at home at least twice per year, including once at night and once during the day, to ensure every family member can perform the action reflexively in any condition.
Earthquake Safety Tips During an Earthquake: Seconds That Determine Everything
When the shaking begins, you enter a window of five to sixty seconds where your physical response determines whether you walk away uninjured or end up in an emergency room. There is no time to think. There is no time to plan. There is only time to execute what has already been drilled.
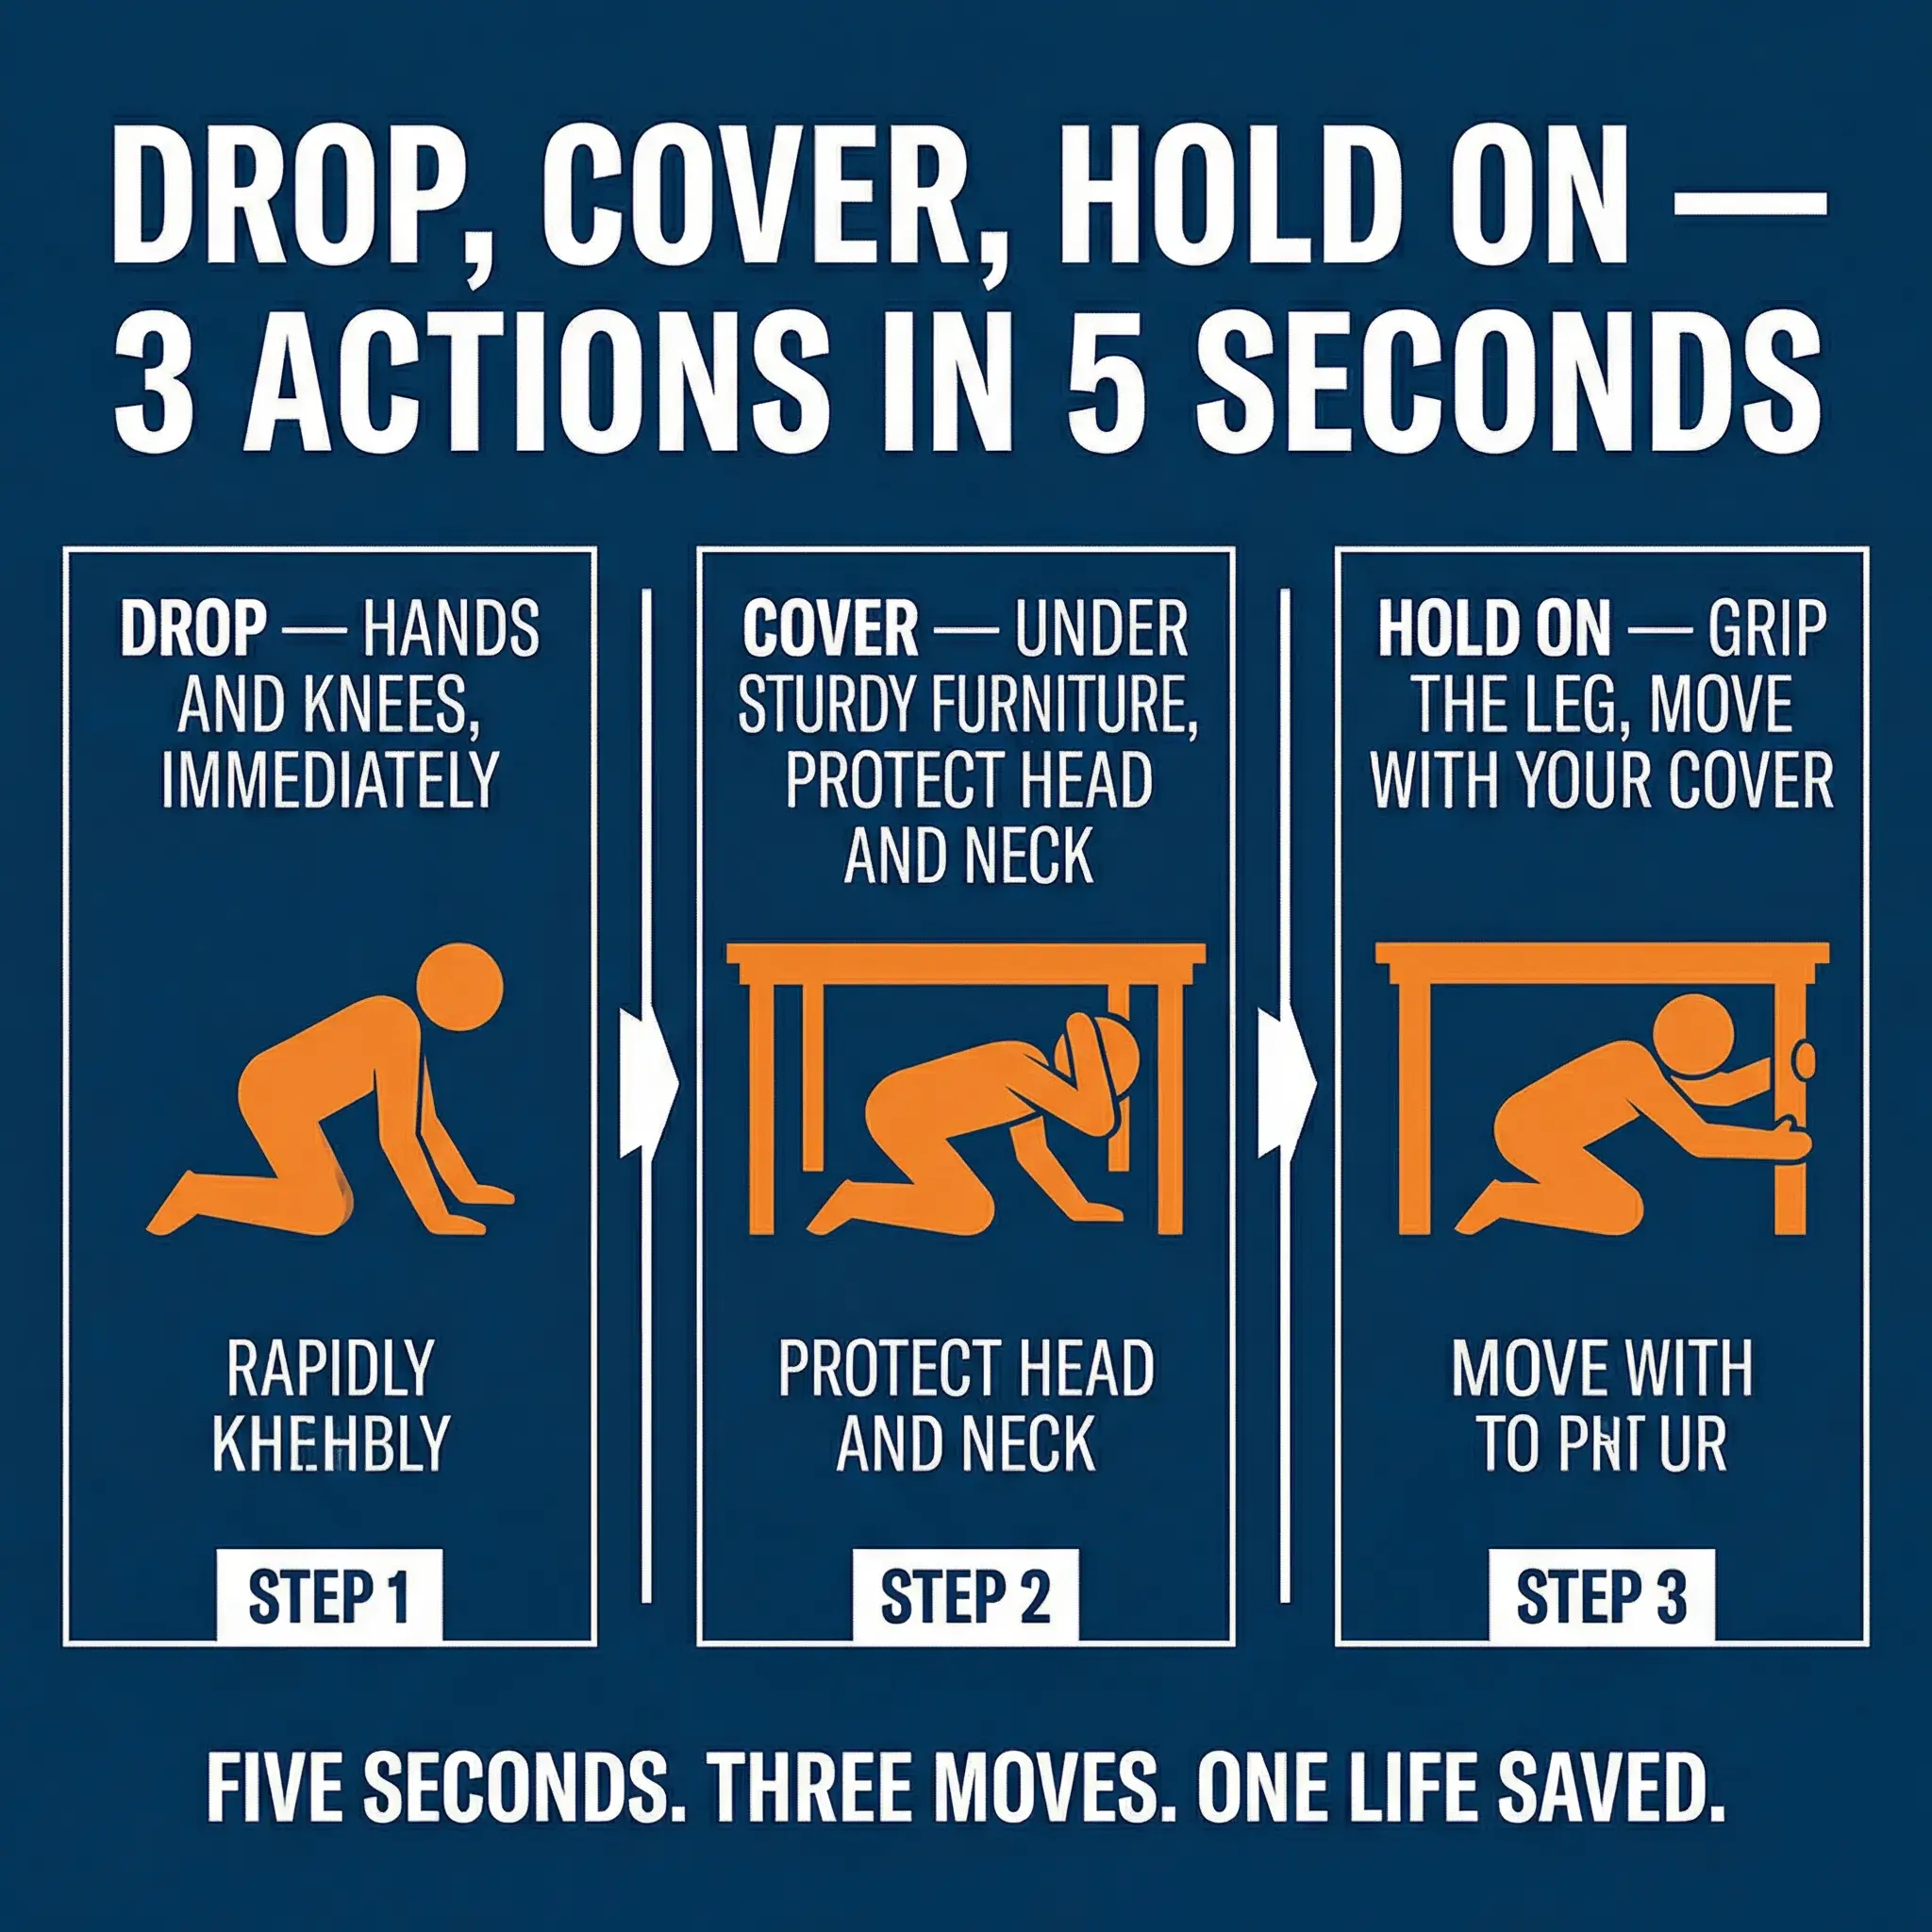
Drop, Cover, and Hold On — The Correct Response
Drop, Cover, and Hold On is not one option among several. It is the only individual protective action validated by decades of earthquake casualty research, endorsed unanimously by FEMA, USGS, the American Red Cross, the International Federation of Red Cross and Red Crescent Societies, and every major national emergency management agency. Alternatives promoted on the internet have been studied and rejected.
The sequence is three immediate physical actions executed without pause:
- DROP to your hands and knees. This prevents the earthquake from throwing you to the ground uncontrolled — the cause of most fall-related earthquake injuries. You cannot fall if you are already down. Crawling is possible; walking during strong shaking is not.
- Take COVER under a sturdy piece of furniture — a desk, a table, a workbench. Protect your head, neck, and torso from falling objects. If no furniture is available, move to an interior wall away from windows and cover your head and neck with both arms. Interior walls are less likely to be struck by falling exterior facade elements.
- HOLD ON to your cover with one hand. Strong shaking moves furniture across floors. If you release the table, it slides away and leaves you exposed. Grip a leg with one hand, protect your neck with the other, and ride the shaking out.
Myths that persist — and get people hurt — need direct correction. I have encountered every one of these in community preparedness sessions, schools, and workplace trainings:
- “Stand in a doorway.” This originated with old adobe and unreinforced masonry construction where the timber door frame was structurally stronger than the surrounding walls. In any modern building, doorways offer zero special protection. Worse, you are exposed to a swinging door and objects falling from both adjacent rooms. Abandon this advice completely.
- “Run outside immediately.” The zone directly outside a building during shaking is a kill zone. Glass, facade panels, brick veneer, roof tiles, and air conditioning units fall outward from the building during shaking. More people have been killed by falling debris while running outside than by staying indoors under cover.
- “The Triangle of Life.” This internet-viral theory recommends curling up next to large objects rather than underneath cover, claiming the object will create a survivable void space when the ceiling collapses. This has been explicitly rejected by FEMA, USGS, every Red Cross society, and peer-reviewed earthquake casualty research. In reality, objects crushed by falling structure do not create predictable voids — they are pushed, rolled, and fragmented unpredictably. Under sturdy cover is safer than beside any object.
- “Earthquakes open the ground and swallow people.” Surface rupture along a fault can displace the ground — but the cinematic image of the earth opening into a chasm that swallows people is fiction. Actual surface rupture produces offset, not chasms. This myth distracts from real hazards.
Pro Tip: If you have young children, make Drop, Cover, and Hold On a game. Call it “Turtle Time” or “Earthquake Superhero.” Practice it weekly until they do it on reflex without being told. During a real earthquake, a child who has drilled this response will protect themselves even if no adult is beside them. A child who has only heard about it will freeze.
What to Do Based on Where You Are
Earthquakes do not wait until you are conveniently positioned at a desk. They strike in cars, in kitchens, in supermarket aisles, in elevators, and in bed at 3 a.m. Every scenario requires the same principle — protect your head and get low — but the specific action adapts to the environment.
These situation-specific actions should be known by every member of your household:
- In bed at night: Stay in bed. Pull the pillow or blanket over your head and neck. Rolling out of bed drops you onto a floor likely covered in broken glass from picture frames, mirrors, and windows. The mattress provides meaningful protection against falling ceiling fixtures, plaster, and light objects.
- In a kitchen: Drop and take cover under the kitchen table if reachable within two steps. Move away from the refrigerator, stove, and overhead cabinets — all of which eject heavy objects during shaking. Do not try to save dishes or turn off the stove mid-shaking.
- In a store, mall, or supermarket: Move away from shelving units and display racks. Drop next to an interior wall or inside a sturdy checkout counter. Do not run for the exit — falling merchandise and panicked crowds create more danger than staying low in a protected spot.
- In an elevator: Press the nearest floor button and exit as soon as the doors open. If the elevator stops between floors, stay put and use the emergency intercom. Elevators have safety brakes designed to engage during shaking.
- Outdoors in an urban area: Move away from buildings — falling glass and facade elements create a debris zone extending roughly half the building’s height from its base. Move to an open area, drop, and cover your head. Stay away from streetlights, power lines, and overpasses.
- On a beach or near the coast: Drop, Cover, and Hold On during the shaking. Once the shaking stops, immediately move to high ground. Earthquake-generated tsunamis can arrive within minutes along nearby coastlines. Do not wait for an official warning — the earthquake IS the warning.
- In a car: Pull over safely away from bridges, overpasses, buildings, power lines, and trees. Stop the car, set the parking brake, and stay inside with your seatbelt fastened. The vehicle’s frame provides meaningful crush protection. Do not exit the vehicle during shaking.
- In a stadium, theater, or crowded venue: Stay in your seat. Drop as low as possible and protect your head with your arms. Do not rush for exits — stampede injuries in panicking crowds during earthquakes consistently cause more casualties than the shaking itself.
- In a wheelchair: Lock your wheels, bend forward as far as possible, and cover your head and neck with your arms. If a sturdy table is immediately beside you, move under it and lock wheels. If not, stay in the chair — it provides better structural protection than the floor.
- Outdoors in a mountainous or hilly area: Move away from steep slopes, cliff edges, and rock faces. Earthquake-triggered rockfalls and landslides kill people who survived the shaking but remained in vulnerable positions. Get to flat, open ground.
Earthquake Safety Tips After an Earthquake: The Danger Is Not Over
The shaking has stopped. Your instinct is relief. But post-earthquake environments are treacherous in ways most people do not anticipate. Structures that survived may be critically weakened. Gas may be accumulating in enclosed spaces. Electrical systems may be energized and exposed. Aftershocks — sometimes nearly as strong as the main event — will arrive. The transition from “during” to “after” is not a transition to safety. It is a transition to a different set of hazards that require calm, systematic response.
The First 10 Minutes — Critical Sequence
The first ten minutes after shaking stops determine whether you avoid secondary injury. Rushing, panicking, and skipping steps are the patterns I see in every post-earthquake injury investigation. The correct response is deliberate and sequential.
Follow these steps in order — do not skip ahead:
- Pause and self-assess. Before you move, check yourself for injuries. Adrenaline masks pain. People walk on broken ankles, ignore deep lacerations, and aggravate spinal injuries because they leap into action before assessing their own condition. Take ten seconds.
- Protect your breathing. If there is visible dust — and there almost always is after any structural cracking, plaster fall, or content damage — cover your mouth and nose with a dust mask, scarf, shirt, or any fabric. Concrete and drywall dust is hazite-grade particulate that damages lungs.
- Put on shoes. If you were in bed or barefoot, do not take a single step without shoes. Post-earthquake floors are covered in broken glass, nails from shifted framing, splintered wood, and debris. Lacerated feet immobilize you when mobility matters most.
- Check on others. Assist household members — children, elderly, anyone with mobility limitations — into a protected position. Prioritize anyone trapped or injured. Do not attempt to move someone with a potential spinal injury unless they face immediate life threat (fire, structural collapse).
- Evacuate only if necessary. If the building shows visible structural damage — cracked walls, shifted doorframes, sagging ceilings, buckled floors — evacuate using stairs, not elevators. If the building appears intact, it is generally safer to remain inside and assess rather than rush outside into potential debris zones.
- Account for everyone. At your pre-designated reunion point, confirm every household or group member is present. If someone is unaccounted for and possibly trapped, note their last known location and report it to emergency responders — do not attempt to dig through collapsed structure without training and proper equipment.
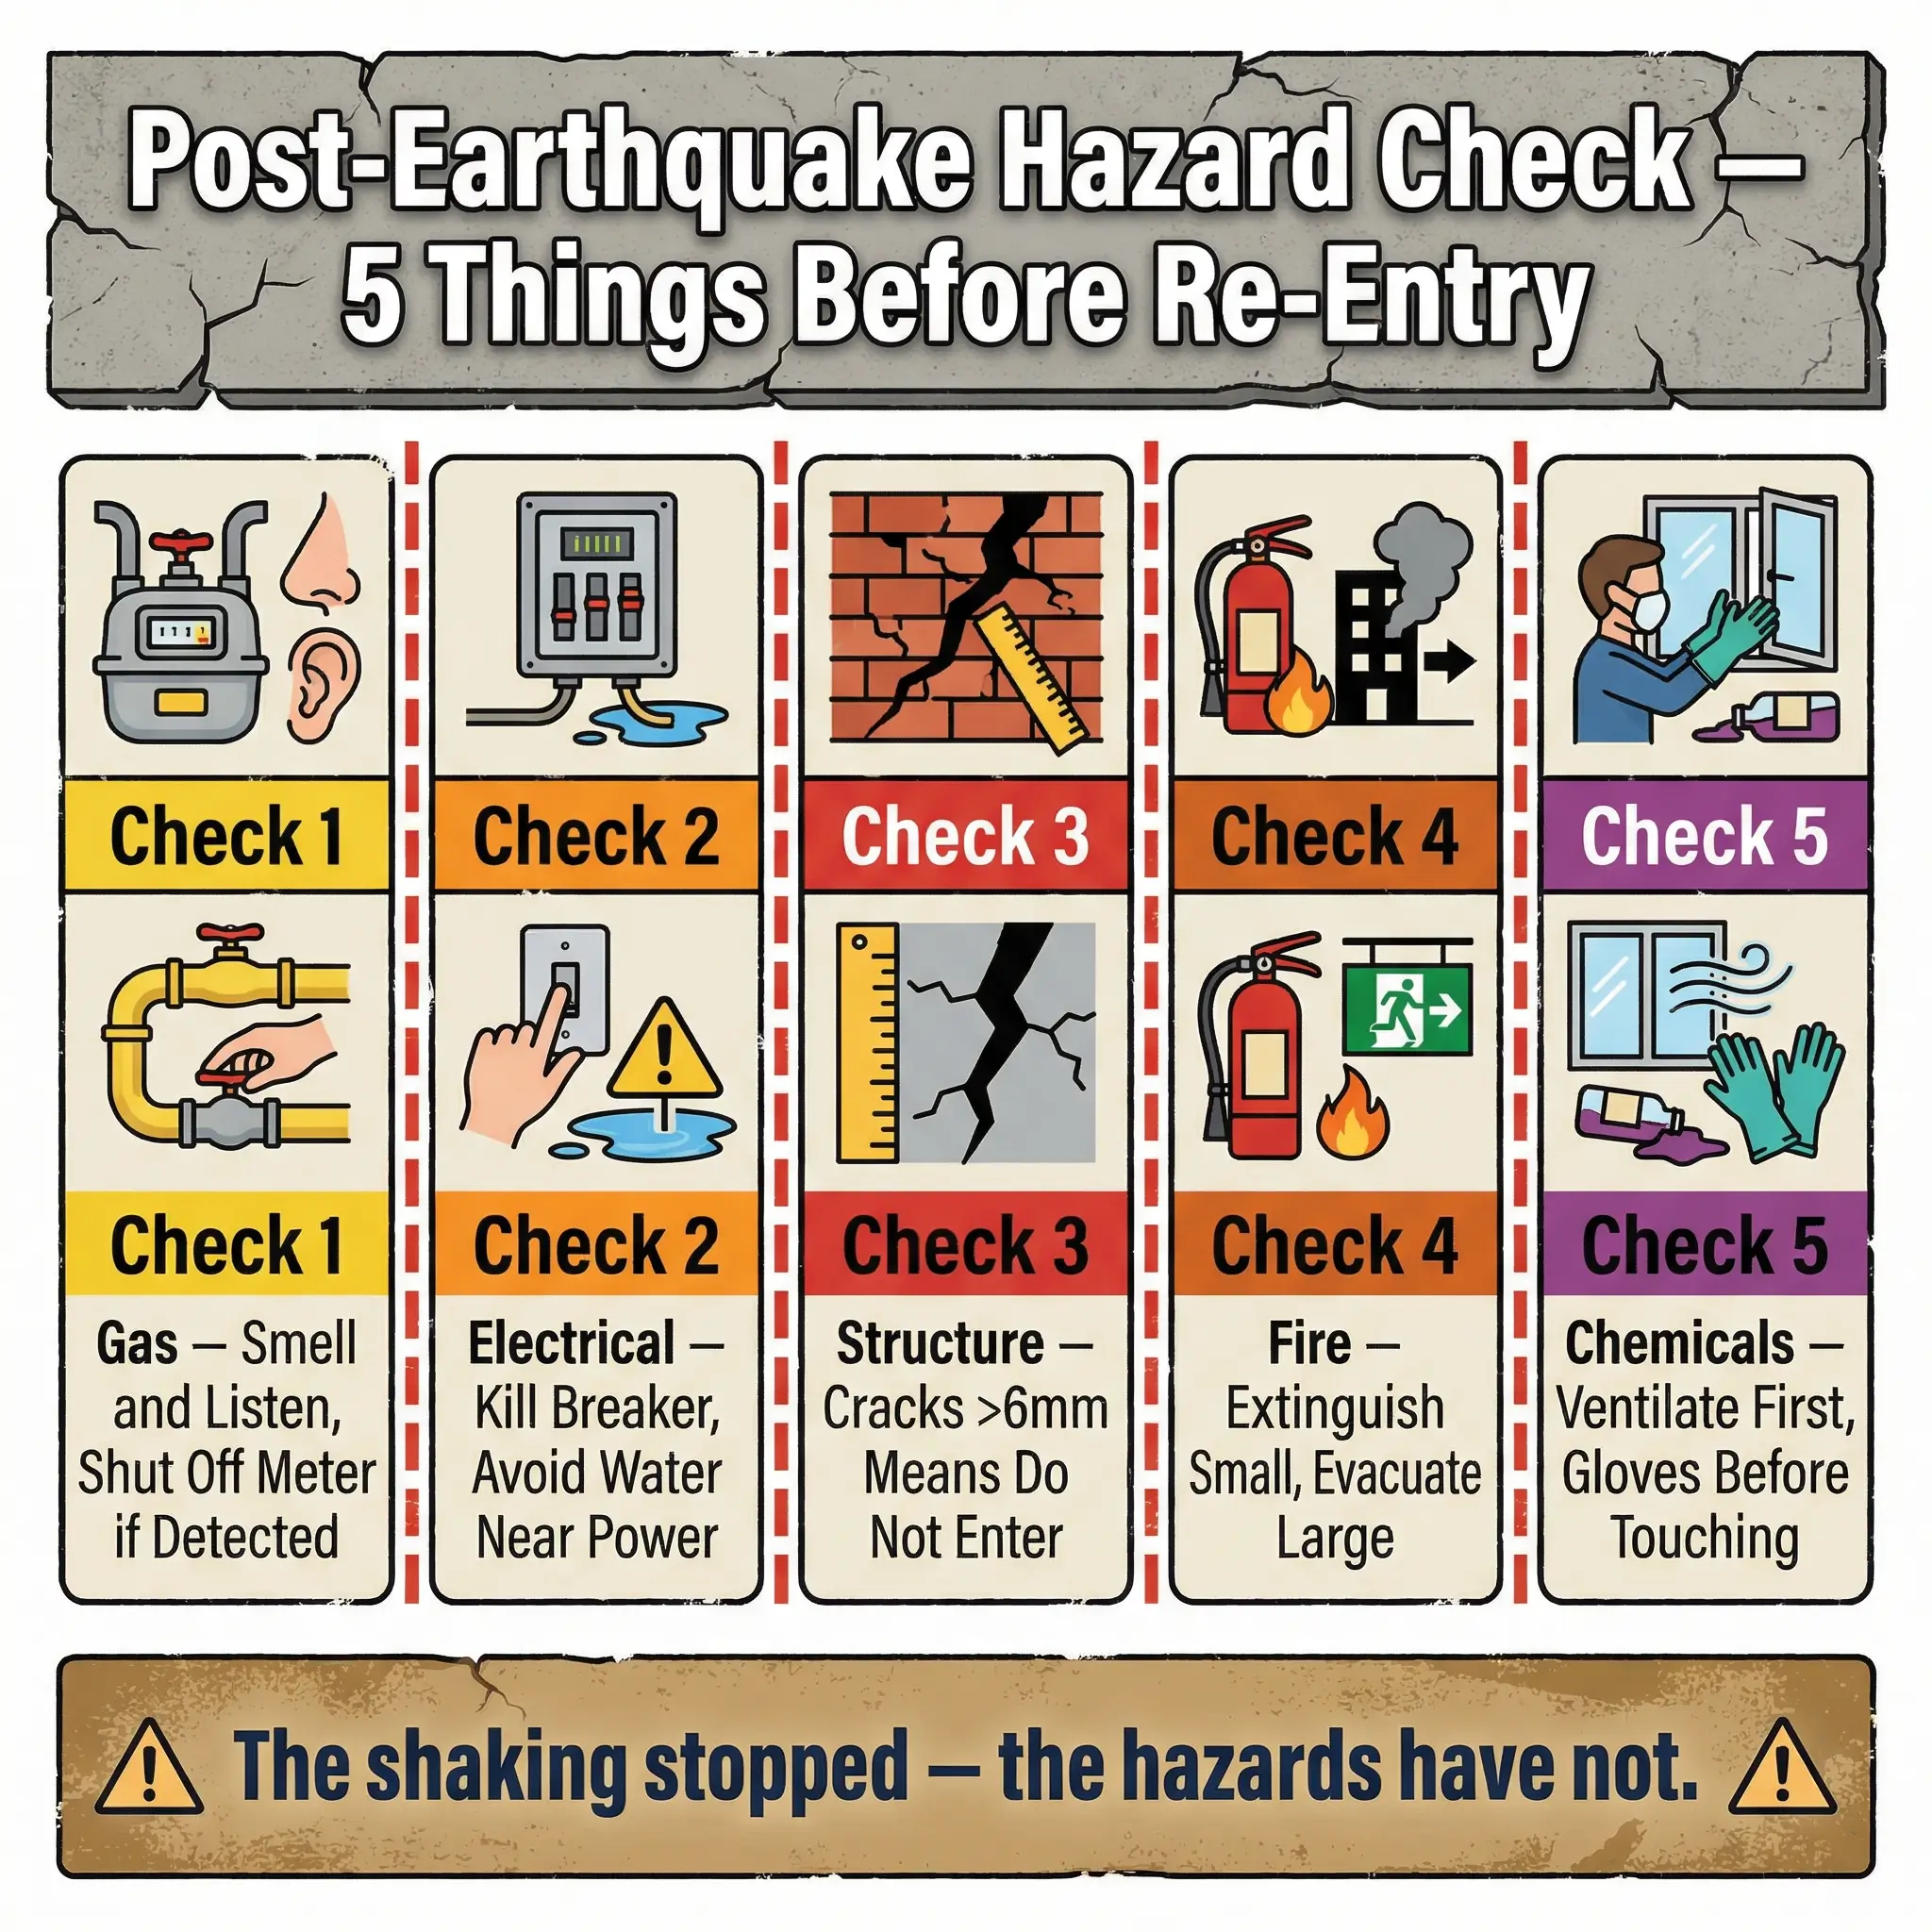
Check for Post-Earthquake Hazards Before Doing Anything Else
Before you re-enter a building, retrieve belongings, clean up, or turn on lights, a systematic hazard check prevents the secondary injuries that are responsible for a shocking percentage of post-earthquake casualties.
Each of these hazards must be assessed calmly and in order:
- Gas leaks: Smell for the rotten-egg odor of natural gas (mercaptan additive). Listen for hissing near gas lines, meters, or appliances. If you detect gas — do not flip any light switch, do not use a lighter or match, do not start a car in the garage. A single electrical spark can ignite accumulated gas. Open exterior doors and windows from outside if possible, shut off the gas at the meter using your pre-positioned wrench, and evacuate. Do not re-enter until the gas utility has inspected and cleared the system.
- Electrical hazards: Look for sparks, dangling wires, or the smell of burning insulation. If you suspect electrical damage, shut off the main breaker from outside the house. Never step in standing water that may be in contact with electrical sources. Downed power lines outside your home should be treated as energized — stay at least 10 meters away and report them.
- Structural damage: Walk around the exterior first. Look for leaning walls, separated foundation-to-wall connections, large cracks (wider than 6 millimeters) in load-bearing walls, or a visibly shifted roofline. If any of these are present, do not enter. A building that survived the main shock may collapse during an aftershock.
- Fire: Small fires from toppled candles, ruptured gas appliances, or electrical shorts may already be smoldering. If the fire is small and you have an extinguisher, attempt suppression. If the fire has spread beyond a single object or you cannot control it in 30 seconds — evacuate immediately and call emergency services.
- Chimney damage: Brick chimneys are highly vulnerable to earthquake damage and frequently collapse during aftershocks. Approach your chimney from a distance and inspect visually for cracks, separation, or leaning. Do not use the fireplace until it has been inspected by a qualified professional.
- Spilled chemicals and medications: Household chemicals — bleach, ammonia, cleaning products — may have spilled and mixed. Some combinations produce toxic gases. Ventilate any area where chemicals have spilled before entering. Collect and properly dispose of spilled medications, especially opioids and controlled substances, to prevent accidental ingestion by children or pets.
| Hazard | How to Detect | Correct Action | What NOT to Do |
|---|---|---|---|
| Gas leak | Rotten-egg smell, hissing | Shut off meter, evacuate, ventilate | Flip any switch, use matches or lighters |
| Electrical damage | Sparks, burning smell, wires down | Kill main breaker from outside | Touch wires, step in water near power |
| Structural cracking | Cracks >6mm, leaning walls, shifted roof | Do not enter — wait for professional inspection | Re-enter to retrieve items |
| Small fire | Visible flame or smoke | Extinguish if controllable in 30 seconds | Fight a fire that has spread beyond one object |
| Chimney damage | Visible cracks, leaning, separation | Do not use fireplace — get professional inspection | Assume it is fine because the house is standing |
| Chemical spills | Odor, spilled containers, mixed liquids | Ventilate area, do not touch without gloves | Enter enclosed area with strong chemical odor |
Aftershocks — The Overlooked Killer
Aftershocks are not minor tremors that taper off politely. They are independent seismic events that follow every earthquake, sometimes numbering in the hundreds, occasionally matching or approaching the intensity of the main event. A structure that stood through the initial quake may have been critically weakened — and an aftershock that would normally cause no damage can trigger full collapse.
Aftershock safety requires continued vigilance for days and sometimes weeks:
- Expect aftershocks as a certainty. After any earthquake above magnitude 5.0, dozens to hundreds of aftershocks will follow. Some will be strong enough to cause additional damage and injury. Treat each one with the same seriousness as the main event.
- Repeat Drop, Cover, and Hold On during every aftershock. The protective action does not expire because the first event has passed. Each aftershock carries independent injury potential from already-loosened objects, weakened structures, and destabilized slopes.
- Do not re-enter damaged structures between aftershocks. This is the hardest rule for people to follow — the urge to retrieve medications, documents, valuables, and pets is overwhelming. But a damaged building is a trap waiting for a trigger. Aftershocks provide that trigger.
- Reassess damage after each significant aftershock. A crack that was cosmetic after the main shock may have widened into a structural failure after a strong aftershock. Continuous reassessment is necessary until professional inspection is completed.
- Move to open ground if near damaged slopes or retaining walls. Aftershocks trigger landslides and retaining wall failures on slopes already destabilized by the main event. If your home is below or adjacent to a steep slope, relocate to flat, open ground until conditions are assessed.
Earthquake Safety for Vulnerable Populations
Standard earthquake advice assumes a healthy, mobile adult. But many of the people most at risk during earthquakes — children, elderly, people with disabilities, and those with chronic medical conditions — need adapted strategies.
Each vulnerable group faces specific challenges that require deliberate planning:
- Young children: Cannot protect themselves without drilling. Practice Drop, Cover, and Hold On as a game. Teach children to protect their heads if no cover is available. Ensure every child knows the family reunion point and can recite the out-of-area contact number. Sew a small identification card into their jacket or backpack with emergency contact information.
- Elderly individuals: Reduced mobility means slower response. Pre-position sturdy cover within arm’s reach of the primary sitting and sleeping areas. Keep shoes, flashlight, and whistle on the bedside table. If mobility aids (walker, cane) are used, secure them beside the bed so they are reachable after shaking stops. Earthquake straps on the bed frame itself can prevent the bed from sliding away from the wall.
- People with mobility disabilities: Wheelchair users should lock wheels and bend forward to protect head and neck. For individuals who cannot Drop to the floor, sit and cover head and neck with arms or a pillow. Pre-arrange assistance with neighbors or building staff for evacuation if stairs are the only exit.
- People with hearing impairments: Cannot hear verbal warnings, alarms, or approaching rescuers. Visual and vibration-based alert systems are essential. Keep a visible signal device (bright-colored fabric, mirror, LED flashlight) accessible for attracting attention if trapped.
- People with chronic medical conditions: Ensure a 30-day supply of essential medications is stored in the earthquake kit and rotated monthly. Insulin, blood thinners, seizure medications, and cardiac drugs are time-critical. Include a written list of medications, dosages, and physician contact information.
- Pets: Pets panic during earthquakes and may bolt through broken windows or open doors. Keep leashes, carriers, food, and water accessible. Microchip identification increases recovery rates dramatically. Know which local emergency shelters accept animals — many do not.
Pro Tip: After an earthquake in a Mediterranean city, I watched a rescue team spend forty minutes reaching an elderly man on the third floor of an undamaged building — not because he was trapped, but because his walker had slid across the room during shaking, his shoes were under broken glass he could not cross barefoot, and he had no phone within reach. He was physically uninjured but completely immobilized. Pre-positioning essentials within arm’s reach of his bed would have given him full self-sufficiency. Plan for the worst position you might be in when shaking starts.

Common Earthquake Safety Mistakes That Cost Lives
Across earthquake response operations and casualty investigations in multiple seismic regions, the same preventable errors appear over and over. These are not obscure edge cases. They are the most common reasons people get hurt or killed in earthquakes that others survived without a scratch.
Every mistake on this list has been documented repeatedly in real post-earthquake assessments:
- Never practicing the plan. The most prevalent failure across every demographic — families, schools, and organizations. People assume they will “know what to do.” They do not. Unpracticed responses default to panic, freezing, or running — all of which increase injury rates compared to Drop, Cover, and Hold On.
- Assuming a “good” building means zero risk. Modern, seismically designed buildings dramatically reduce collapse risk. They do not eliminate injury risk. Non-structural hazards — falling contents, shattered glass, toppled furniture — cause the majority of injuries in buildings that perform well structurally.
- Running outside during shaking. This single mistake has been directly linked to fatalities in multiple earthquakes where the building itself remained standing. Falling facade elements, glass, roof tiles, and exterior fixtures create a lethal debris zone around building perimeters during shaking.
- Re-entering damaged buildings too soon. The urgency to check damage, retrieve belongings, or “just grab one thing” pushes people back into structurally compromised buildings before professional assessment. Aftershocks collapse what the main shock weakened.
- Using candles or matches after the earthquake. Post-earthquake gas leaks may not be immediately detectable. Lighting a candle, match, or lighter in an enclosed space with an undetected gas leak causes explosions. Use only battery-powered lighting.
- Ignoring post-earthquake emotional impact. Earthquakes are deeply traumatic, especially for children and people who have experienced previous natural disasters. Anxiety, insomnia, hypervigilance, and acute stress responses impair judgment and increase accident risk in the days and weeks following. Acknowledge this reality and seek support — it is not weakness, it is a normal physiological response to a life-threatening event.
- Failing to prepare an emergency kit. Surveys consistently show that fewer than 40% of households in seismically active regions maintain a stocked earthquake kit. The 72-hour window of self-sufficiency is not theoretical — it is the documented reality after major earthquakes when infrastructure fails.
- Not securing household contents. The cheapest, simplest, most effective preparation — and the most skipped. Furniture straps, cabinet latches, and wall brackets cost under fifty dollars for an entire home and take an afternoon to install. Not doing this is choosing injury when it was avoidable.
FEMA estimates that over 55% of earthquake injuries in structurally sound buildings are caused by falling contents and non-structural elements — nearly all preventable through basic household securing measures.
Earthquake Safety in Schools and Community Spaces
Schools, community centers, places of worship, and public facilities present unique earthquake challenges because of high occupancy, vulnerable populations (children), limited evacuation routes, and inconsistent levels of preparedness.
Effective earthquake safety in these settings requires specific, practiced protocols:
- Classroom Drop, Cover, and Hold On: Students should shelter under desks, gripping the desk legs. Teachers must be positioned near the classroom door — not to open it during shaking, but to prevent it from slamming shut and blocking the exit. Practice monthly in elementary schools, quarterly in secondary schools.
- Hallway response: If caught in a hallway with no furniture, drop against an interior wall, face away from windows, and cover the head and neck with arms and a backpack or bag. Do not attempt to reach a classroom during shaking.
- Assembly and accountability: Each classroom or group needs a designated accountability person who takes the attendance register to the assembly point. Missing-student reports must be generated within 10 minutes and communicated to emergency coordinators.
- Parent reunification procedures: Schools must have documented, practiced reunification plans. Parents must know the school’s policy — where to go, what identification to bring, and who is authorized for pickup. Posting this at school entry points and sending it home annually prevents the chaos that follows school-affecting earthquakes.
- Community center and worship space drills: Congregations and community groups should practice earthquake response at least annually. Identify sturdy cover points in the space — heavy pews, solid tables, structural columns. Designate exit marshals for each section of the venue.
Long-Term Recovery and Community Resilience After an Earthquake
Surviving the earthquake and its immediate aftermath is only the beginning. Long-term recovery — physical, financial, and psychological — determines whether individuals and communities rebuild or remain vulnerable.
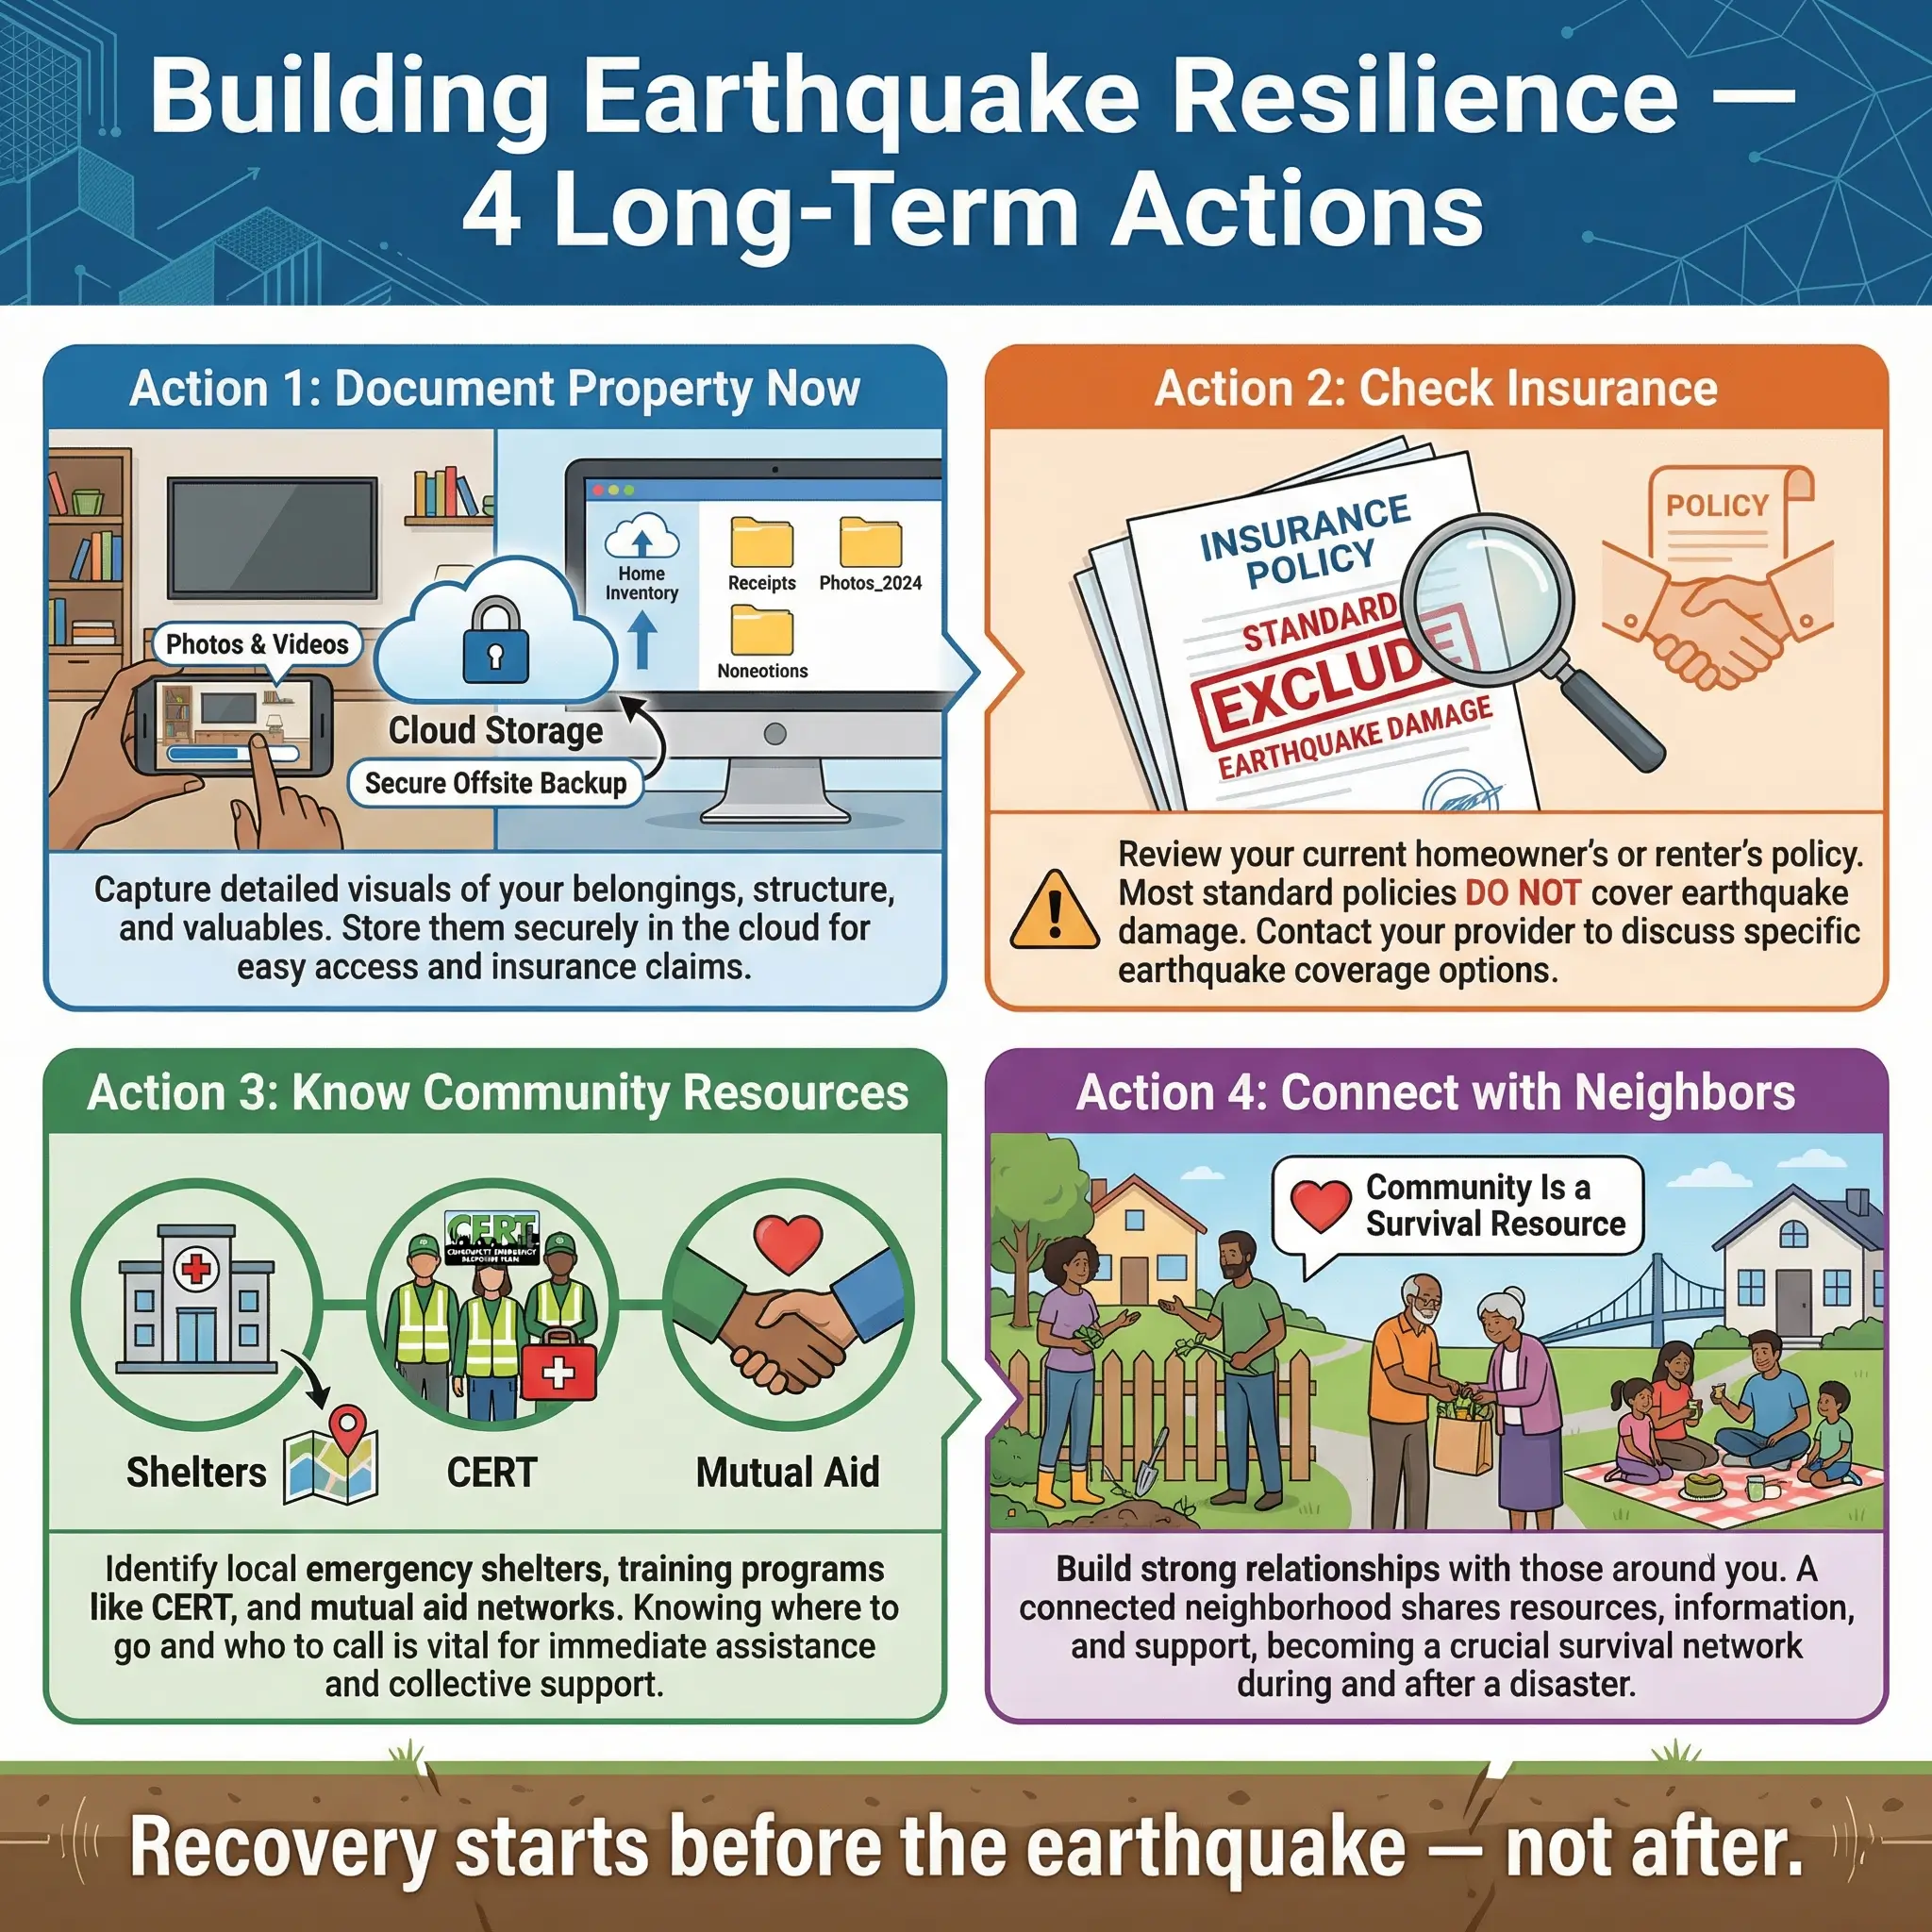
Recovery planning should begin before the earthquake, not after:
- Document your property now. Photograph or video-record every room, major appliance, and valuable item. Store this documentation off-site (cloud storage, out-of-area relative’s home). Insurance claims without documentation are routinely denied or reduced.
- Understand your insurance coverage. Standard homeowner and renter insurance policies in most countries do not cover earthquake damage. Separate earthquake insurance or riders must be purchased. Review your coverage annually — not after the earthquake.
- Know your community resources. Identify local emergency shelters, community emergency response teams (CERT), neighborhood mutual-aid networks, and government disaster assistance programs before you need them. Post-earthquake is not the time to research available help.
- Prepare for psychological recovery. Earthquakes produce PTSD, anxiety disorders, and depression at significant rates — especially in children and people who suffered injury or property loss. Know where mental health resources are available. Normalize discussing fear and distress. Professional support after a traumatic event is not a sign of weakness — it is evidence-based health management.
- Build community resilience. Neighbors who know each other, share resources, and coordinate plans are dramatically more resilient than isolated households. Join or create neighborhood preparedness groups. Share skills — one neighbor with first aid training, another with construction experience, another with a generator — creates a collective capability that exceeds any individual preparation.
Pro Tip: After every significant earthquake I have responded to, the communities that recovered fastest were never the wealthiest or the best-engineered. They were the most connected. Neighborhoods where people knew each other’s names, checked on each other within minutes, and shared resources without being asked outperformed affluent, isolated communities every single time. Community is a survival resource. Invest in it.
Conclusion
Earthquake safety tips are everywhere — on government websites, in school pamphlets, on social media infographics shared after every newsworthy tremor. But tips alone have never saved a single life. What saves lives is action taken before the earthquake arrives: the bookshelf bolted to the wall, the emergency kit stocked and accessible, the family drill that made Drop, Cover, and Hold On a reflex instead of a concept, the gas wrench wired to the meter, the shoes kept under the bed. Every earthquake I have responded to has reinforced the same conclusion — the people who were prepared walked away, and the people who were not prepared wished they had spent the two hours and fifty dollars that preparation required.
This is not about fear. It is about the simple, honest recognition that the ground beneath us moves, and when it does, the physics are indifferent to whether we are ready. Preparation is the only intervention that works before, during, and after the event. It does not require special training, expensive equipment, or professional help for most actions. It requires deciding — today — that the safety of your family, your household, and your community is worth an afternoon of effort.
Secure your home. Build your kit. Write your plan. Drill it until it is automatic. Know what to do and what not to do after the shaking stops. And talk to your neighbors — because when the next earthquake comes, and in seismic zones it will come, no one survives alone. The best earthquake safety tip is the one you act on before you need it.