

I once audited a chemical handling facility where the Risk Assessment (RA) binder was pristine—perfect formatting, zero coffee stains, and filed neatly in the manager’s office. Yet, out on the floor, I watched an operator balance on a plastic bucket to pour a corrosive solvent into a hopper because the designated platform had rusted away months ago. The document claimed the risk was “Low” because engineering controls were in place; reality showed the risk was critical because those controls had failed, and nobody updated the assessment.
This disconnect is why Risk Assessment is the single most critical tool in an HSE professional’s arsenal, and often the most misused. It is not an exercise in liability limitation or regulatory box-ticking. It is a fundamental moral obligation to analyze a task, identify what can destroy a life or an asset, and implement barriers to stop it. If your assessment doesn’t match the physical reality of the shop floor, it is worse than useless—it is dangerous misinformation.
TL;DR
- Risk Assessment is not just paperwork: It is a proactive method to identify killers before they strike, not a document to show auditors after an accident.
- Hazard vs. Risk: A hazard is the source of harm (e.g., electricity); risk is the chance of that harm happening (e.g., electrocution).
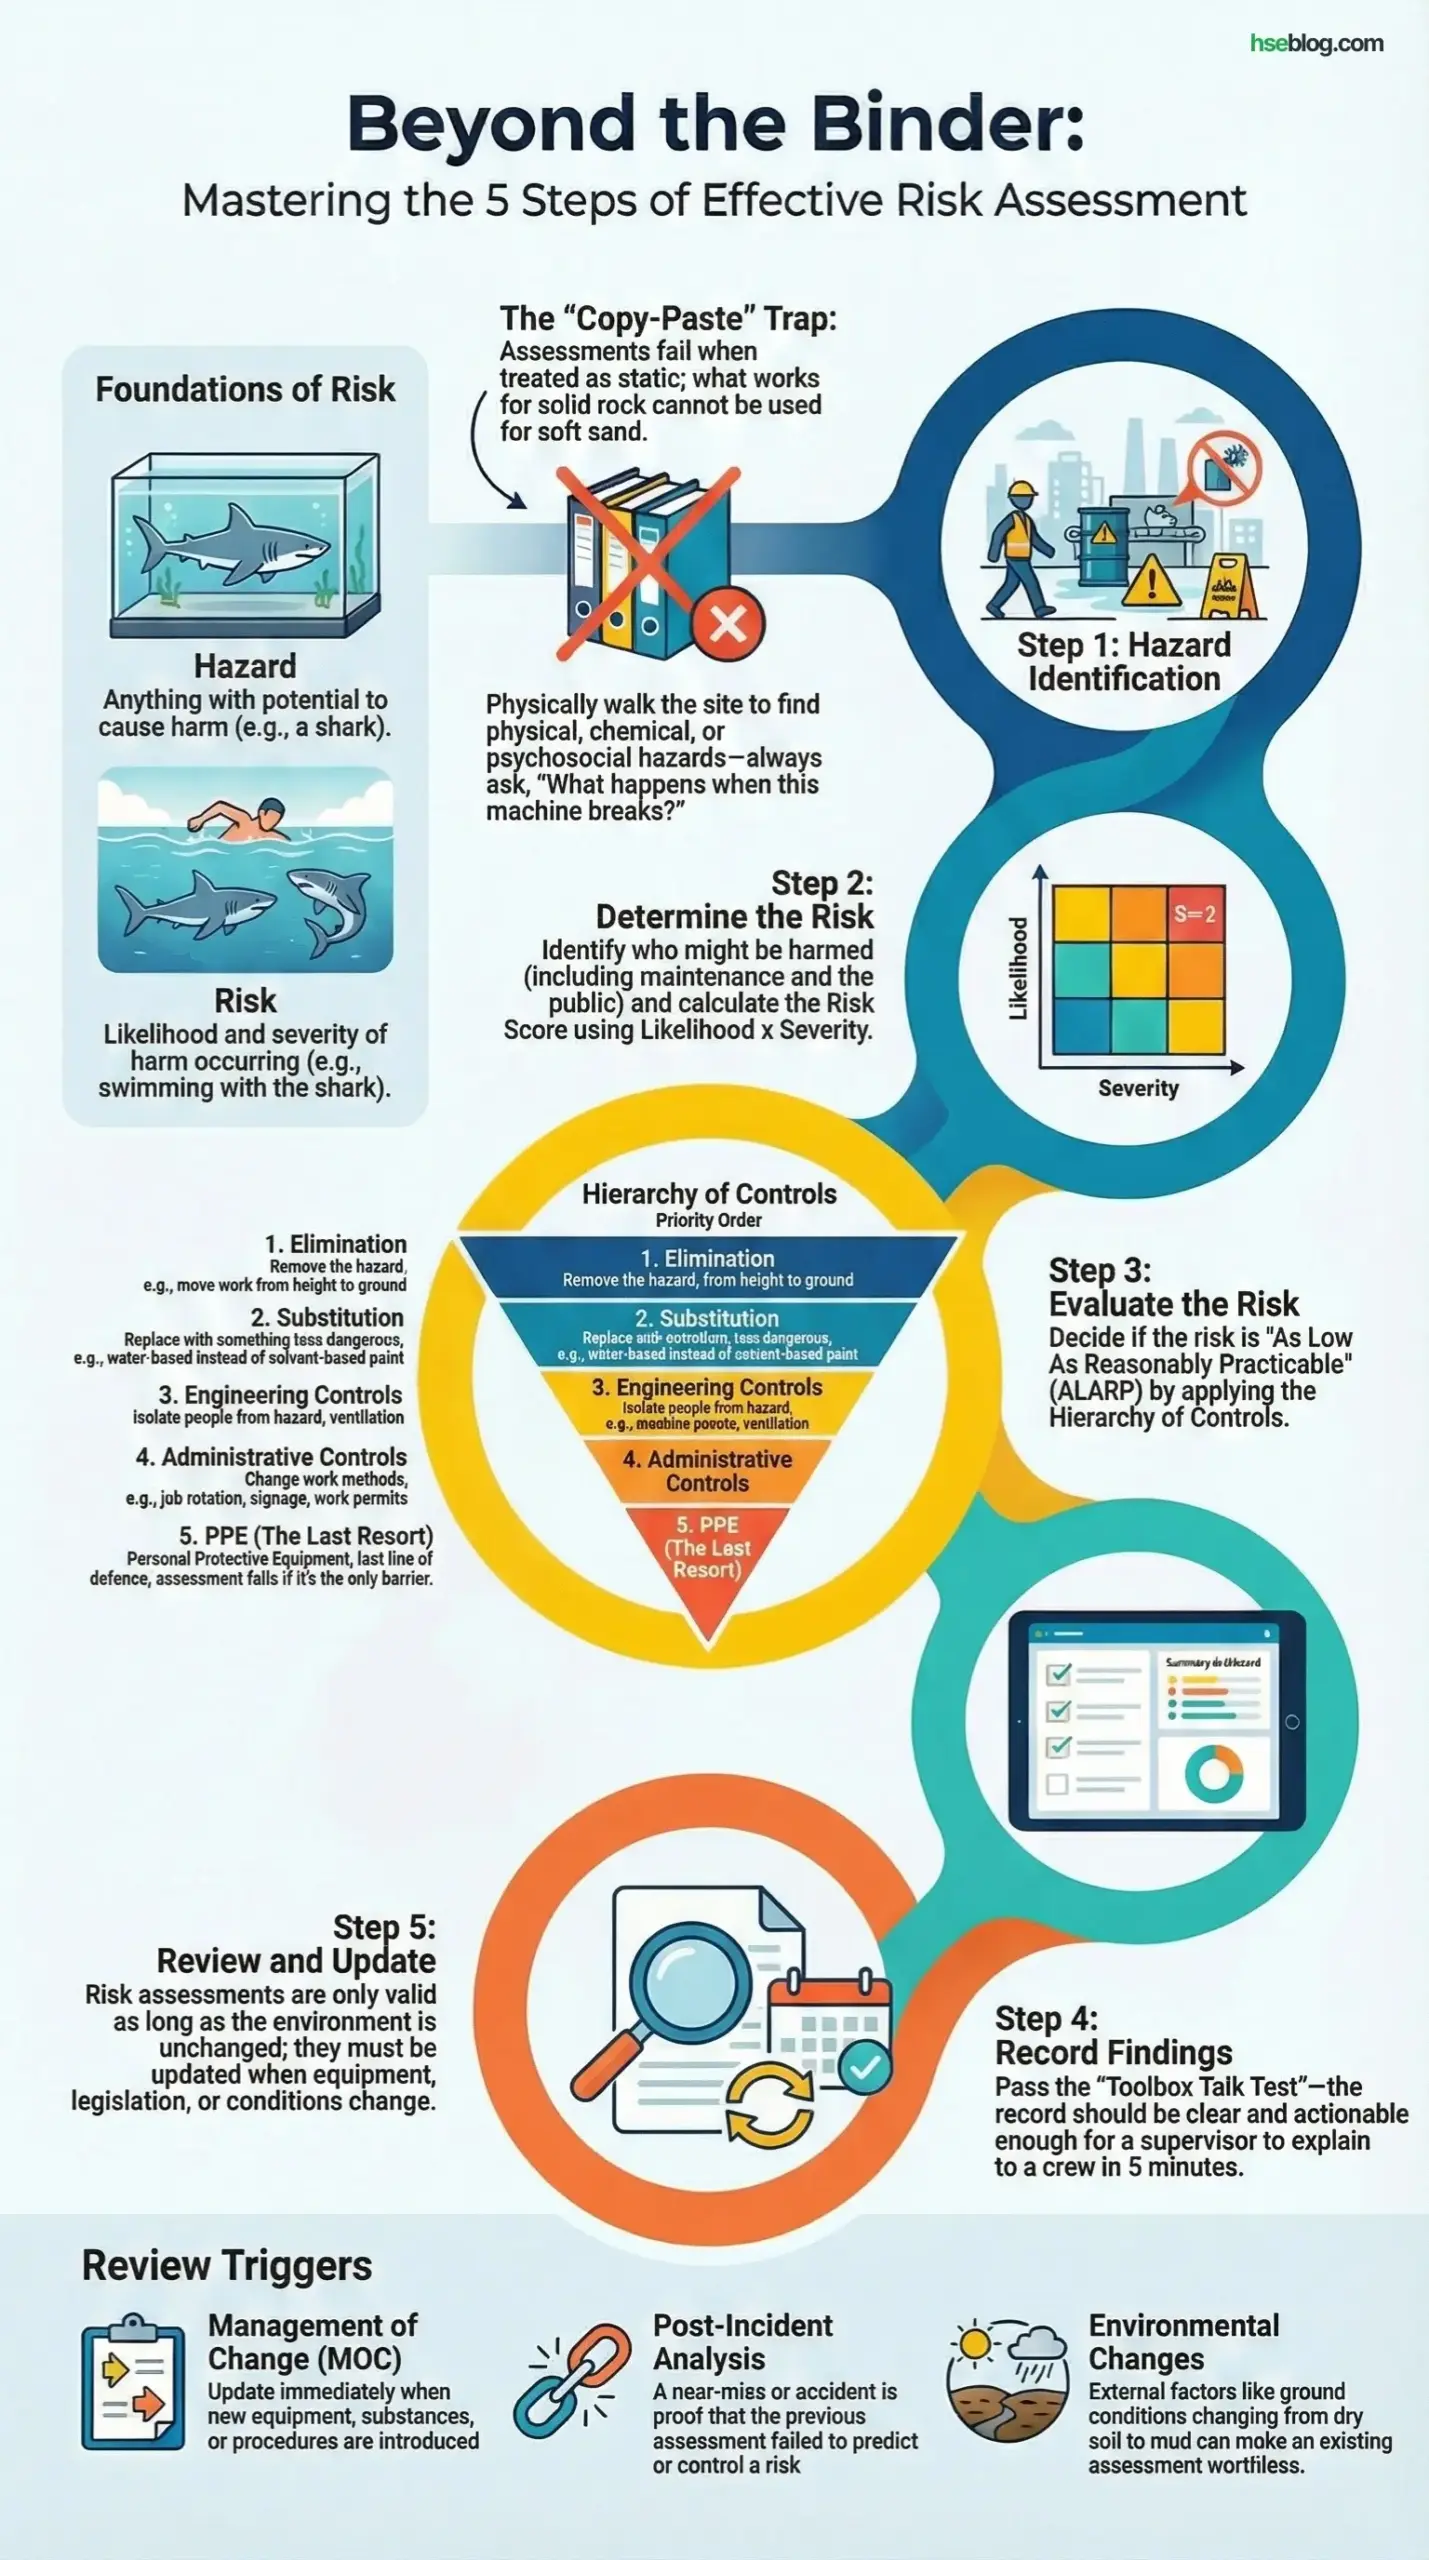
- The 5 Steps are cyclical: Identify, Determine, Evaluate, Record, and Review. The process never truly ends as long as work continues.
- Consultation is key: You cannot assess risk accurately from a desk; you must involve the workers doing the job.
- Review triggers: Assessments must be updated immediately after incidents, significant changes (MOC), or new legislation.
What is Risk Assessment?
A Risk Assessment is a systematic process of evaluating the potential risks that may be involved in a projected activity or undertaking. In practical field terms, it is a structured look at your workplace to identify those things, situations, processes, etc., that may cause harm, particularly to people.
To conduct one effectively, you must understand the distinction between two core concepts that are often confused: Hazard and Risk.
- Hazard: Anything with the potential to cause harm. This includes substances, energy sources, work methods, or machinery.
- Risk: The likelihood that harm will occur from that hazard, combined with the severity of that harm.
Pro Tip: When I train junior safety officers, I use the “Shark in a Tank” analogy. A shark is a hazard. If the shark is in a sealed glass tank and you are outside, the risk is negligible. If you jump into the tank, the hazard remains the same, but the risk skyrockets. Controls (the glass wall) determine the risk level.
Why Most Assessments Fail
In my experience across EPC and mining projects, assessments fail because they are treated as static documents. I have seen “copy-paste” assessments used for excavation work in soft sand that were originally written for solid rock. The hazards are totally different, yet the paperwork looked identical. A true Risk Assessment is a living review of the actual conditions on site.
The 5 Steps to Conducting a Risk Assessment
While regulations like OSHA or HSE (UK) may have slight variations in terminology, the core logic remains universal. These are the five steps I enforce on every site, from offshore rigs to manufacturing plants.
Step 1: Hazard Identification
You cannot control a danger you haven’t seen. This step involves walking the site and looking at what could reasonably be expected to cause harm. This is not a desktop exercise; it requires physical observation.
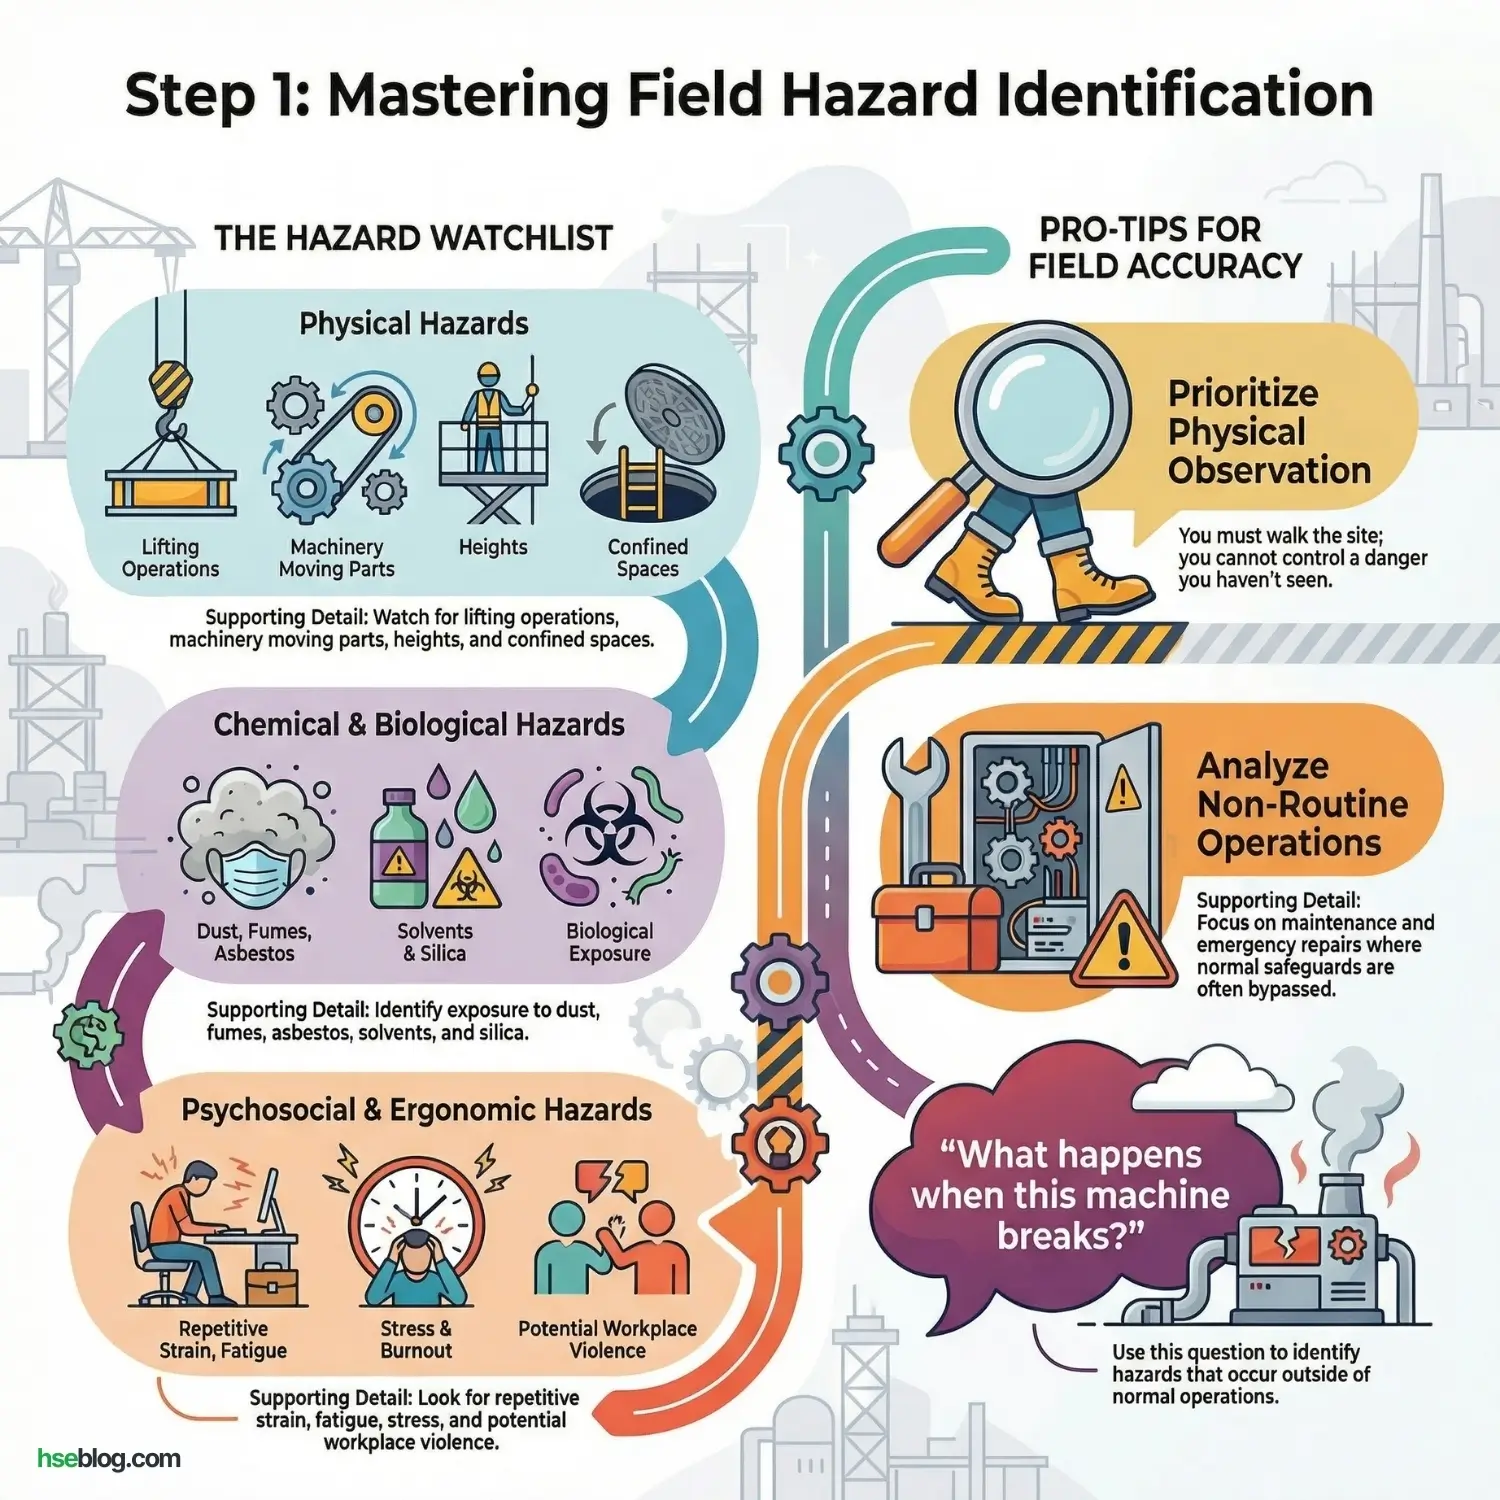
When I walk a site for hazard ID, I look for:
- Physical Hazards: Lifting operations, slips/trips, machinery moving parts, height, confined spaces.
- Chemical/Biological Hazards: Dust, fumes, asbestos, solvents, silica.
- Psychosocial/Ergonomic Hazards: Repetitive strain, fatigue, stress, workplace violence.
Common Field Mistake:
Ignoring non-routine operations. Most accidents I investigate happen during maintenance, cleaning, or emergency repairs—times when normal safeguards are often bypassed. Ensure your identification phase asks, “What happens when this machine breaks?”
Step 2: Determine the Risk
Once hazards are identified, we must determine who might be harmed and how, and then calculate the risk level. This typically involves a Risk Matrix, evaluating two factors:
- Likelihood: How probable is it that the harm will occur? (Rare to Certain)
- Severity: If the harm occurs, how bad will it be? (First Aid to Fatality)
Who might be harmed?
It is rarely just the operator. I always check for:
- Maintenance staff (who enter danger zones).
- Visitors or contractors (who don’t know the site).
- Members of the public (if the site borders a community).
Calculating the Level
Risk Score = Likelihood X Severity
If you are lifting a 10-ton beam over a walkway:
- Hazard: Falling load.
- Severity: Fatality (5/5).
- Likelihood: Without controls, perhaps Occasional (3/5).
- Result: High Risk (15/25) – Unacceptable.
Step 3: Evaluate the Risk
This is the decision-making step. Having determined the risk level, you must decide if the risk is acceptable (ALARP – As Low As Reasonably Practicable) or if more controls are needed.
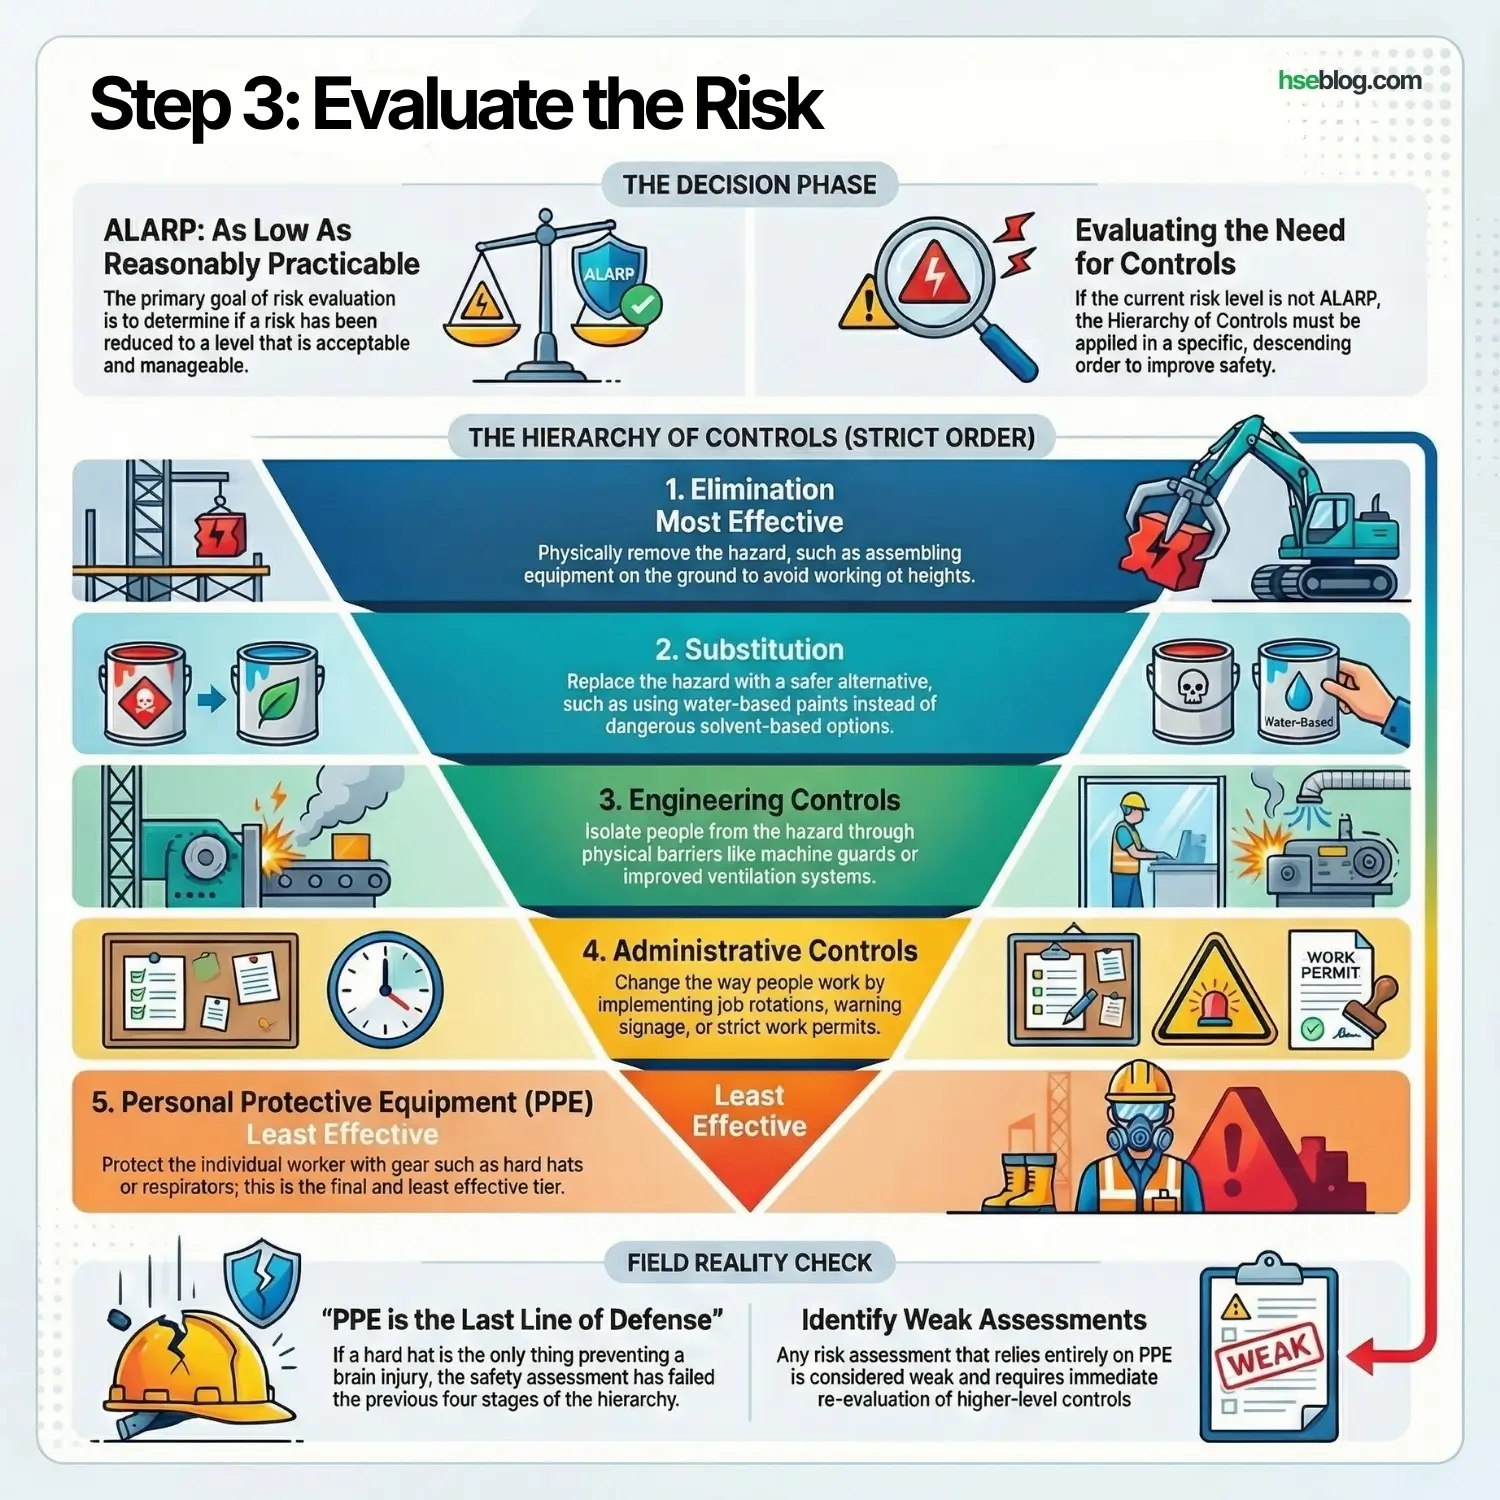
We use the Hierarchy of Controls to reduce risk. I strictly enforce this hierarchy in this exact order:
- Elimination: Physically remove the hazard (e.g., don’t work at height; assemble on the ground).
- Substitution: Replace the hazard (e.g., use water-based paint instead of solvent-based).
- Engineering Controls: Isolate people from the hazard (e.g., machine guards, ventilation).
- Administrative Controls: Change the way people work (e.g., job rotation, signage, permits).
- PPE: Protect the worker with gear (e.g., hard hats, respirators).
Field Reality Check: If your risk assessment relies entirely on PPE (Step 5), it is a weak assessment. PPE is the last line of defense. If a hard hat is the only thing standing between a worker and a brain injury, we have failed in the previous four stages.
Step 4: Record Findings
If you don’t write it down, it didn’t happen. However, recording findings isn’t just about covering your back for legal reasons; it’s about communication.
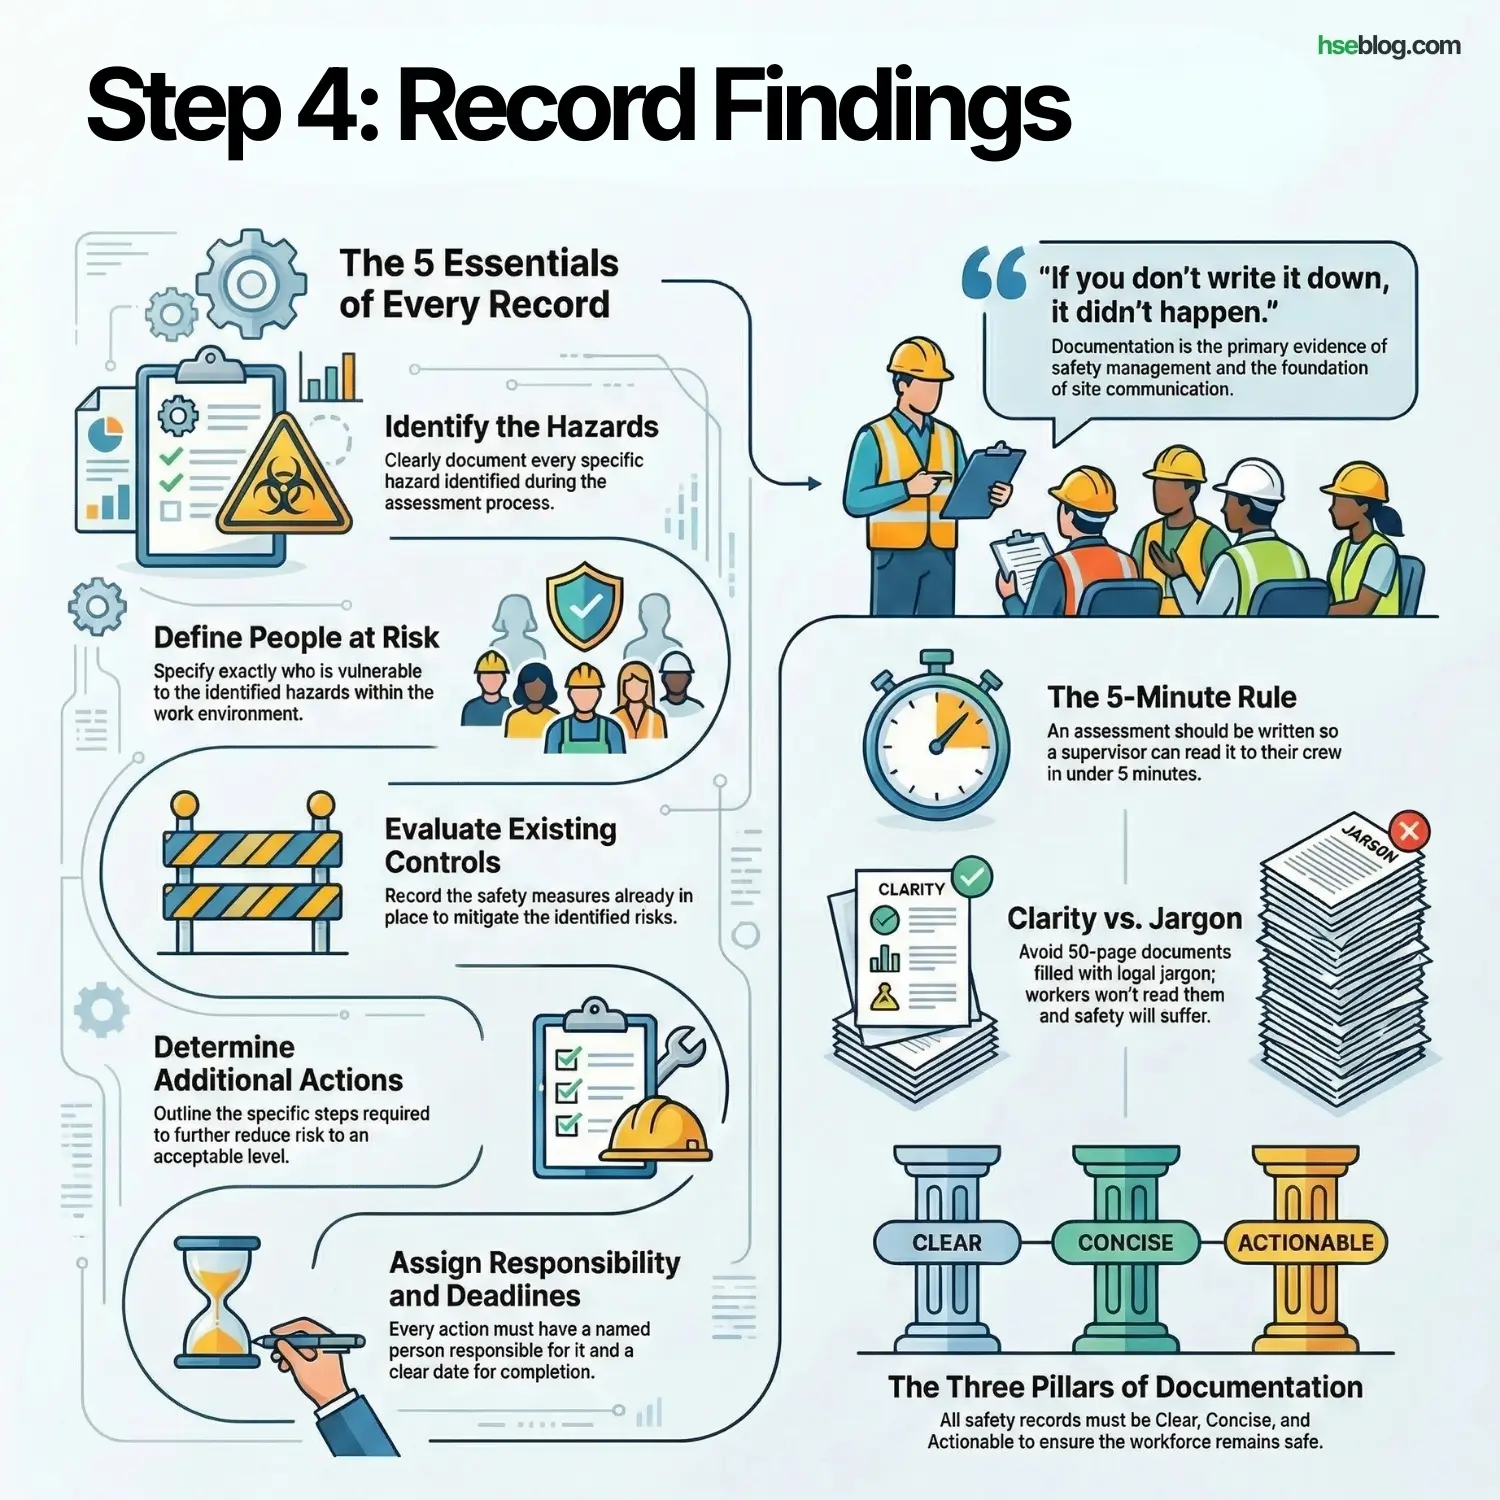
The record must include:
- The hazards identified.
- The people at risk.
- The existing controls.
- The additional actions required to reduce risk to an acceptable level.
- Who is responsible for those actions and the deadline.
The “Toolbox Talk” Test:
I always tell my safety officers: “Write the assessment so that a supervisor can read it to the crew in 5 minutes.” If the document is 50 pages of legal jargon, the workers won’t read it, and they won’t be safe. Keep it clear, concise, and actionable.
Step 5: Review and Update
A Risk Assessment is only valid as long as the work environment remains unchanged. In dynamic sectors like construction or oil & gas, the environment changes daily.
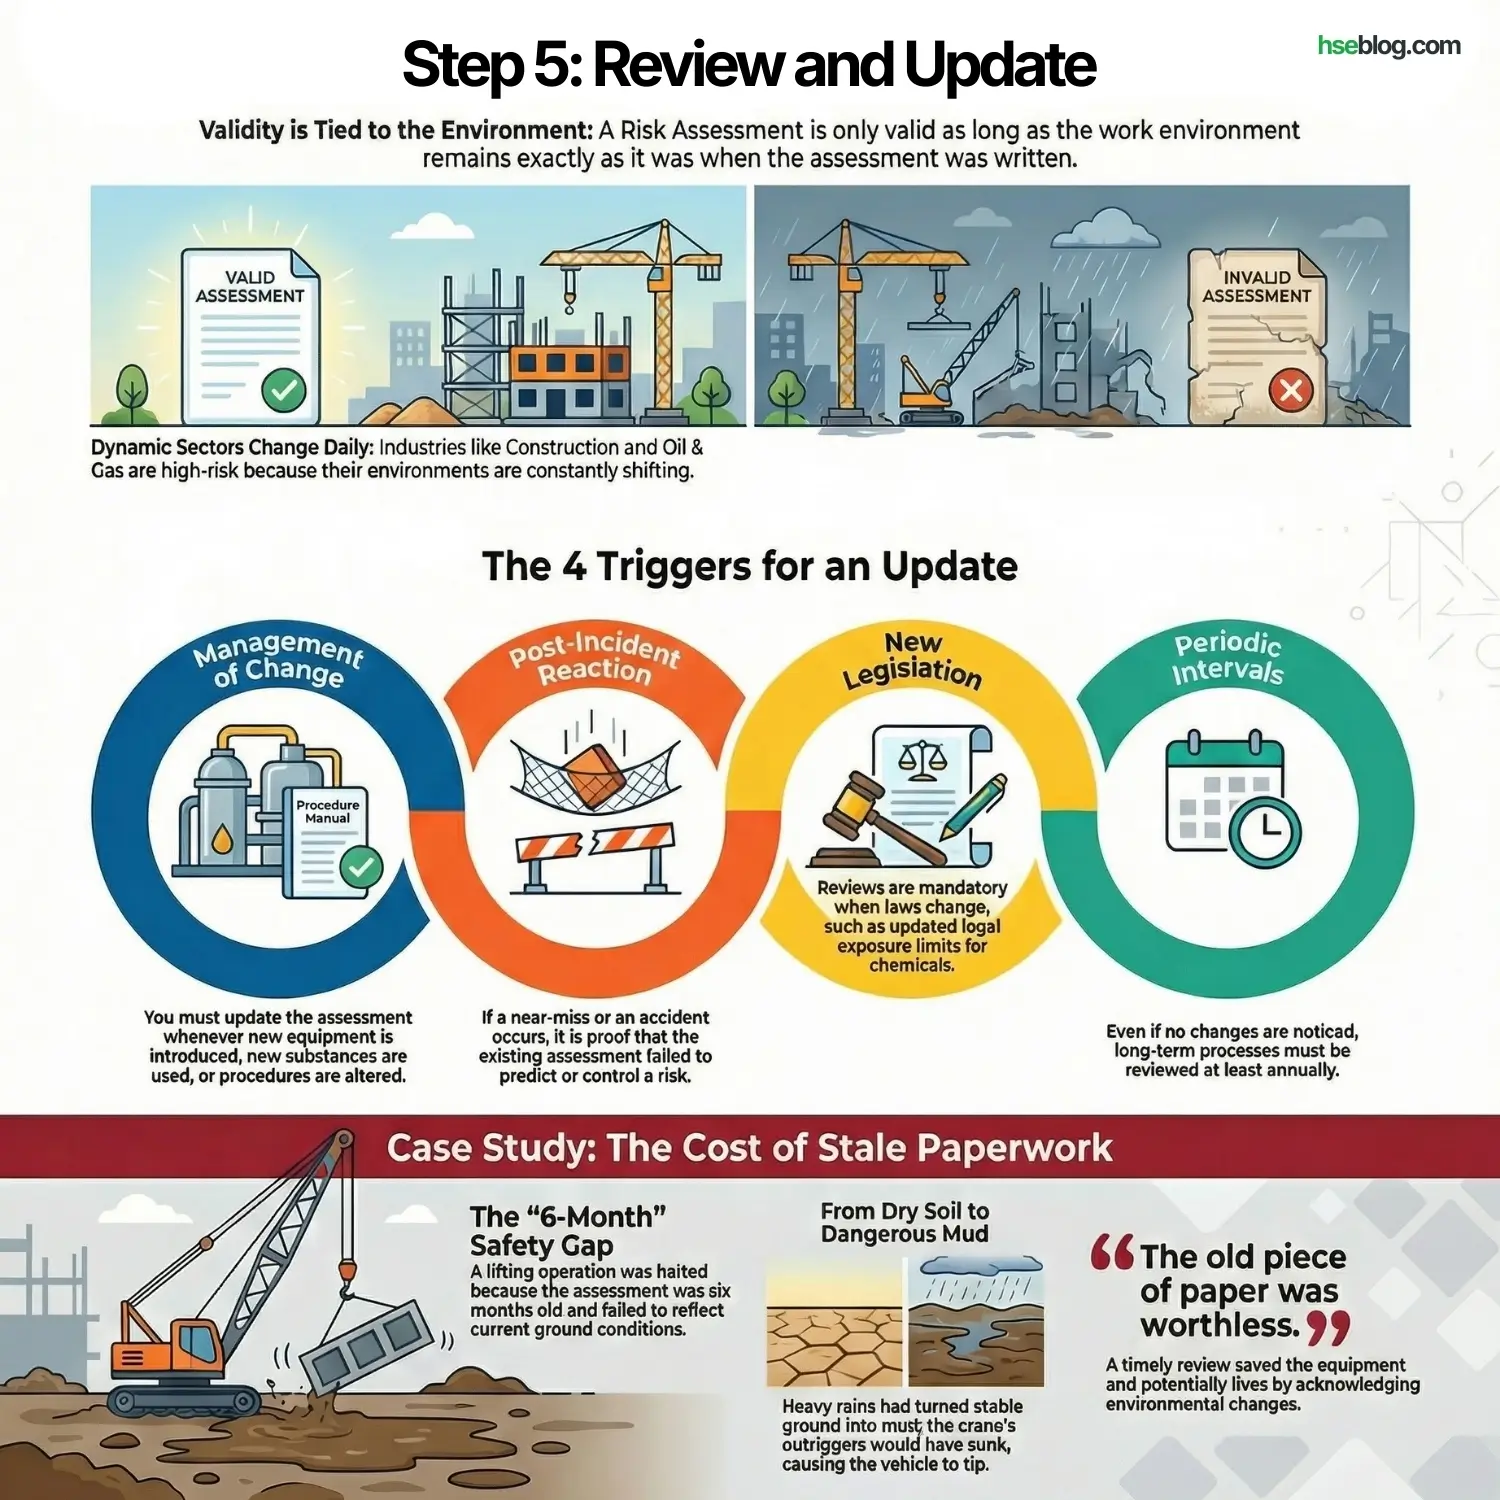
You must review and update the assessment when:
- Changes occur: New equipment, new substances, or a change in procedure (Management of Change).
- Incidents happen: If a near-miss or accident occurs, the assessment clearly failed to predict or control a risk.
- New legislation: When laws change (e.g., exposure limits for chemicals).
- Periodically: At least annually for long-term processes.
I once stopped a lifting operation because the Risk Assessment was dated six months prior. Since then, the ground conditions had changed from dry soil to mud due to heavy rains. The outriggers would have sunk. The old piece of paper was worthless; the review saved the crane from tipping.
Conclusion
In my years managing HSE, I have learned that the quality of a Risk Assessment is not measured by the thickness of the file, but by the awareness of the workforce. A generic, “tick-box” assessment is a dangerous illusion of safety.
As HSE professionals and supervisors, our job is to ensure these 5 steps are applied with rigor and honesty. We must be willing to pause the job if the assessment no longer matches the reality on the ground. We assess risk not to satisfy a regulator, but to ensure every worker walks out the gate at the end of their shift in the same condition they arrived.