
TL;DR
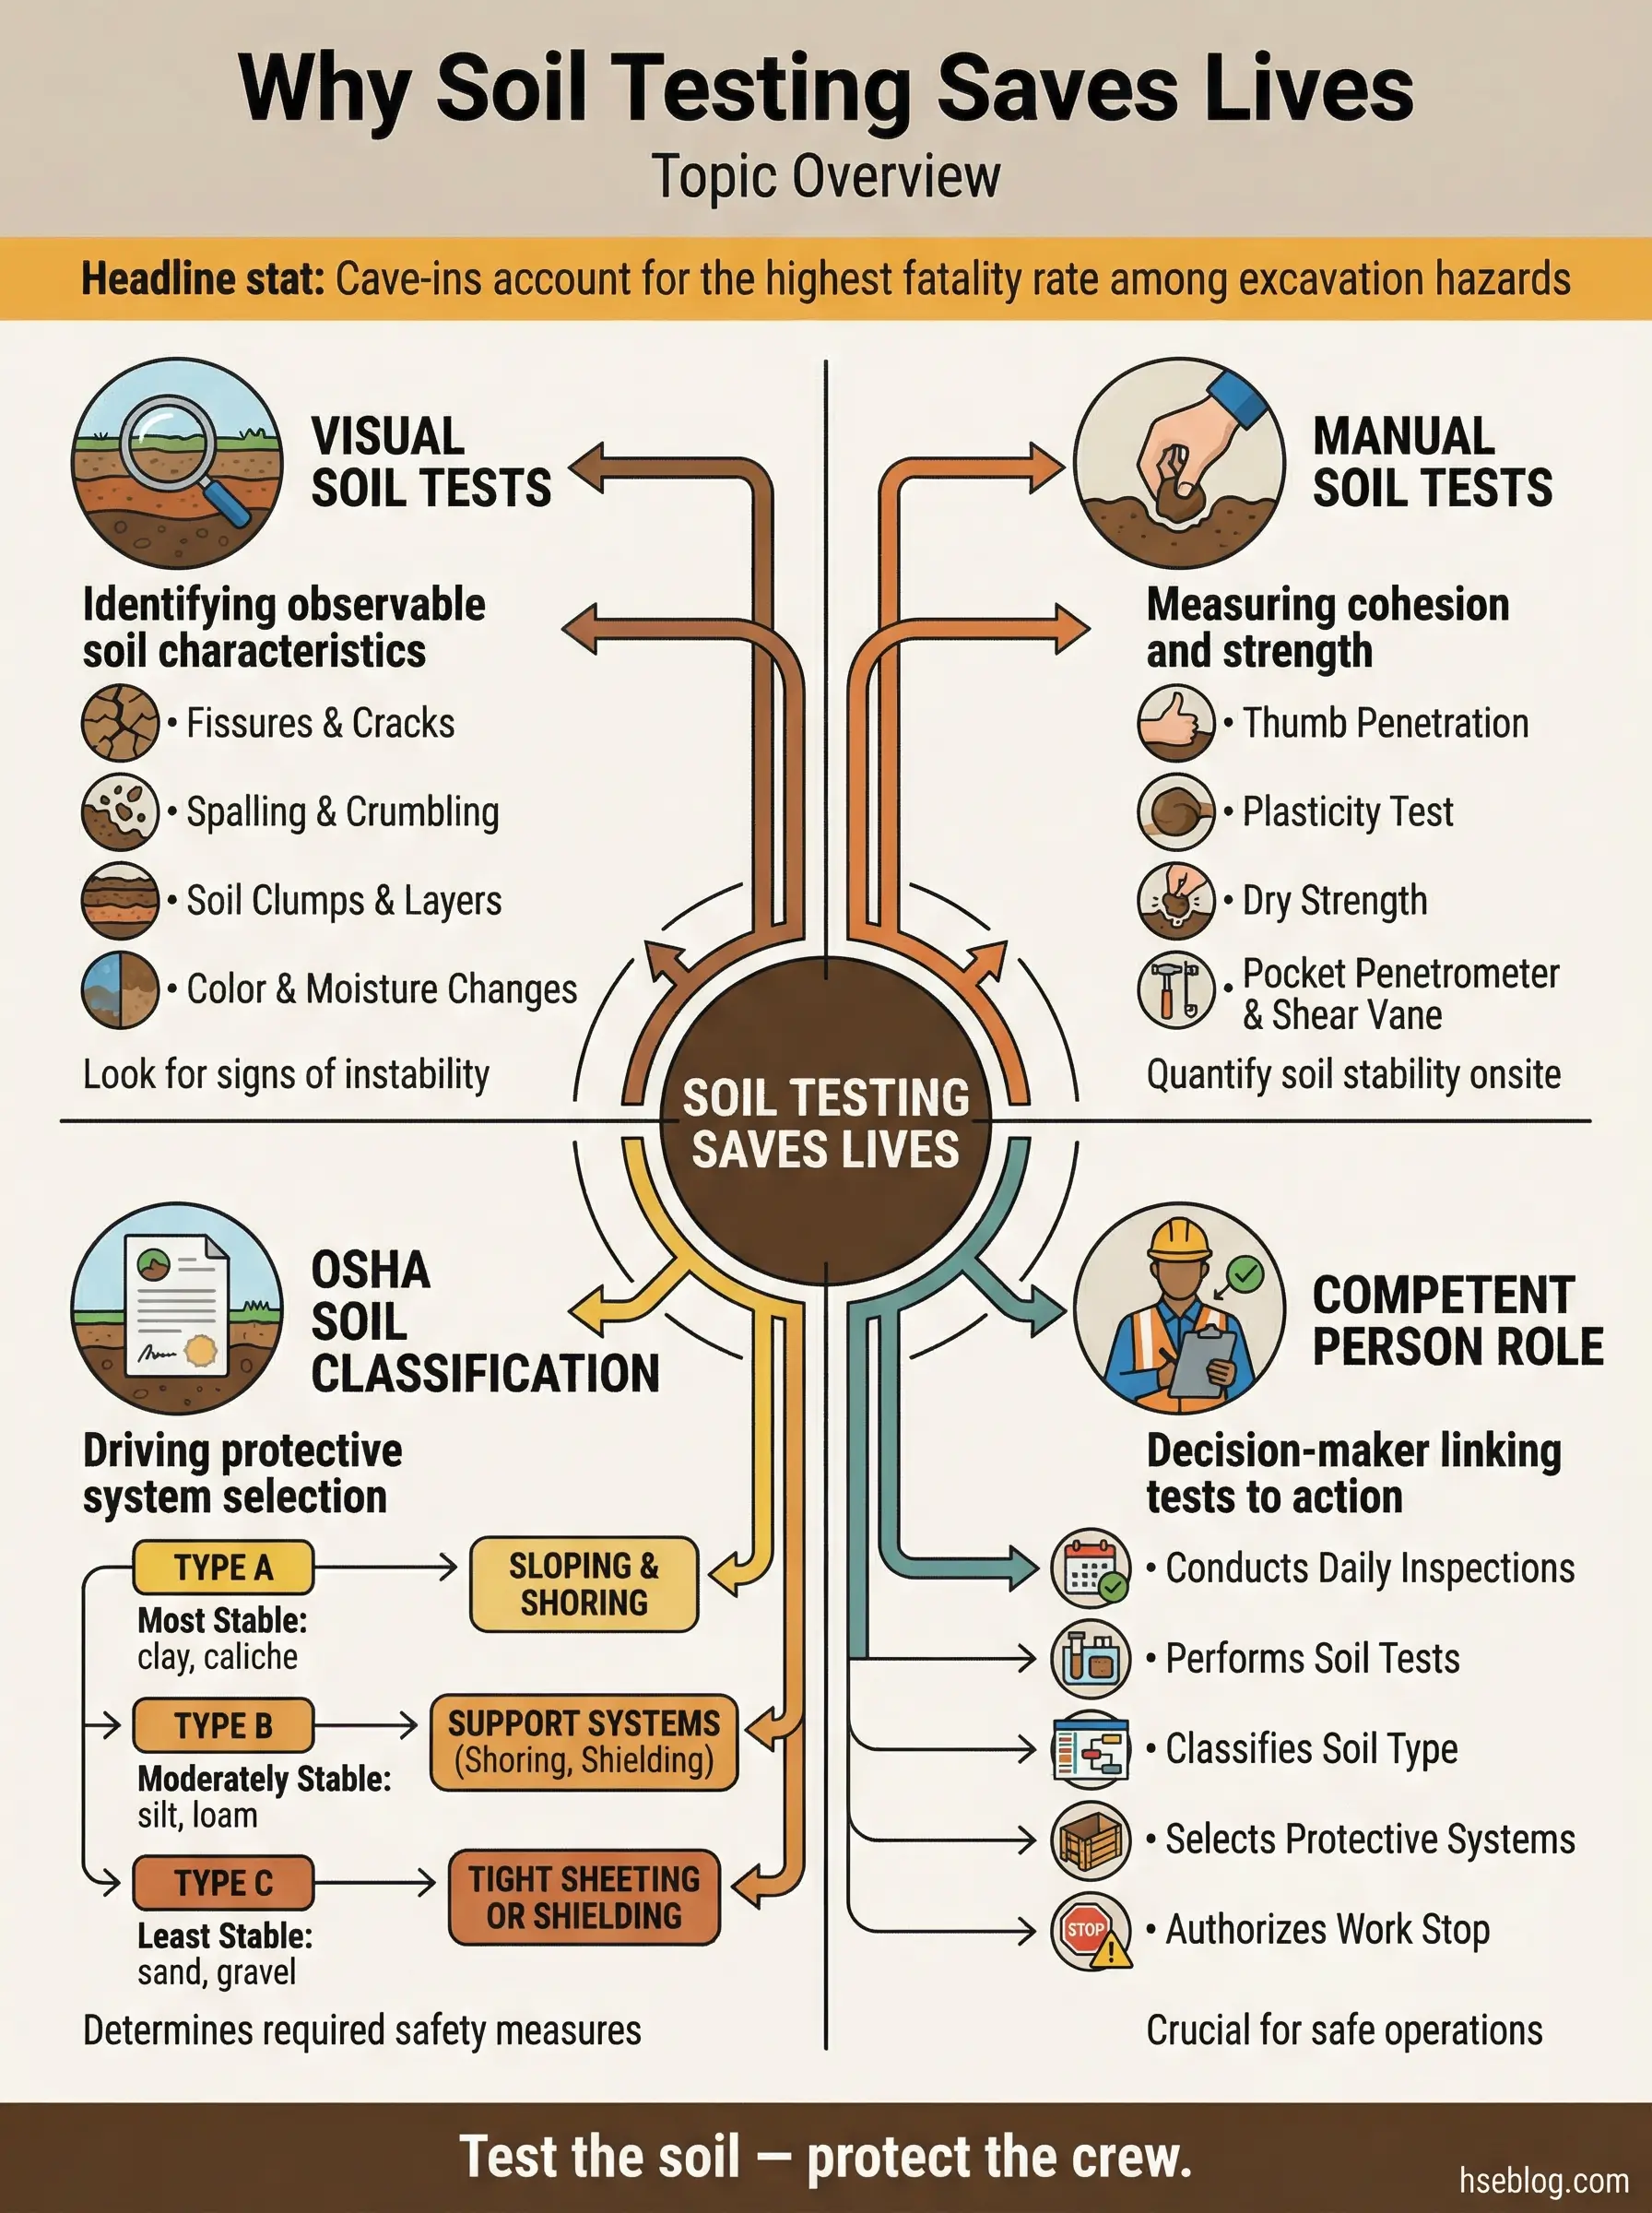
- Soil testing methods classify soil type before any excavation begins, determining whether protective systems can keep workers alive underground.
- Visual tests assess soil structure by examining color, grain size, moisture, and crack patterns at the excavation face.
- Manual tests measure cohesion and strength using field techniques like the thumb penetration test, ribbon test, and dry strength test.
- OSHA requires a competent person to classify soil as Type A, B, or C before selecting sloping, shoring, or shielding systems.
- Misclassified soil has buried workers alive — every soil test is a life-or-death decision, not a paperwork exercise.
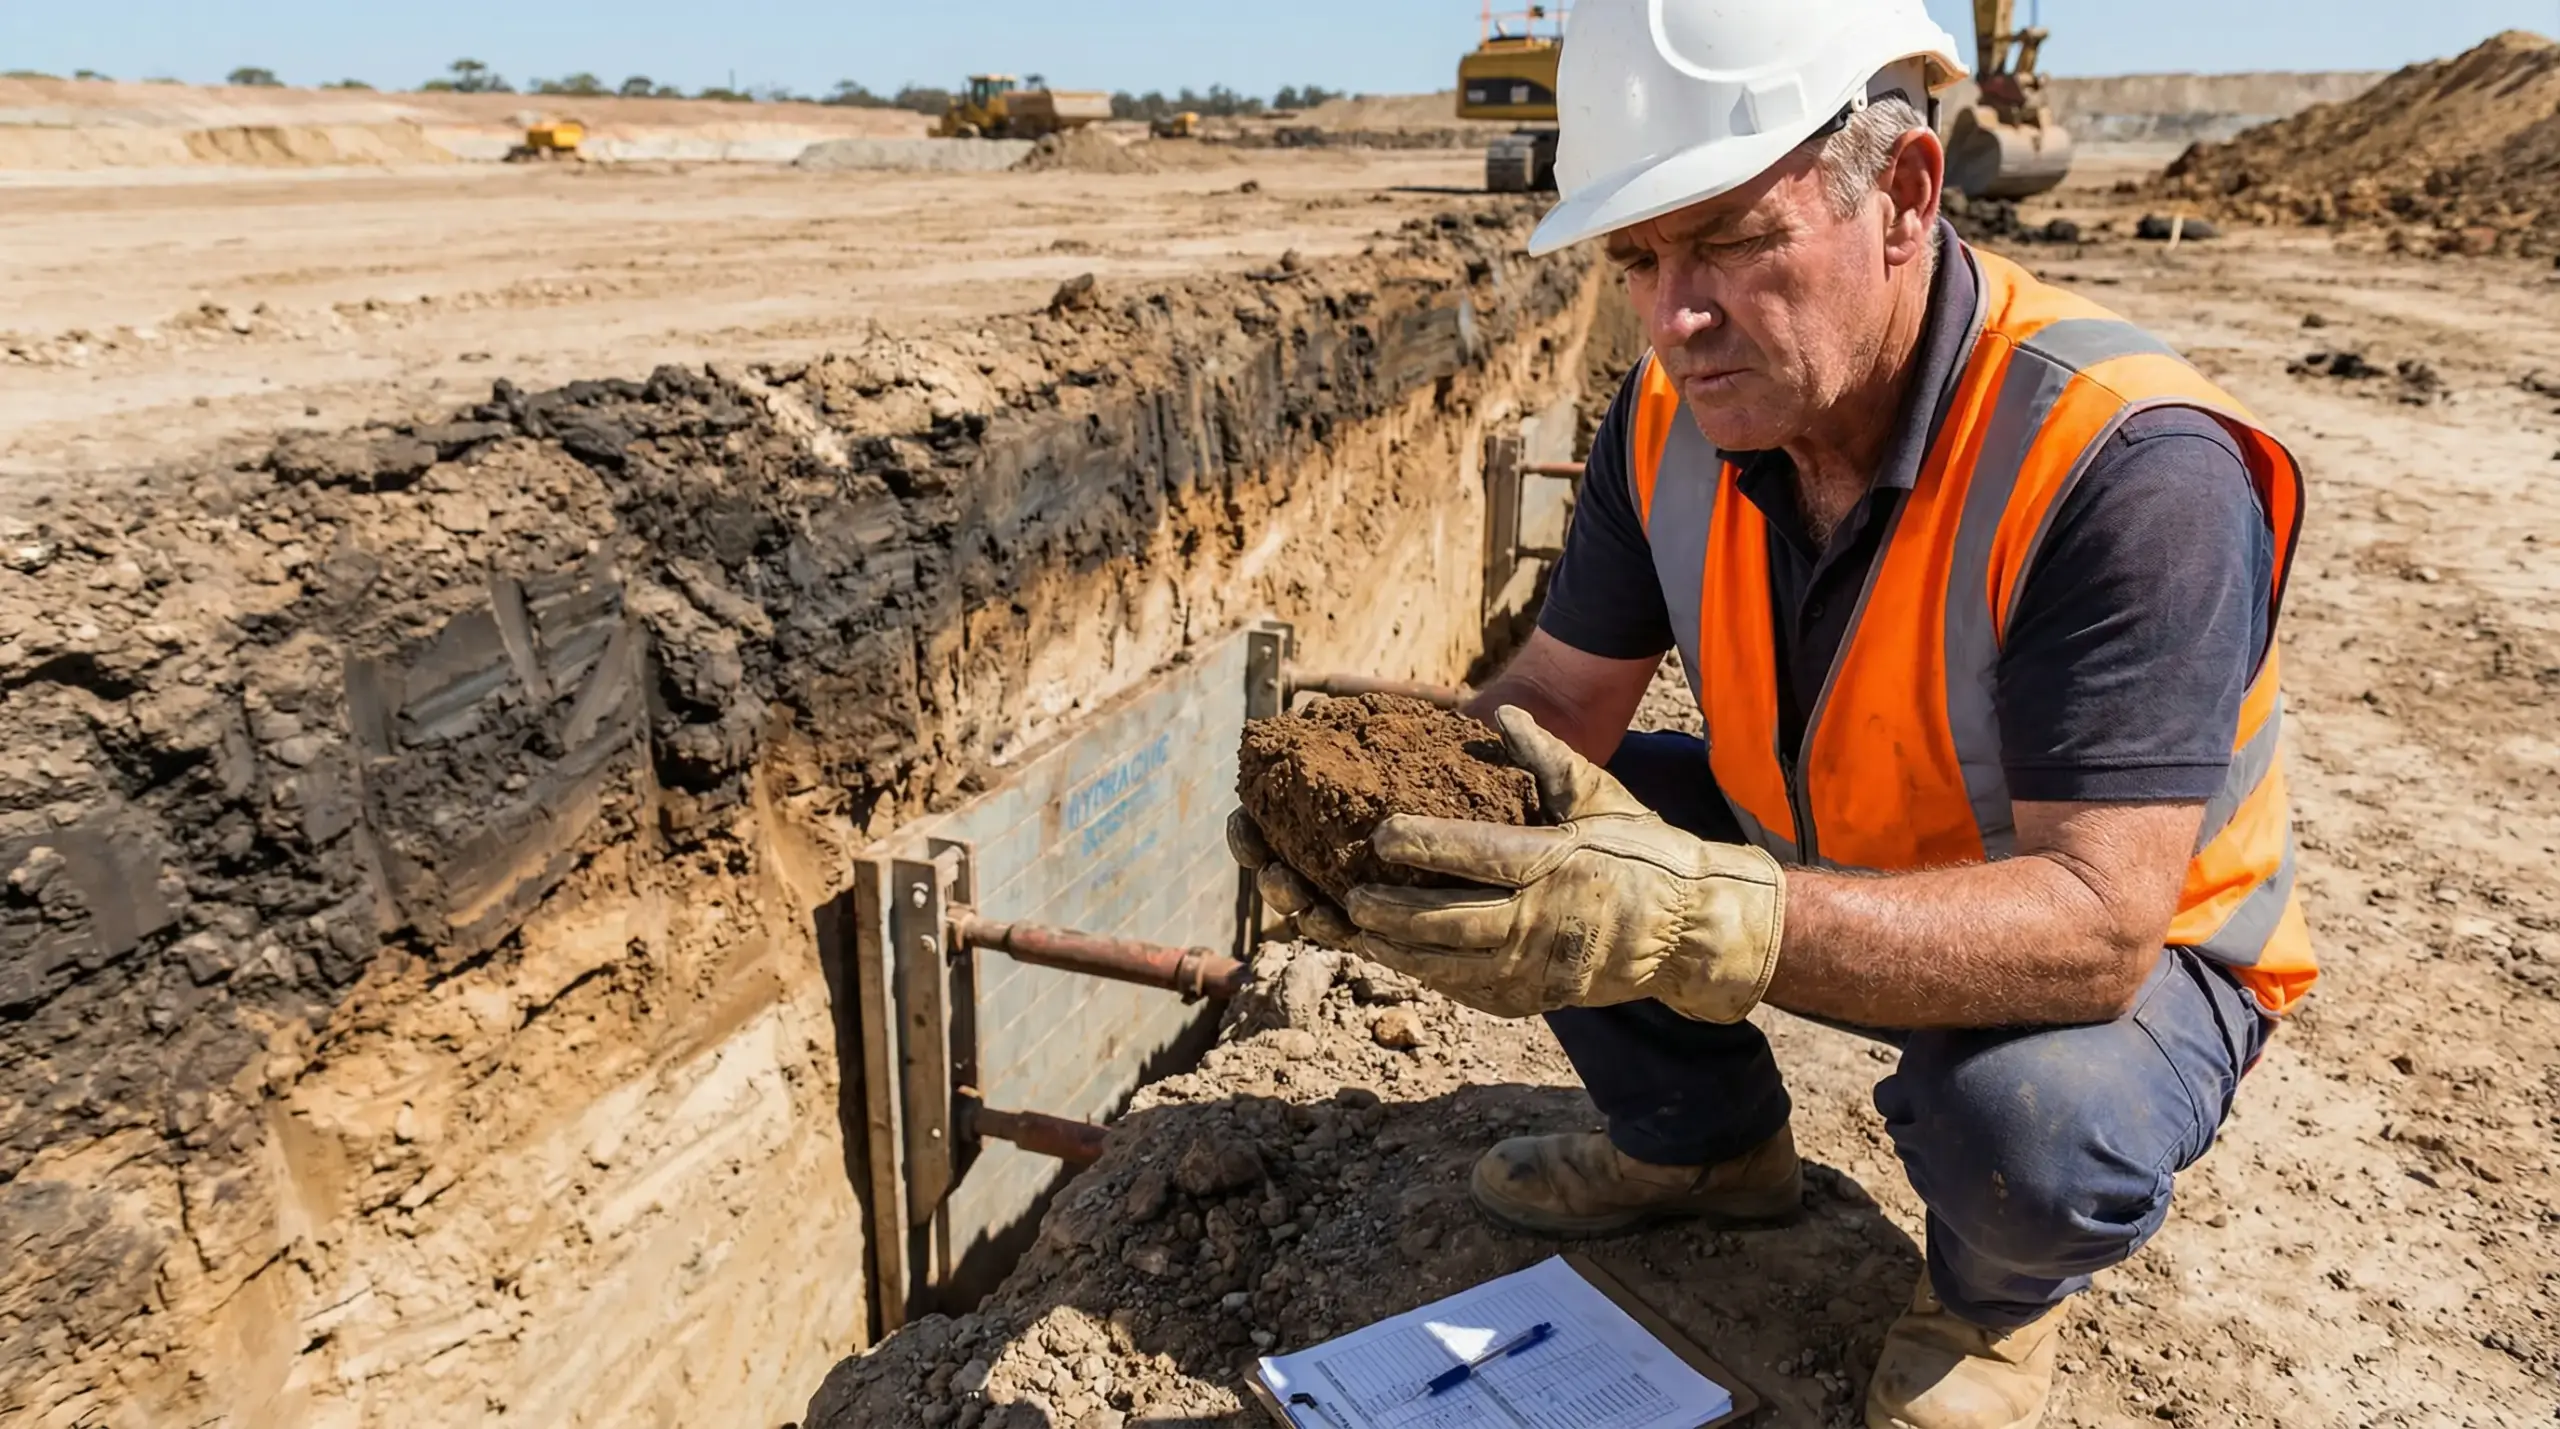
Three meters into an open-cut excavation on a pipeline project in the Gulf, I watched the competent person press his thumb into the exposed sidewall and immediately call the crew out. The soil crumbled under minimal pressure. What the project engineer had documented as “stable clay” on the bore log was, in reality, a granular mix with zero cohesion — a Type C soil masquerading as something it was not. The shoring system installed that morning was rated for Type B. Had we loaded that trench with workers and equipment, the walls would have failed before lunch.
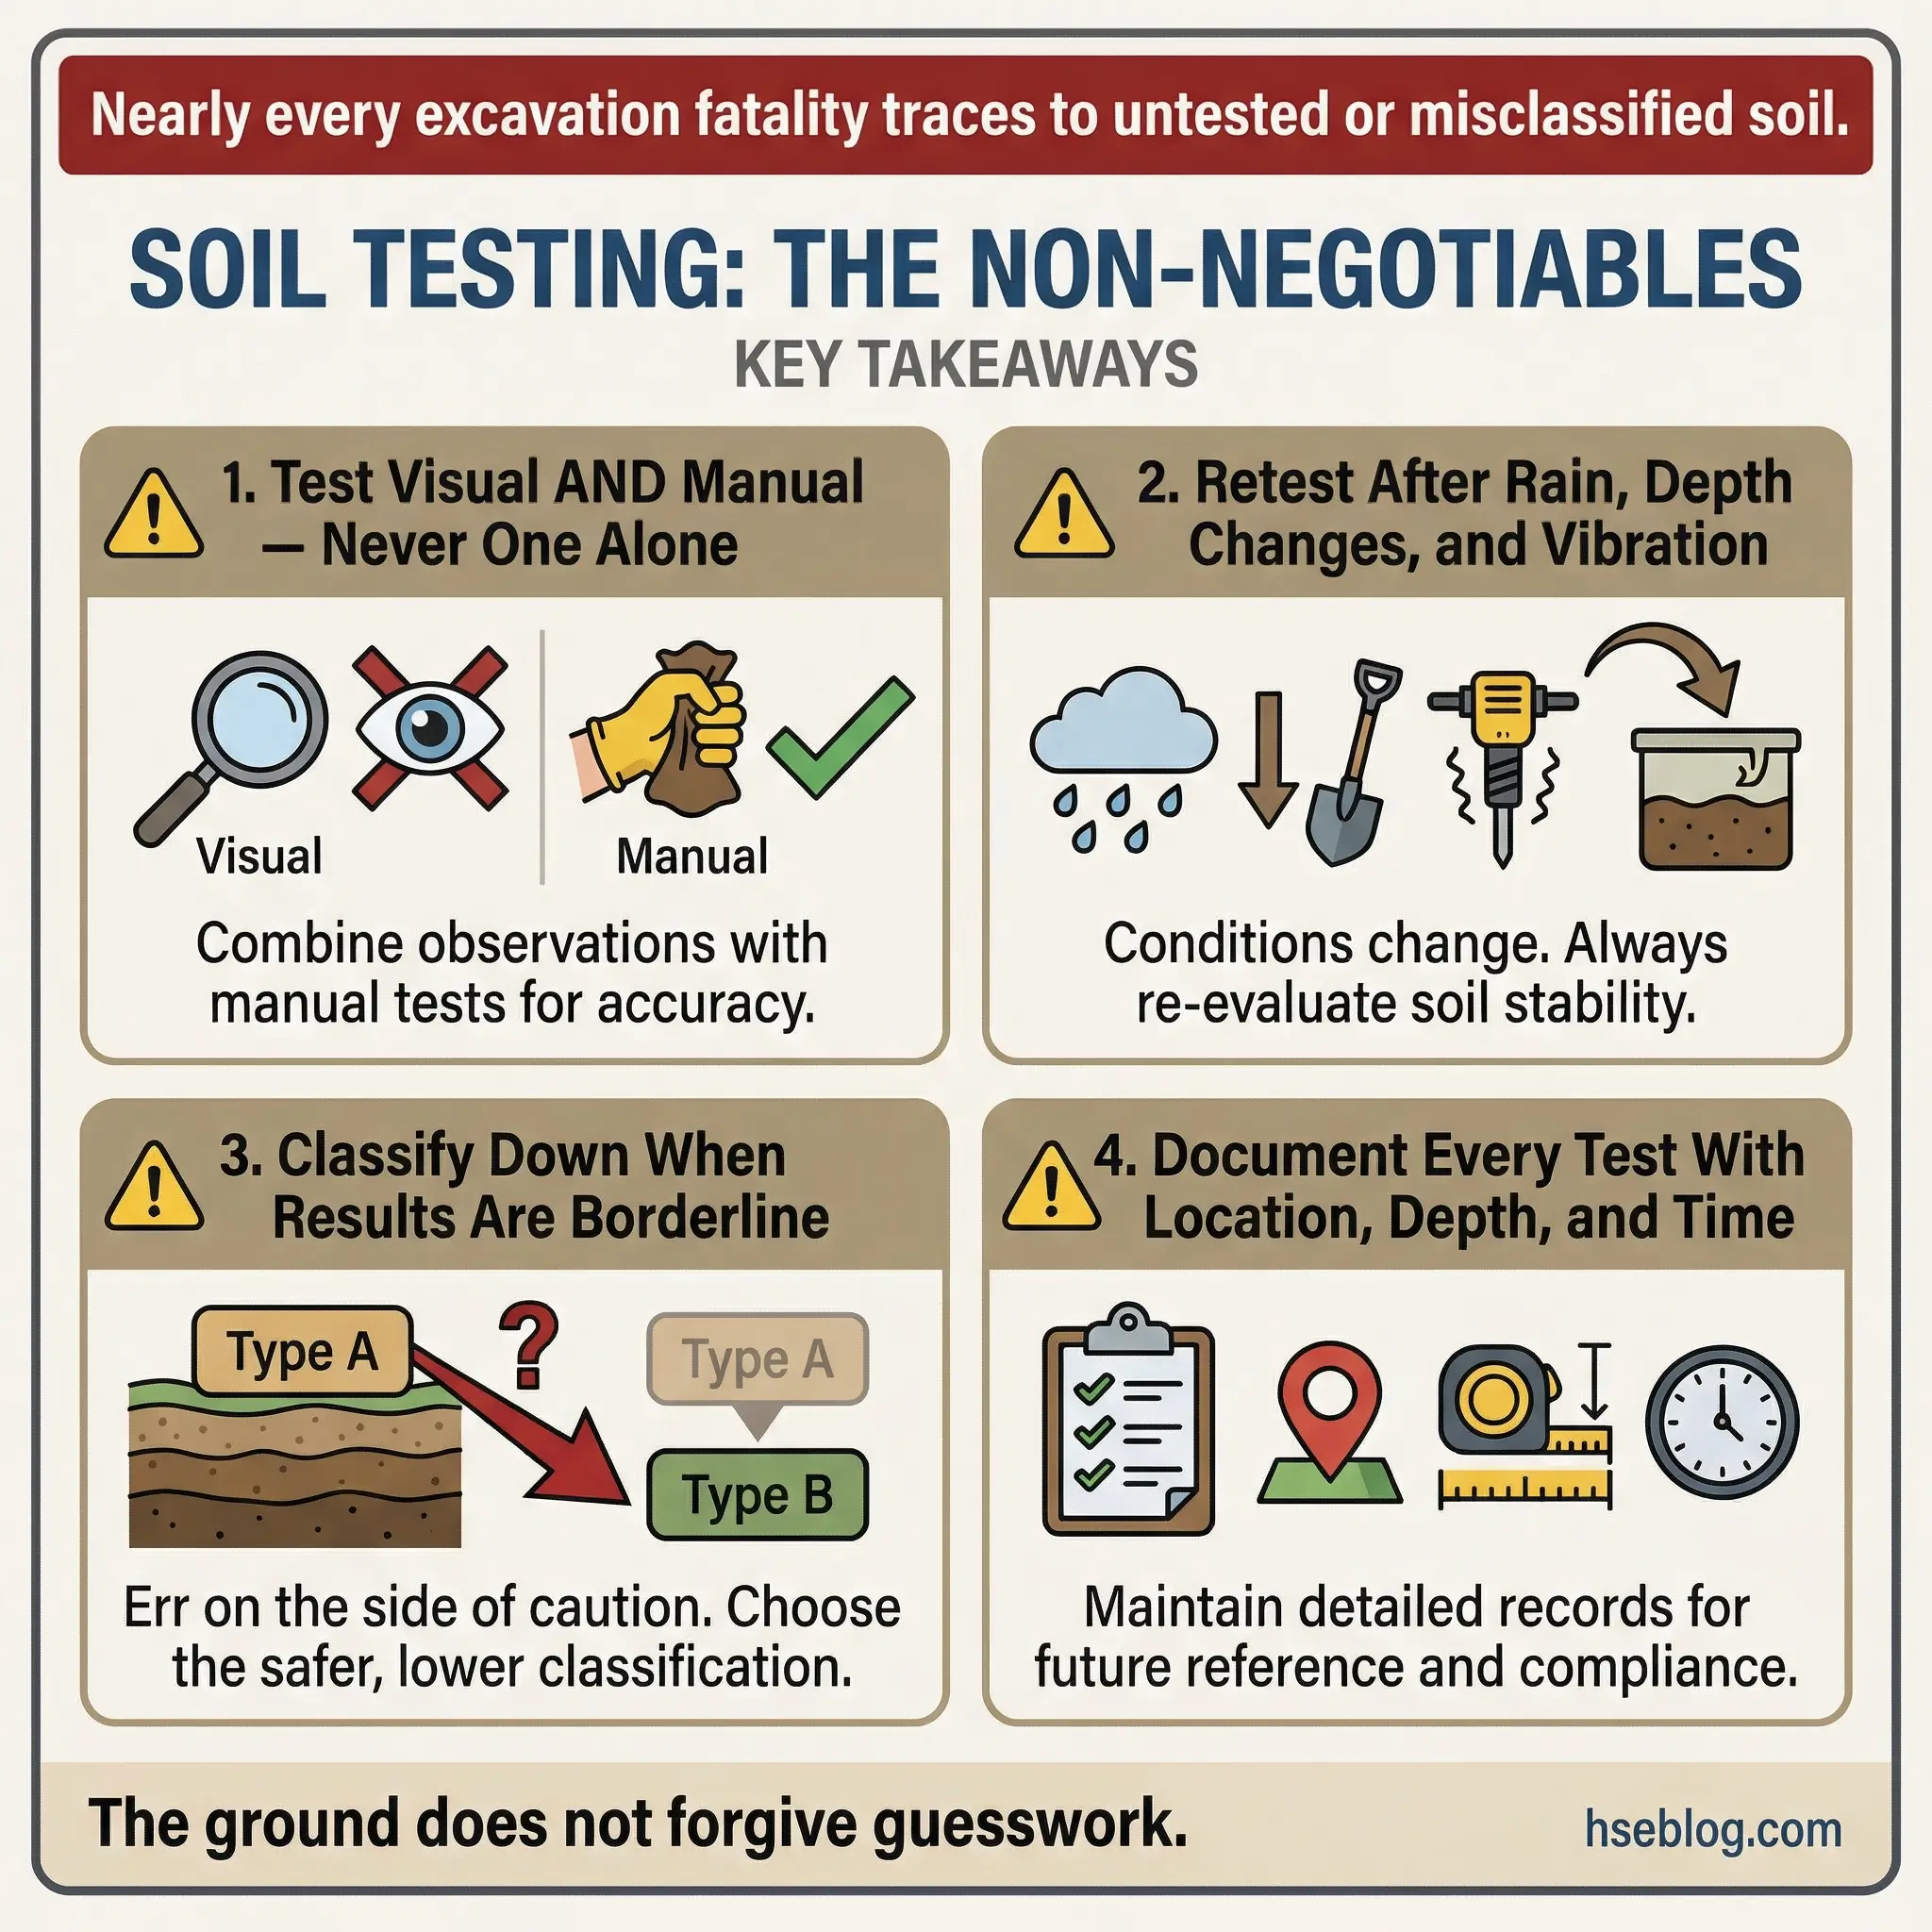
Soil testing methods are the frontline defense against excavation cave-ins — the deadliest hazard in construction earthwork. OSHA reports that cave-ins kill more construction workers than any other excavation-related event, and nearly every fatality investigation I have reviewed traces back to one root cause: the soil was never properly tested, or the test results were ignored. This article breaks down the visual and manual soil testing methods used on real job sites, explains how OSHA’s soil classification system governs excavation protective systems, and identifies the common field mistakes that turn routine trenches into fatal traps.
What Are Soil Testing Methods in Excavation Safety?
Soil testing methods are field-based evaluation techniques used to determine the physical properties, stability, and classification of soil at or near an excavation site. A competent person performs these tests to classify the soil under OSHA 29 CFR 1926 Subpart P, Appendix A, which then dictates the type and configuration of excavation protective systems — sloping angles, shoring designs, or shielding requirements.
The two primary categories of soil testing methods are visual tests and manual tests. Visual tests involve direct observation of soil characteristics such as particle size, color, moisture content, layering, and crack patterns. Manual tests involve physical manipulation of soil samples to measure cohesion, plasticity, and unconfined compressive strength. Neither category alone is sufficient. OSHA requires both visual and manual testing to classify soil accurately.
OSHA 29 CFR 1926.652(a)(1): Each employee in an excavation shall be protected from cave-ins by an adequate protective system designed in accordance with the soil classification and site conditions.
The stakes behind this technical process are blunt. Soil classification determines whether the trench walls need to be sloped at 34 degrees or 53 degrees. It determines whether timber shoring can hold or whether hydraulic systems are mandatory. One classification error — calling a Type C soil Type B — can halve the required slope angle and leave workers inside an excavation that physics will not support.
Visual Soil Testing Methods for Field Classification
Visual soil tests are the first line of assessment. Before anyone touches a soil sample, the competent person should be reading the excavation face the way a physician reads an X-ray — looking for specific indicators that reveal what the ground is made of and how it will behave under load.
These are the key visual soil tests performed on site, each targeting a different soil property:
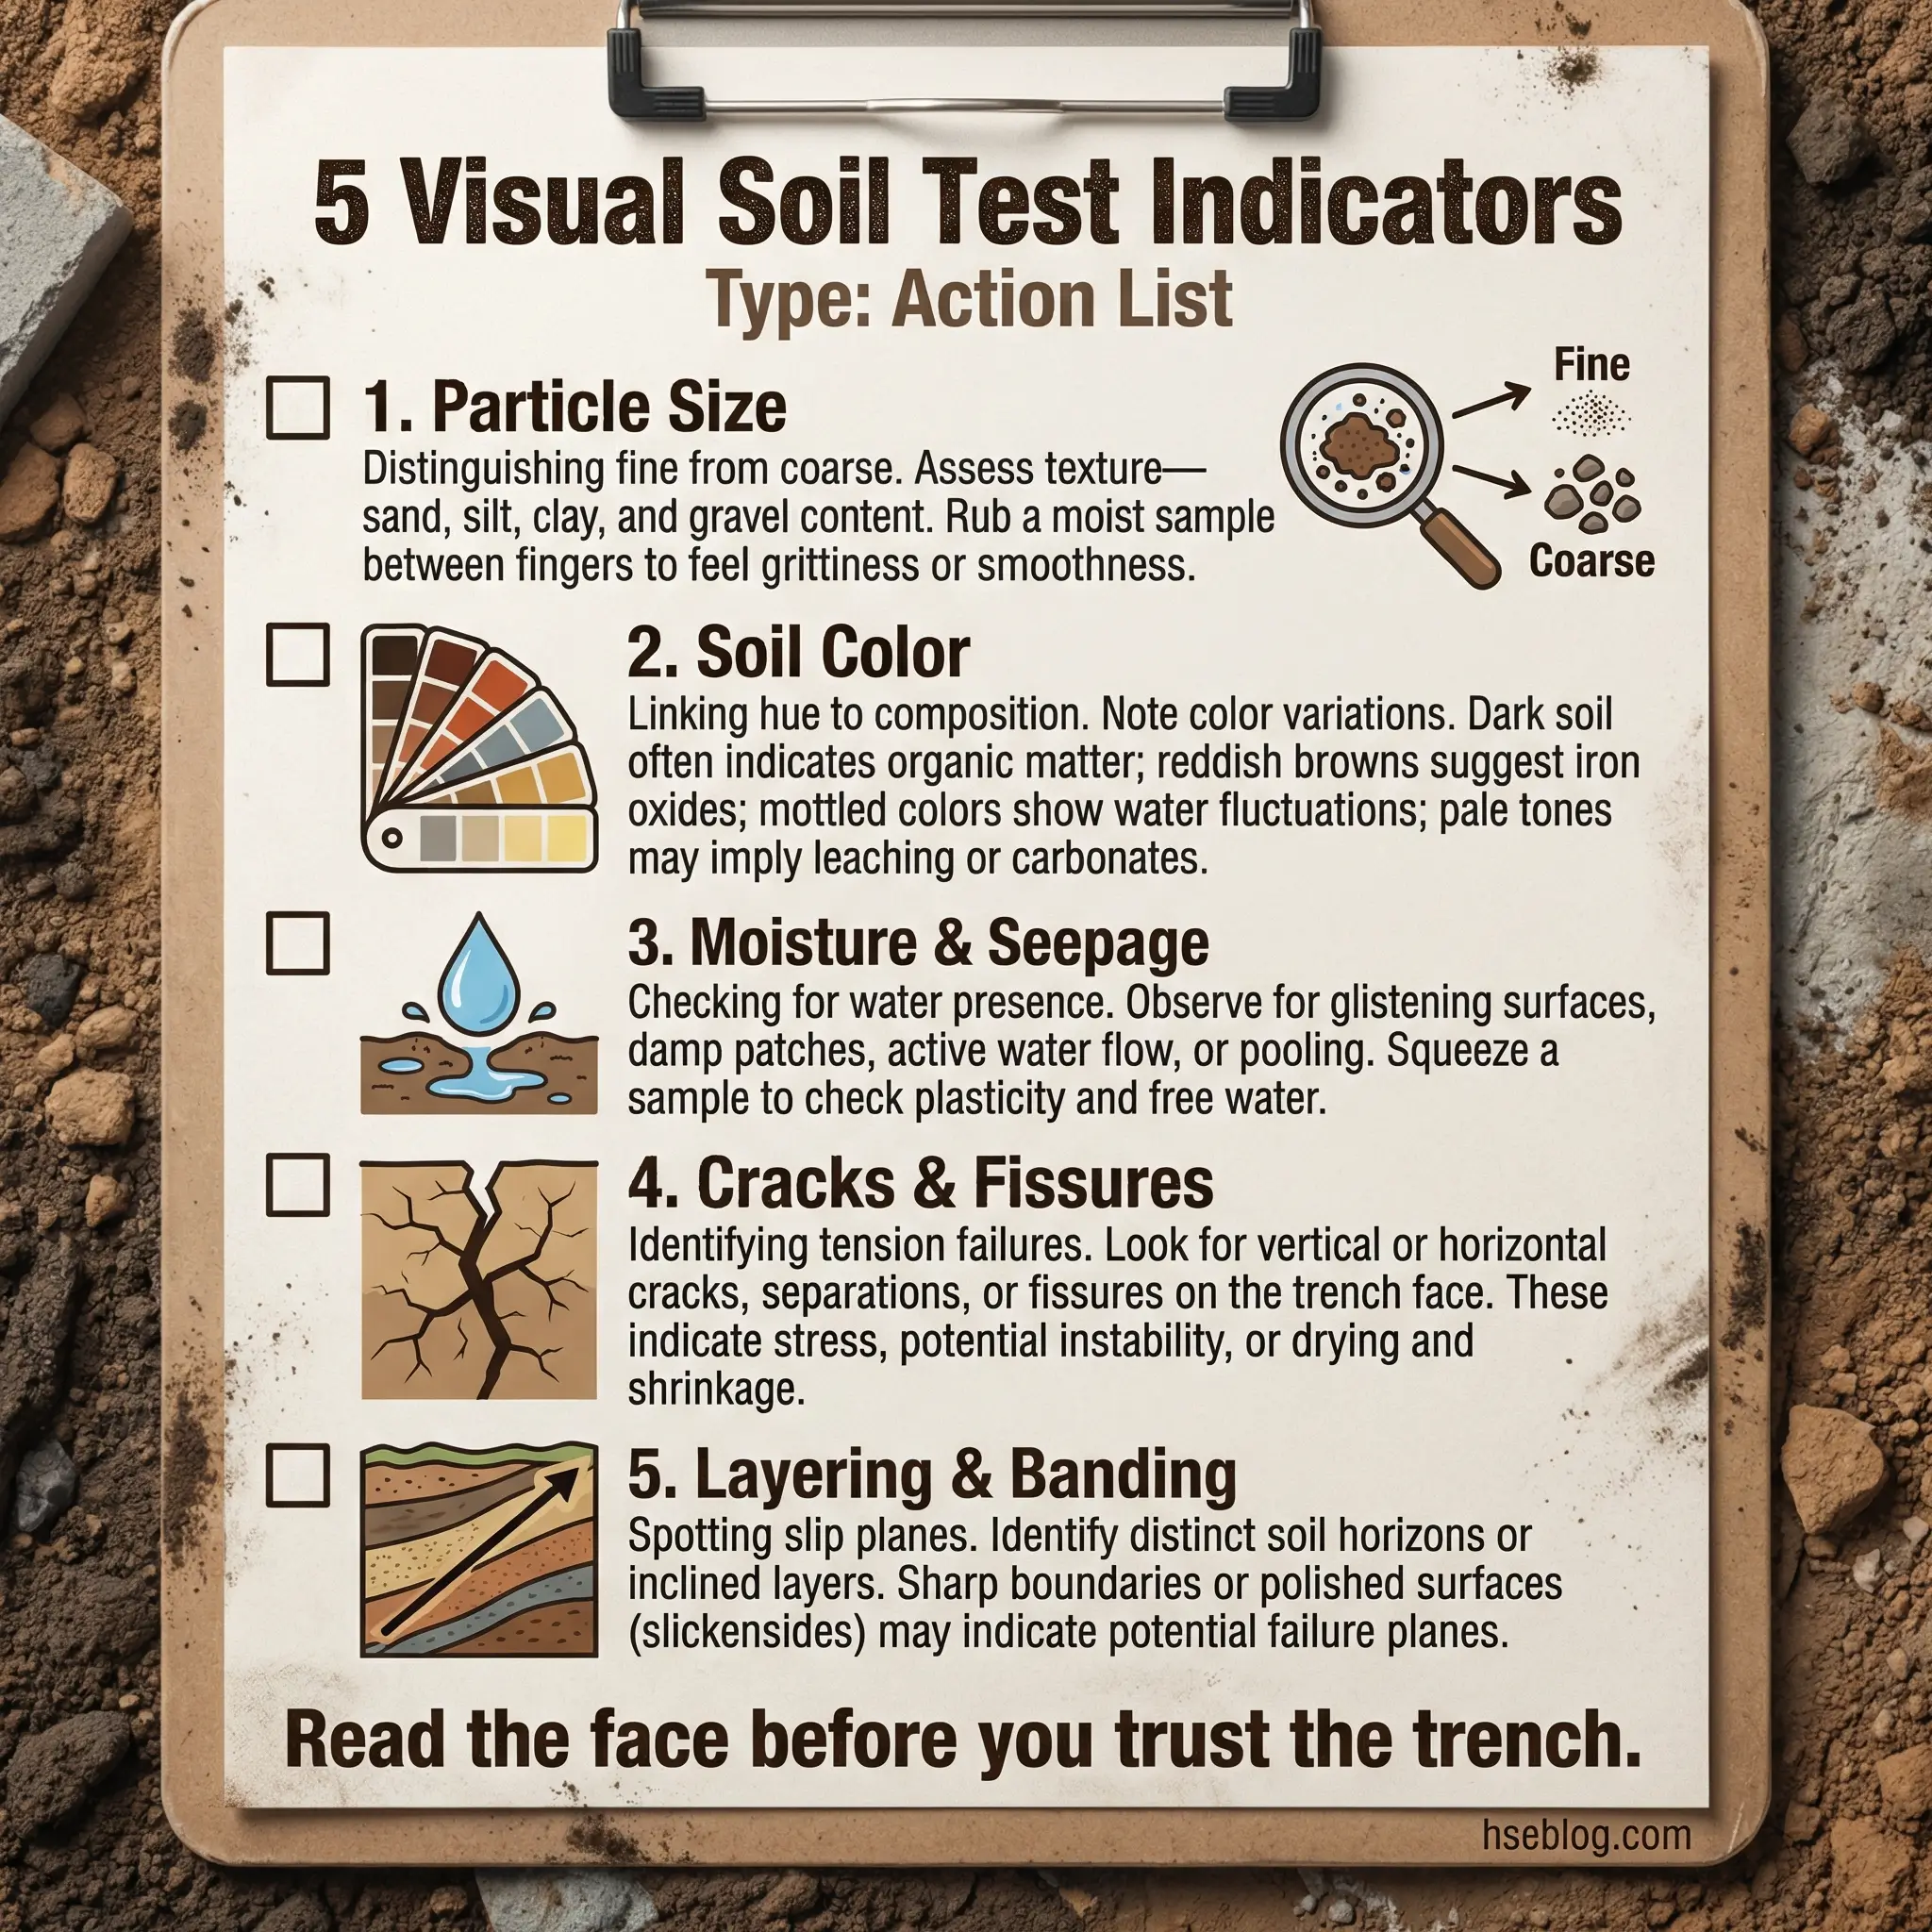
- Particle size observation: Examine individual grains on a freshly exposed face. Fine particles that are invisible to the naked eye indicate clay or silt. Visible grains suggest sand or gravel. Coarse, loose grains with no binding matrix are an immediate indicator of granular, non-cohesive soil — typically Type C.
- Soil color assessment: Dark brown or black soils often contain organic material, which weakens bearing capacity. Red or orange hues may indicate iron oxide content in laterite clays. Grey or blue-grey tones in saturated soils suggest anaerobic conditions and potential instability.
- Moisture and seepage observation: Check the excavation face and bottom for water seepage, standing water, or saturated zones. Water flowing from the sidewalls automatically downgrades cohesive soils — a previously stable Type A clay becomes Type B or C the moment freestanding water enters the equation.
- Crack and fissure inspection: Tension cracks running parallel to the excavation edge are a critical warning. They indicate the soil mass is already separating from the surrounding ground. I have stopped work on multiple occasions simply because hairline cracks appeared along the trench lip within the first hour of digging.
- Layering and banding: Look for horizontal or diagonal strata changes in the excavation wall. Transitions between clay and sand layers create slip planes — the interface where two soil types meet is often the weakest point, and cave-ins frequently initiate along these boundaries.
Pro Tip: Carry a hand lens (10x magnification) and a tape measure during every excavation inspection. The lens reveals particle size differences invisible to the naked eye, and the tape confirms whether crack offsets exceed the thresholds your competent person training specifies.
Visual tests establish a preliminary classification. They tell you what the soil looks like. But looks deceive — which is exactly why OSHA mandates manual testing to confirm what visual observation suggests.
Manual Soil Testing Methods: Confirming What You See
Manual soil tests require the competent person to physically handle soil samples taken from the excavation. These tests measure properties that visual observation alone cannot confirm — primarily cohesion, plasticity, and unconfined compressive strength. Each test is straightforward, requires no laboratory equipment, and takes less than two minutes on site.
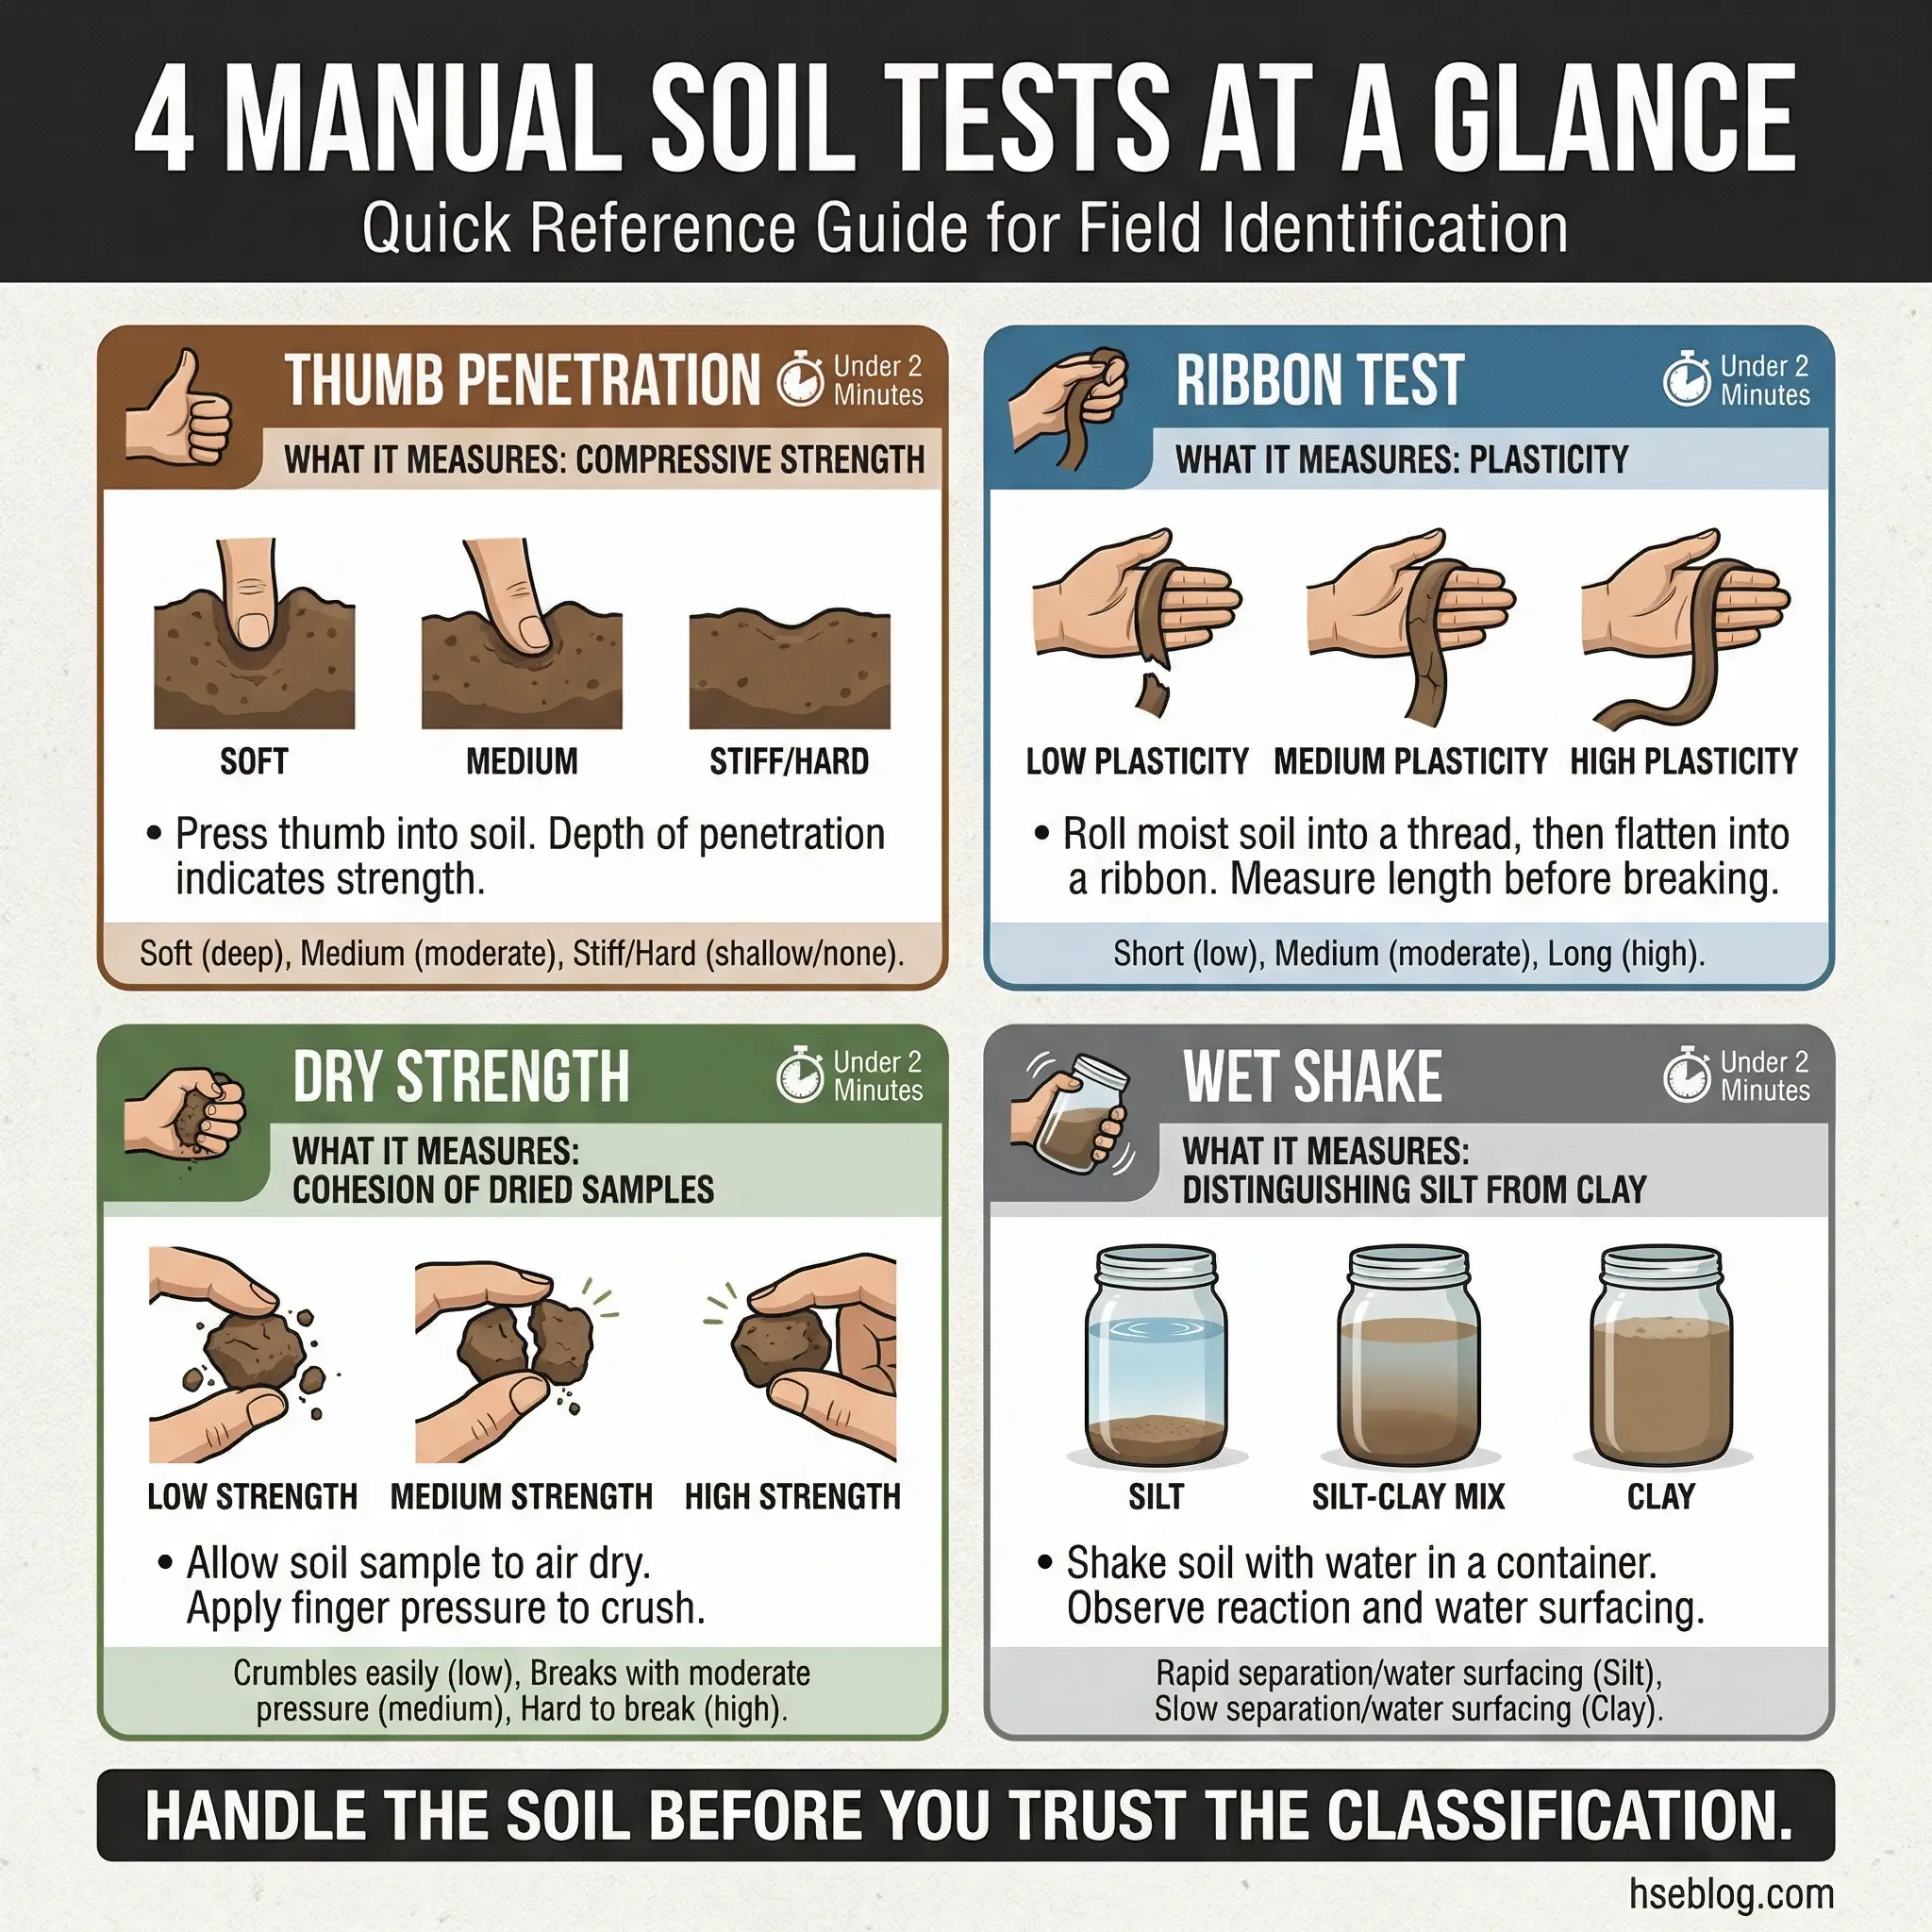
The Thumb Penetration Test
This is the single most common field test in excavation safety, and it directly measures unconfined compressive strength — the property that determines whether soil will hold a vertical face or collapse.
The procedure is a controlled sequence that any competent person should be able to execute without hesitation:
- Take a fresh, undisturbed soil sample from the excavation face at the depth where workers will be exposed.
- Press your thumb firmly into the sample using moderate pressure — not full force, not a light touch.
- Observe the penetration depth and the resistance encountered.
- Type A result: Thumb barely indents the surface. The soil resists penetration and feels hard, similar to pressing into stiff modeling clay. Unconfined compressive strength exceeds 1.5 tons per square foot (tsf).
- Type B result: Thumb penetrates up to the length of the thumbnail with moderate effort. Soil yields but holds some shape. Strength falls between 0.5 and 1.5 tsf.
- Type C result: Thumb penetrates easily with little resistance. Soil crumbles or deforms significantly. Strength is below 0.5 tsf. This soil cannot support a vertical face.
Pro Tip: Always perform the thumb penetration test on a sample from the lowest point of the excavation — not the surface. Soil properties change with depth. Surface soil may test as Type A while the material at the base, where hydrostatic pressure and moisture migration concentrate, behaves as Type C.
The Ribbon Test (Plasticity Test)
The ribbon test determines plasticity — the soil’s ability to deform without cracking or crumbling. Highly plastic soils tend to be cohesive clays that hold together under stress.
The process is simple and revealing:
- Take a moist soil sample and roll it between your palms into a cylinder about the diameter of a pencil.
- Flatten the cylinder into a ribbon by pressing it between your thumb and forefinger.
- Extend the ribbon horizontally and observe the length it reaches before breaking.
- Cohesive clay: Produces a long, flexible ribbon (15 cm or more) without cracking. Indicates high plasticity and likely Type A or B classification.
- Silty or weak soil: Ribbon cracks, crumbles, or breaks within a few centimeters. Low plasticity — likely Type B at best, Type C if combined with poor visual indicators.
The Dry Strength Test
Dry strength testing evaluates how a dried soil clod resists breaking. This is particularly useful when you suspect a soil might be silt masquerading as clay — a dangerous misidentification because silt has far less cohesion than its visual appearance suggests.
A competent person can perform this test with a sample collected earlier in the day:
- High dry strength: The dried clod resists breaking between fingers and requires significant force to fracture. This indicates clay content and supports a Type A or B classification.
- Low dry strength: The clod crumbles easily, breaks into powder, or disintegrates with light finger pressure. Silt and fine sand behave this way. This soil has minimal cohesion and warrants a Type C classification.
The Wet Shake Test (Dilatancy Test)
This test distinguishes silt from clay by observing how water behaves on the soil surface when shaken. It is especially valuable in wet conditions where other manual tests become unreliable.
The test takes less than a minute and requires only a palm-sized sample:
- Place a small sample of saturated soil in your open palm.
- Shake your hand vigorously side to side.
- Silt reaction: Water rapidly appears on the surface, giving it a glossy, wet sheen. When you squeeze the sample, the water disappears back into the soil. Silt is non-cohesive — classify as Type C.
- Clay reaction: No visible water appears on the surface during shaking. Clay holds its moisture internally. This supports a cohesive, higher-classification result.
OSHA Soil Classification: Type A, B, and C
Every visual and manual soil test feeds into a single critical output — the OSHA soil classification. This classification is not academic. It directly controls the excavation protective system design, worker exposure limits, and whether a trench is legal to enter.
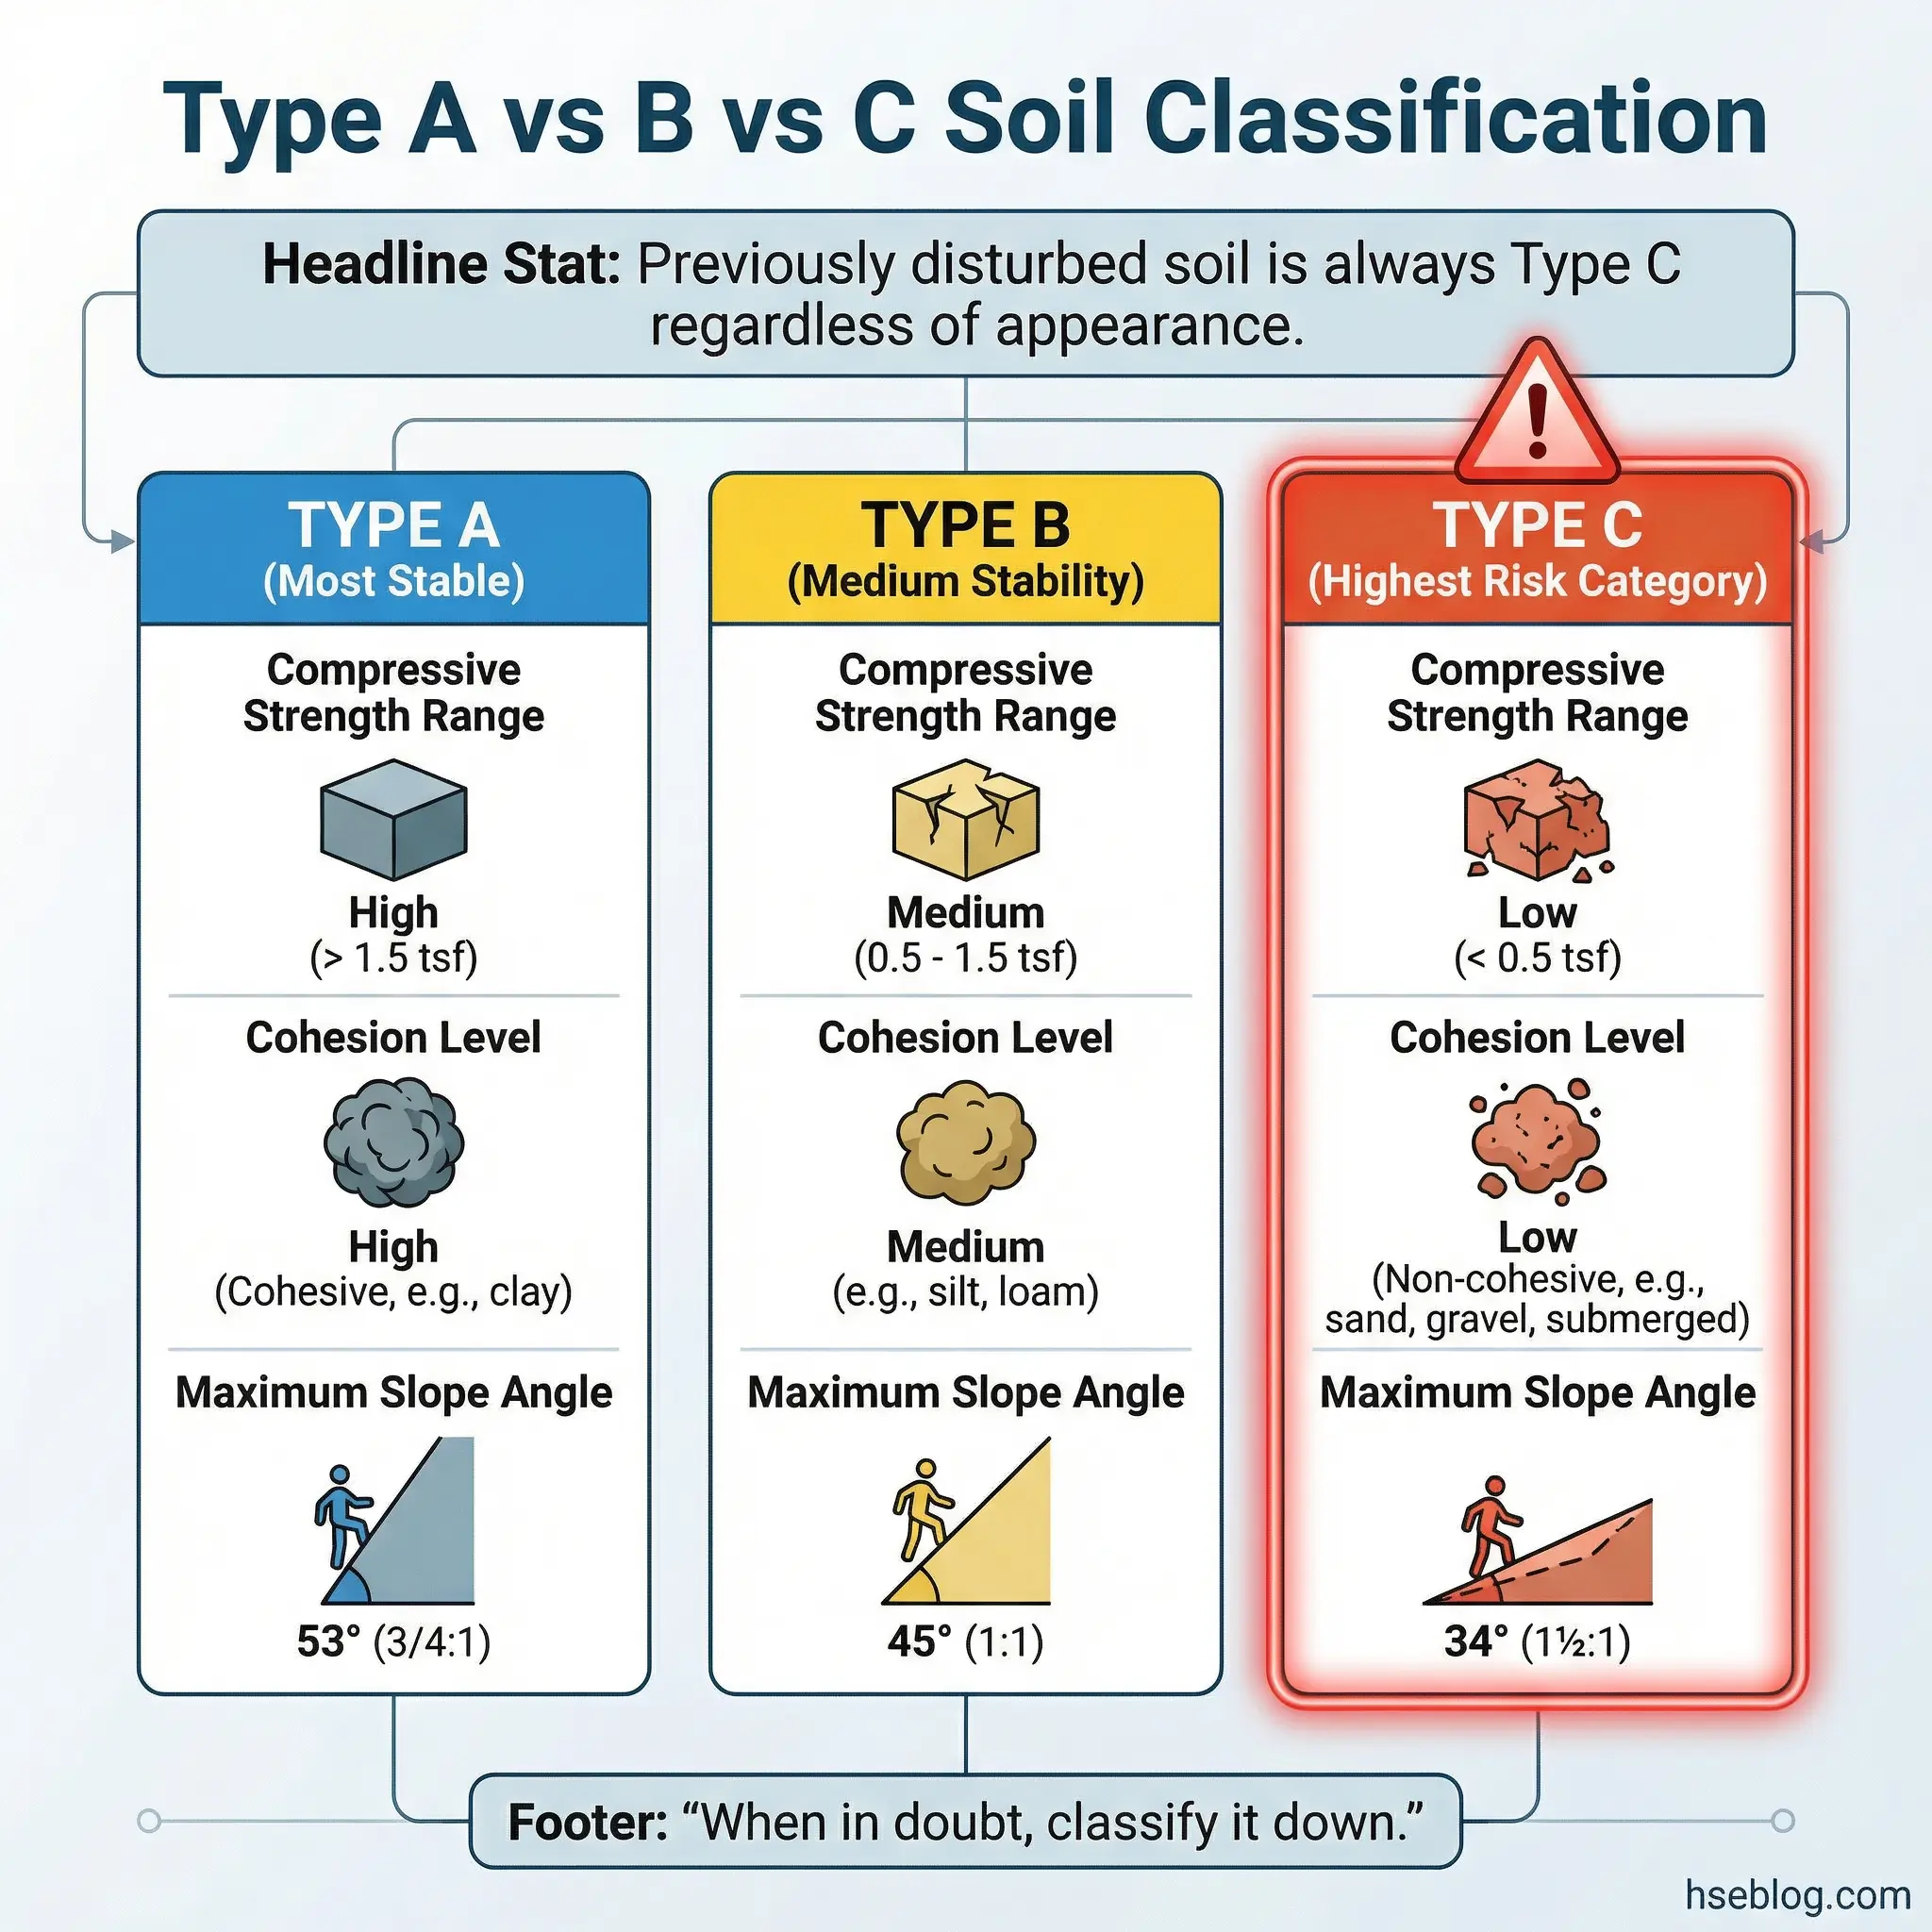
Understanding the differences between Type A, B, and C soils is foundational to every excavation safety decision made on site:
| Property | Type A | Type B | Type C |
|---|---|---|---|
| Unconfined Compressive Strength | Greater than 1.5 tsf | 0.5 – 1.5 tsf | Less than 0.5 tsf |
| Examples | Clay, silty clay, hardpan | Silt, sandy loam, medium clay | Gravel, sand, loamy sand, submerged soil |
| Cohesion | High — holds a vertical face | Moderate — deforms under pressure | None or minimal — collapses freely |
| Maximum Allowable Slope | ¾H:1V (53°) | 1H:1V (45°) | 1½H:1V (34°) |
| Typical Protective System | Sloping or basic timber shoring | Shoring or shielding (trench box) | Shielding mandatory or heavy-duty sloping |
Several conditions automatically downgrade soil from its natural classification, regardless of test results. A competent person must recognize these override conditions:
- Fissured soil: Even if a clay tests as Type A in the thumb penetration test, visible fissures or cracks mean it cannot be classified higher than Type B. Fissures create planes of weakness that allow block failures.
- Previously disturbed soil: Backfill material, soil that has been excavated and replaced, or any fill material is automatically Type C. Disturbed soil has lost its natural structure and cannot be relied upon for lateral support.
- Submerged or free-seeping soil: Water presence automatically disqualifies Type A classification. A clay that would otherwise rate Type A drops to at least Type B — and in many cases Type C — the moment water enters the excavation.
- Vibration exposure: Excavations near heavy traffic, pile driving, or operating heavy equipment face vibratory loads that degrade soil cohesion over time. This is frequently overlooked on urban construction projects where road traffic runs meters from open trenches.
Field principle I enforce on every project: When test results are borderline between two classifications, always default to the lower classification. There is no such thing as being too conservative with soil type. The excavation protective system can always handle a higher-rated soil — but it cannot survive a lower-rated one.
Pro Tip: Document every soil test with the location within the excavation, depth, time, weather conditions, and the specific test method used. This documentation is your legal defense if an incident occurs — and it is the first document an OSHA compliance officer will request during an inspection.
Common Mistakes in Field Soil Testing
Soil testing errors do not look like dramatic failures in the moment. They look like shortcuts — small omissions that seem harmless until the trench wall gives way. Over a decade of excavation inspections across construction and pipeline projects, I have documented the same mistakes repeating across different continents, companies, and crews.
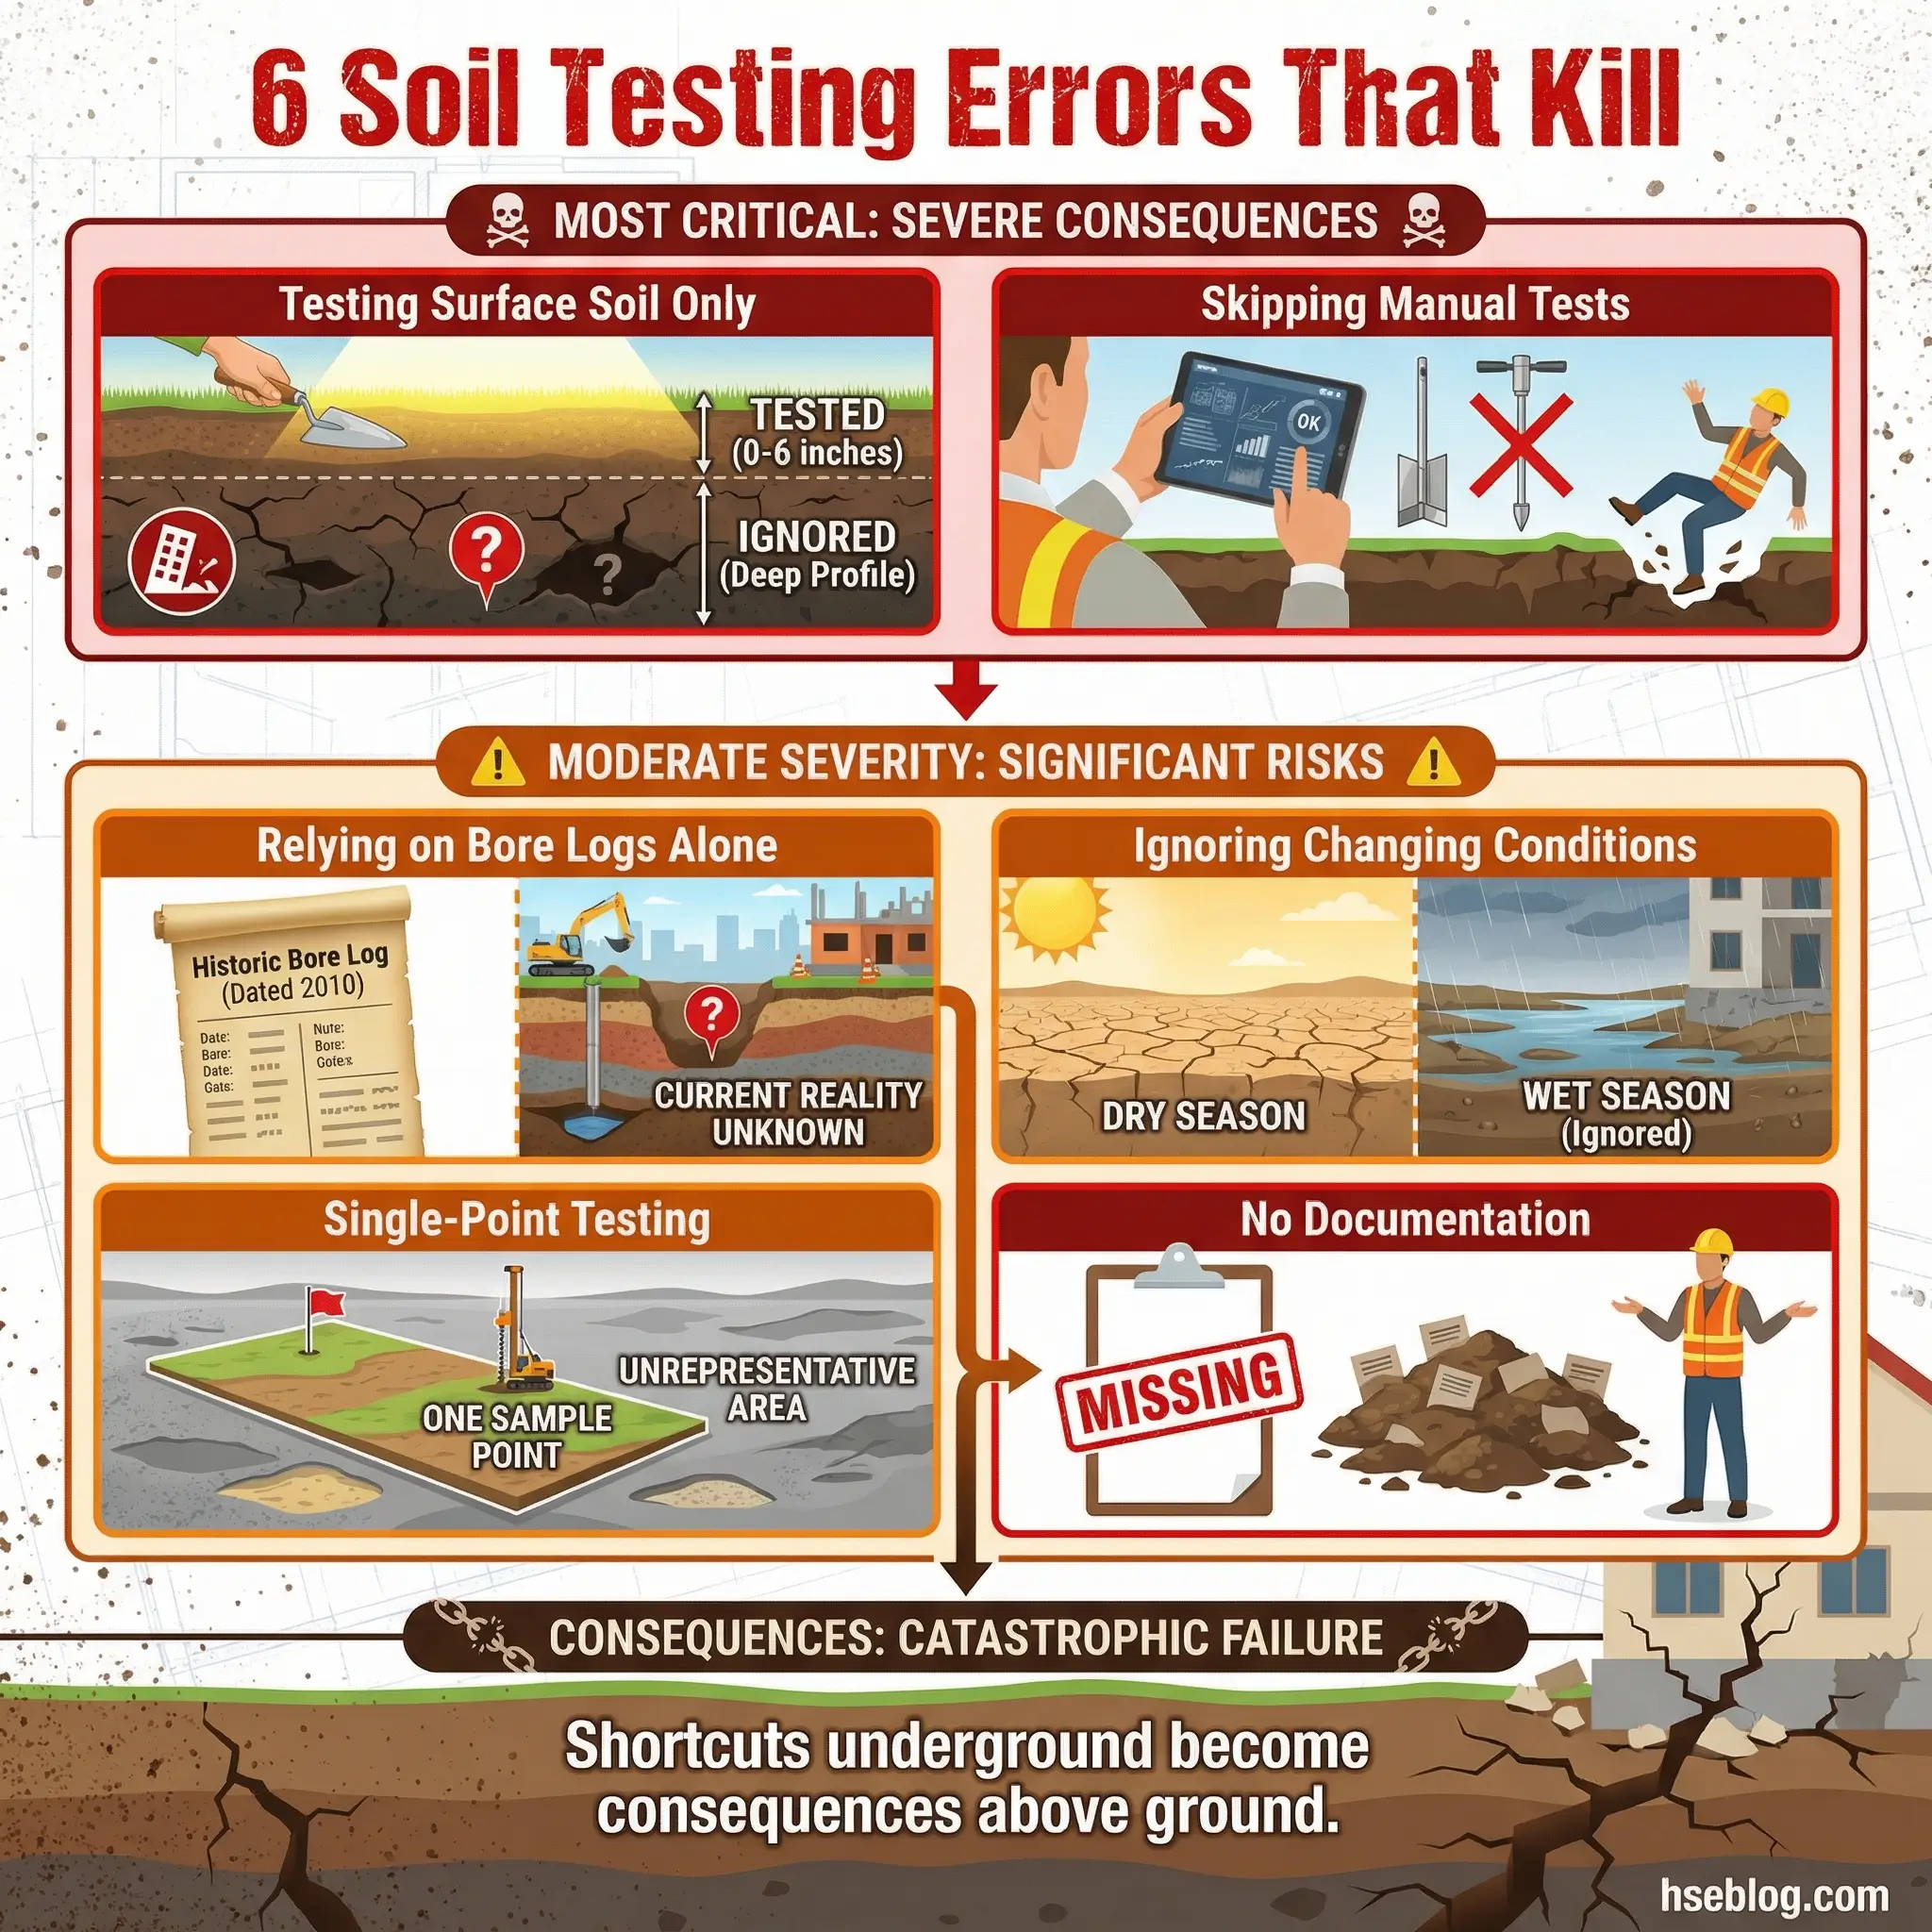
These are the failures I encounter most frequently, and every one of them has contributed to a serious incident or near-miss somewhere in my career:
- Testing only surface soil: The competent person takes a sample from the spoil pile or the top 30 cm of the excavation face. Surface soil is weathered, dried, and often unrepresentative of what sits at working depth. The soil at the bottom of the trench — where workers stand — is what kills.
- Relying on bore logs instead of field tests: Geotechnical bore logs are valuable planning tools, but they describe soil at the time and location of the bore. Conditions change between boreholes, across seasons, and after rain events. I have seen bore logs that classified an entire 200-meter pipeline corridor as “stiff clay” — yet field testing revealed three separate transitions to granular material along the route.
- Performing visual tests only: Skipping manual tests because the soil “looks like clay” is the single most dangerous shortcut in excavation safety. Silt looks almost identical to clay in visual inspection. It behaves nothing like clay under load.
- Ignoring changing conditions: Soil classification is not a one-time event. Rain, dewatering operations, adjacent traffic, temperature changes, and the passage of time all alter soil behavior. A trench that tested as Type A on Monday morning can behave as Type C by Wednesday afternoon if it rained overnight.
- Failing to test at multiple locations: Large excavations require testing at multiple points along the excavation face — not one sample from a single spot. Soil properties can change dramatically over just a few meters, especially on sites with mixed fill or geological transitions.
- No documentation of test results: If the test was not recorded, it did not happen — at least not from a legal, compliance, or investigative perspective. Undocumented soil tests leave the competent person, the contractor, and the client exposed to full liability in the event of a cave-in.
Pro Tip: Build a habit of testing soil at the start of every shift, after any rain event, and any time the excavation depth increases by more than 0.5 meters. Conditions shift faster than most crews realize, and retesting takes less time than a rescue operation.
The Competent Person: Who Tests and Who Decides
OSHA does not allow just anyone to perform soil testing and classification. The regulatory framework assigns this responsibility to a single defined role — the competent person. This is not a courtesy title. It carries specific legal obligations, and misunderstanding this role has resulted in citations, project shutdowns, and criminal charges after fatalities.
The competent person for excavation must meet two non-negotiable criteria under OSHA 29 CFR 1926.650(b):
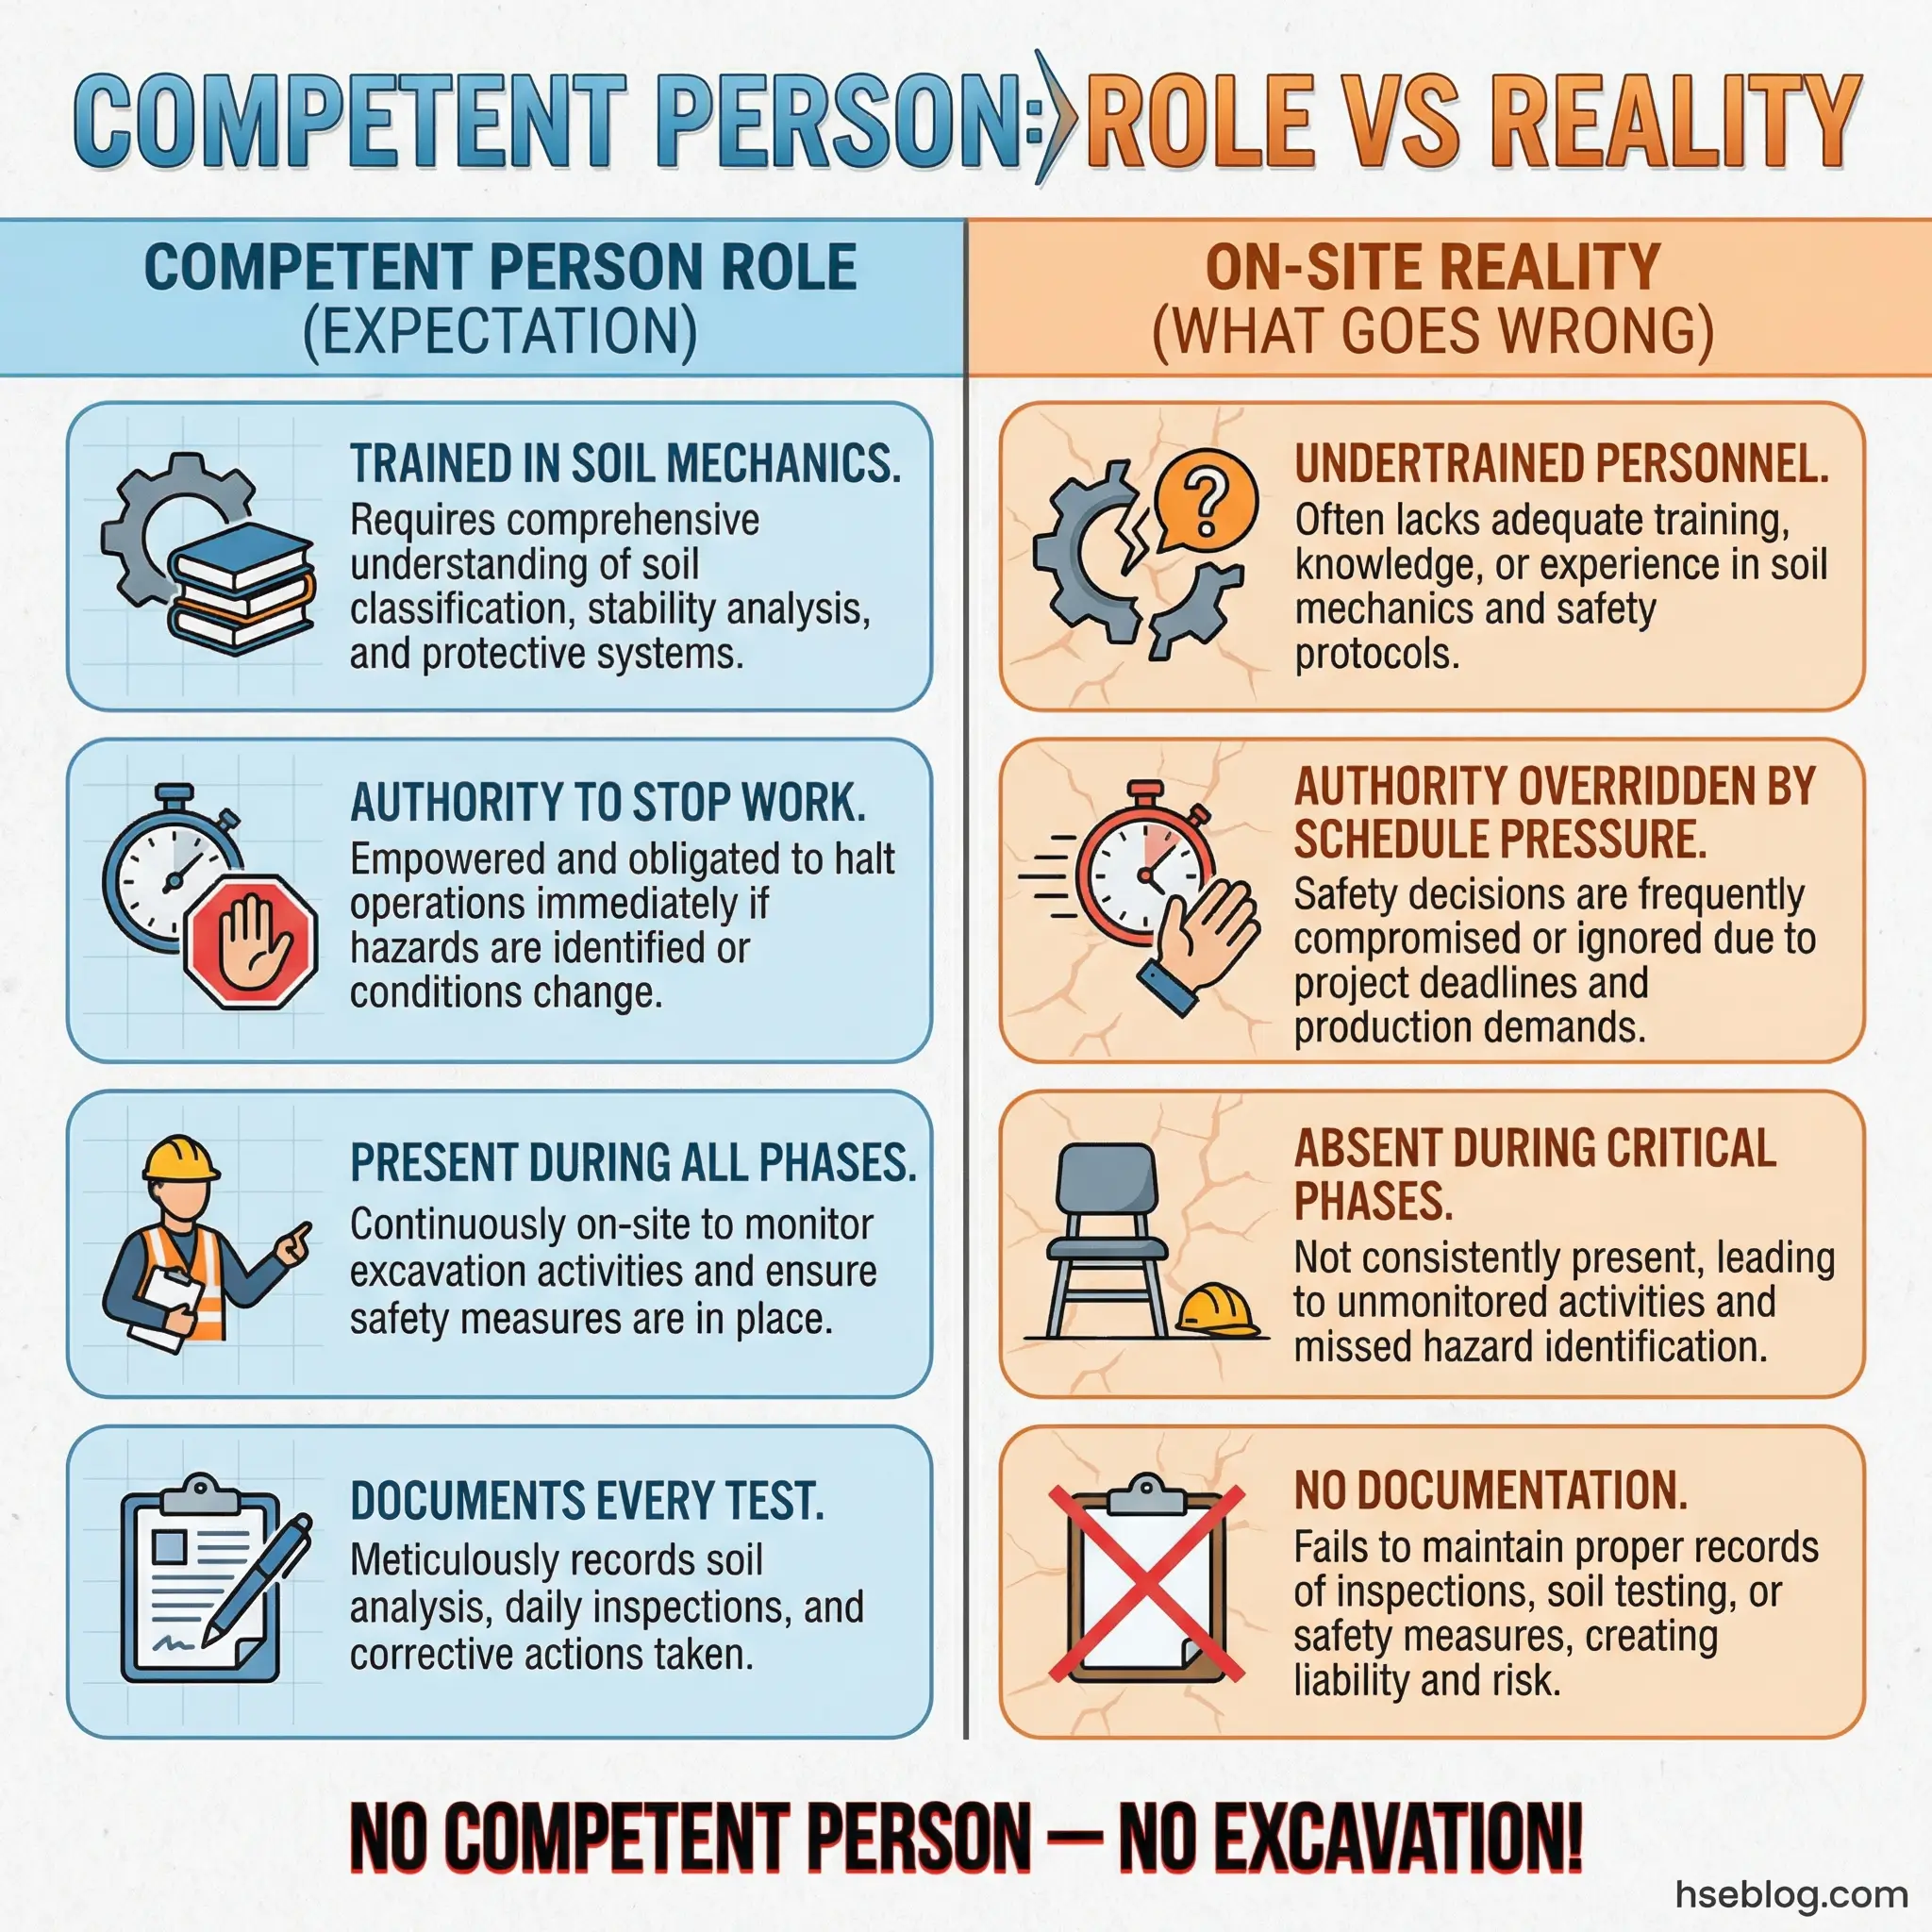
- Capability to identify hazards: The individual must be trained and experienced enough to recognize existing and predictable hazards in the surrounding environment, including soil conditions, water presence, adjacent structures, utility crossings, and superimposed loads.
- Authority to take corrective action: The competent person must have the organizational authority to stop work, modify protective systems, evacuate workers, and change the soil classification without requiring approval from a supervisor or project manager. Authority on paper that does not exist in practice is not authority.
During a highway widening project in Northern Europe, I observed a competent person reclassify a 40-meter section of trench from Type B to Type C after an overnight rain event changed the soil’s behavior. The project manager challenged the decision because it required replacing the existing trench box with a wider system, adding two days to the schedule. The competent person held the classification. That decision — and the authority to enforce it — is what OSHA’s competent person requirement exists to protect.
Several organizational failures undermine the competent person’s effectiveness in the field:
- Assigning the role to someone without genuine training in soil mechanics, excavation hazards, and protective system design. A one-day awareness course does not produce competence.
- Splitting the role across multiple people so that no single individual owns the classification decision. Shared responsibility in excavation safety translates to no responsibility.
- Pressuring the competent person to maintain favorable classifications to avoid schedule or cost impacts. This is not hypothetical — it is the root cause behind a significant percentage of excavation fatalities.
- Failing to ensure the competent person is present during all phases of excavation work. Soil testing and classification are meaningless if the person qualified to perform them is on another part of the site when conditions change.
OSHA 29 CFR 1926.651(k)(1): Daily inspections of excavations, adjacent areas, and protective systems shall be made by a competent person for evidence of a situation that could result in possible cave-ins.
When Soil Test Results Demand a Stop-Work Decision
Soil testing methods only protect workers if the results actually change decisions on the ground. The hardest part of this process is not the testing itself — it is acting on results that conflict with the project plan. I have seen competent, well-trained people hesitate to call a stop-work because the cost implications felt disproportionate to what seemed like a minor reclassification.
There is no minor reclassification. Any of these field conditions require immediate work stoppage and reassessment of the excavation protective system:
- Manual tests indicate a lower classification than the installed protective system supports. If your shoring is rated for Type B and the thumb penetration test shows Type C, every worker in that excavation is unprotected. Stop. Evacuate. Redesign.
- Tension cracks appear at or near the excavation edge. These indicate active soil movement. The trench wall is already in the process of failing. This is not a “monitor and continue” situation.
- Water begins entering the excavation from any source — groundwater seepage, surface runoff, a broken utility line. Water changes everything about soil behavior. A previously stable wall can lose cohesion within minutes of saturation.
- Spoil piles are placed within the setback zone. OSHA requires spoil to be placed at least 0.6 meters (2 feet) from the excavation edge. Spoil within this zone adds surcharge load to already stressed soil. I have witnessed a sidewall failure triggered entirely by a spoil pile that had been pushed too close by a careless excavator operator.
- Vibration sources increase or move closer. New heavy equipment operating near the trench, increased traffic on an adjacent road, or pile driving starting on a nearby section of the project all change the dynamic loading on the excavation walls.
The cost of a stop-work decision is always less than the cost of a cave-in. Always. That equation has never once been wrong in the history of excavation safety.
Conclusion
Soil testing methods are not a checkbox on a permit form. They are the physical act of asking the ground whether it will hold — and having the training, the tools, and the courage to believe the answer. Every visual inspection of the excavation face, every thumb pressed into a soil sample, every ribbon test and dry strength evaluation feeds directly into the classification that determines whether a protective system will save a life or fail under pressure.
The methods themselves are simple. A competent person can master the thumb penetration test, the ribbon test, the wet shake test, and the dry strength test with proper training and supervised field practice. What is not simple is the discipline to perform these tests every time, at every depth change, after every rain event, and at every new section of an excavation — especially when schedule pressure makes shortcuts feel reasonable.
I have stood at the edge of excavations where the soil told a different story than the paperwork. Every time, the soil was right. The workers who go home at the end of the shift are protected not by what the engineer predicted in an office, but by what the competent person confirmed in the field. Soil testing methods are the last line of defense between a routine trench and a burial site. Treat them that way.