

TL;DR
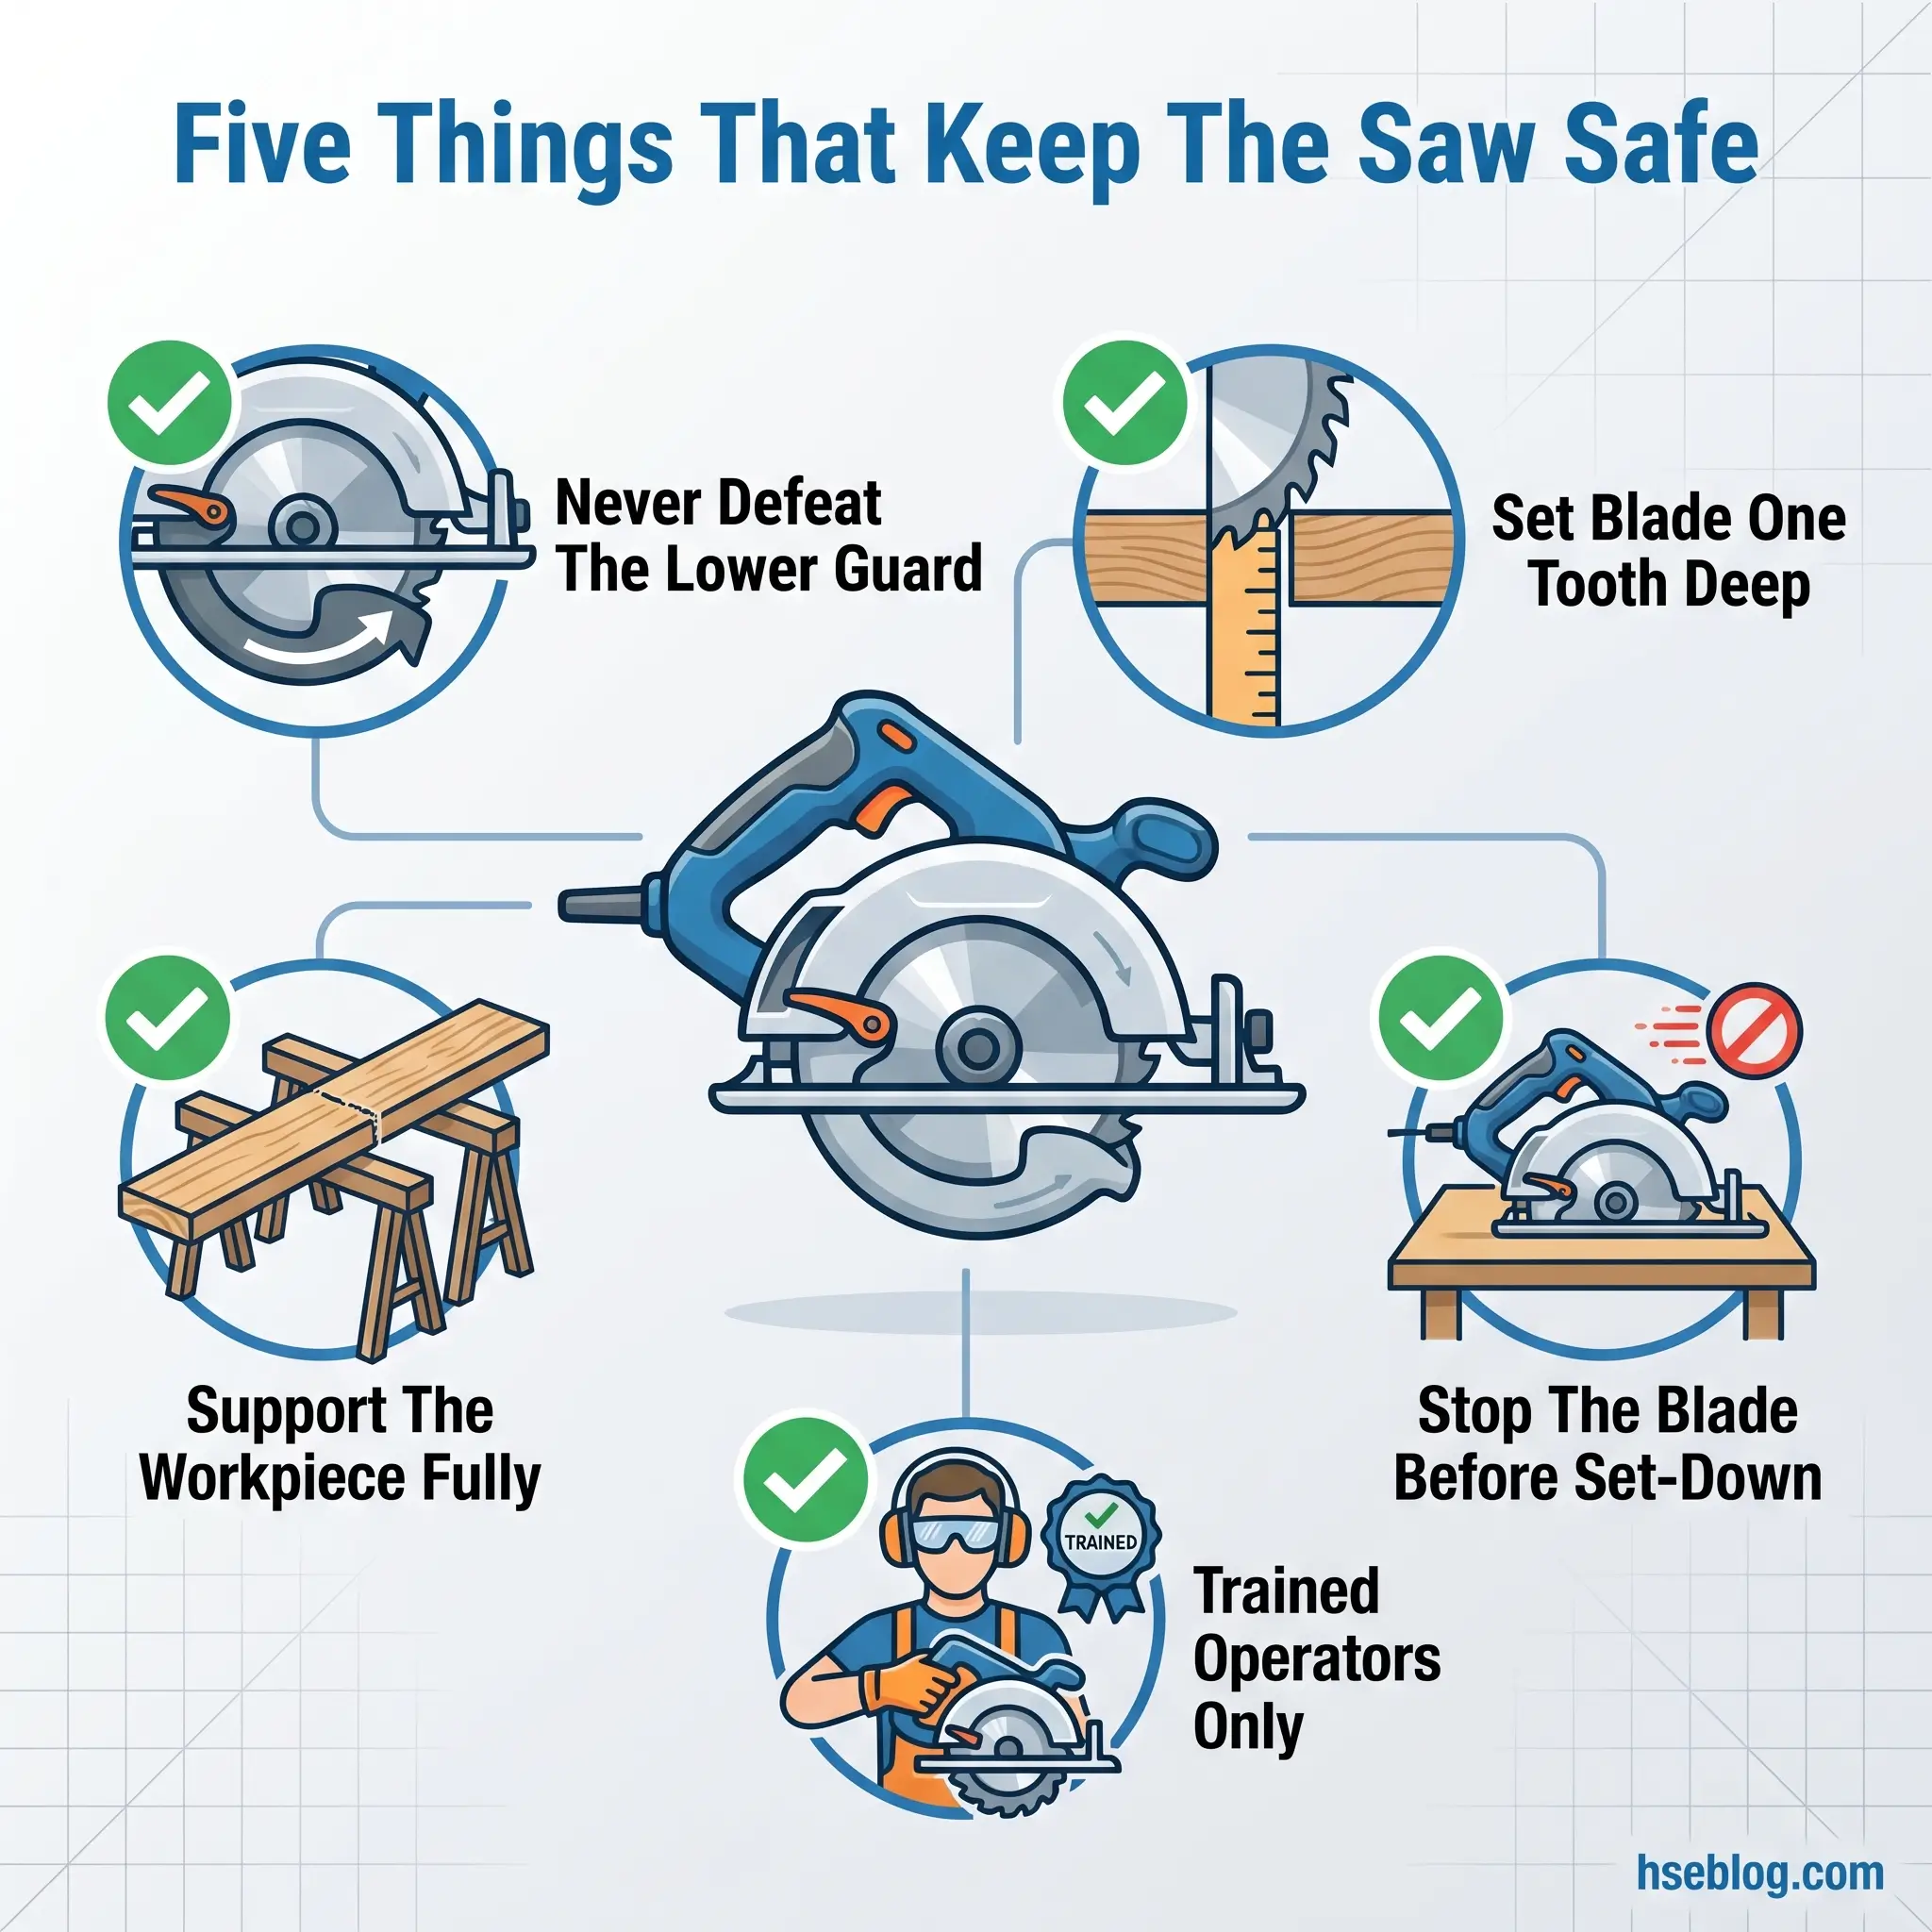
- Never defeat the lower guard. Tying or wedging the retracting guard open is the most common cause of serious blade-contact injury.
- Set blade depth shallow. Project the blade roughly one tooth below the workpiece to limit exposure and pinch surface.
- Support the workpiece fully. Unsupported or sagging stock pinches the kerf and drives kickback back toward you.
- Let the blade stop before set-down. A coasting blade walks the saw across whatever sits on the bench.
- Put a trained operator on the tool. Under OSHA and UK PUWER, assumed experience is not a substitute for task-specific training.
Circular saw safety rests on two things working together: an intact guard system — the fixed upper guard, the spring-loaded lower guard, and the riving knife — and a disciplined operating procedure. The guard cannot enclose the blade at the point of cut, so correct depth setting, full workpiece support, and trained operation carry most of the protection.
A portable circular saw is one of the few power tools that cannot fully enclose its own hazard. The blade sits exposed at the exact point where it meets the work — by design, because that is where the cut has to happen.
That single design fact shapes everything about circular saw safety. Because the guard manages the blade everywhere except the cut line, the operator’s procedure — not the guard alone — decides whether the tool stays controlled or turns into an amputation event. This article covers the guard mechanism and how it fails, the pre-use checks, the operating sequence, kickback physics, PPE, blade maintenance, and the OSHA/PUWER regulatory layer.
This article provides general HSE knowledge. Operating a portable circular saw is life-critical work and must be planned and supervised by a competent person with relevant training, jurisdiction-specific authorization, and a task-specific risk assessment. The information here does not replace that.
Circular Saw Hazards: Why Guarding and Procedure Matter
Three mechanisms cause nearly every serious circular saw injury, and they sit in a clear order of severity. Understanding which one you are defending against tells you which control matters in the moment.
- Blade contact — direct contact with the rotating blade, causing laceration or amputation. This is the highest-severity outcome and the reason the guard system exists.
- Kickback — a pinched or bound blade throws the tool back toward the operator, a struck-by event that often ends in secondary blade contact. It is physics, not carelessness.
- Entanglement — loose clothing, a dangling lanyard, or a loose glove caught by the blade or arbor, pulling the hand toward the cut.
The honest pattern across the published incident record is that most serious events trace back to a defeated guard, the wrong blade, or an unsupported workpiece — not freak accidents.
A detail worth naming up front: experienced operators are over-represented in guard-defeat incidents. Familiarity erodes the habit, and the worker who has made ten thousand cuts is often the one who ties the lower guard back to get a “cleaner” line.

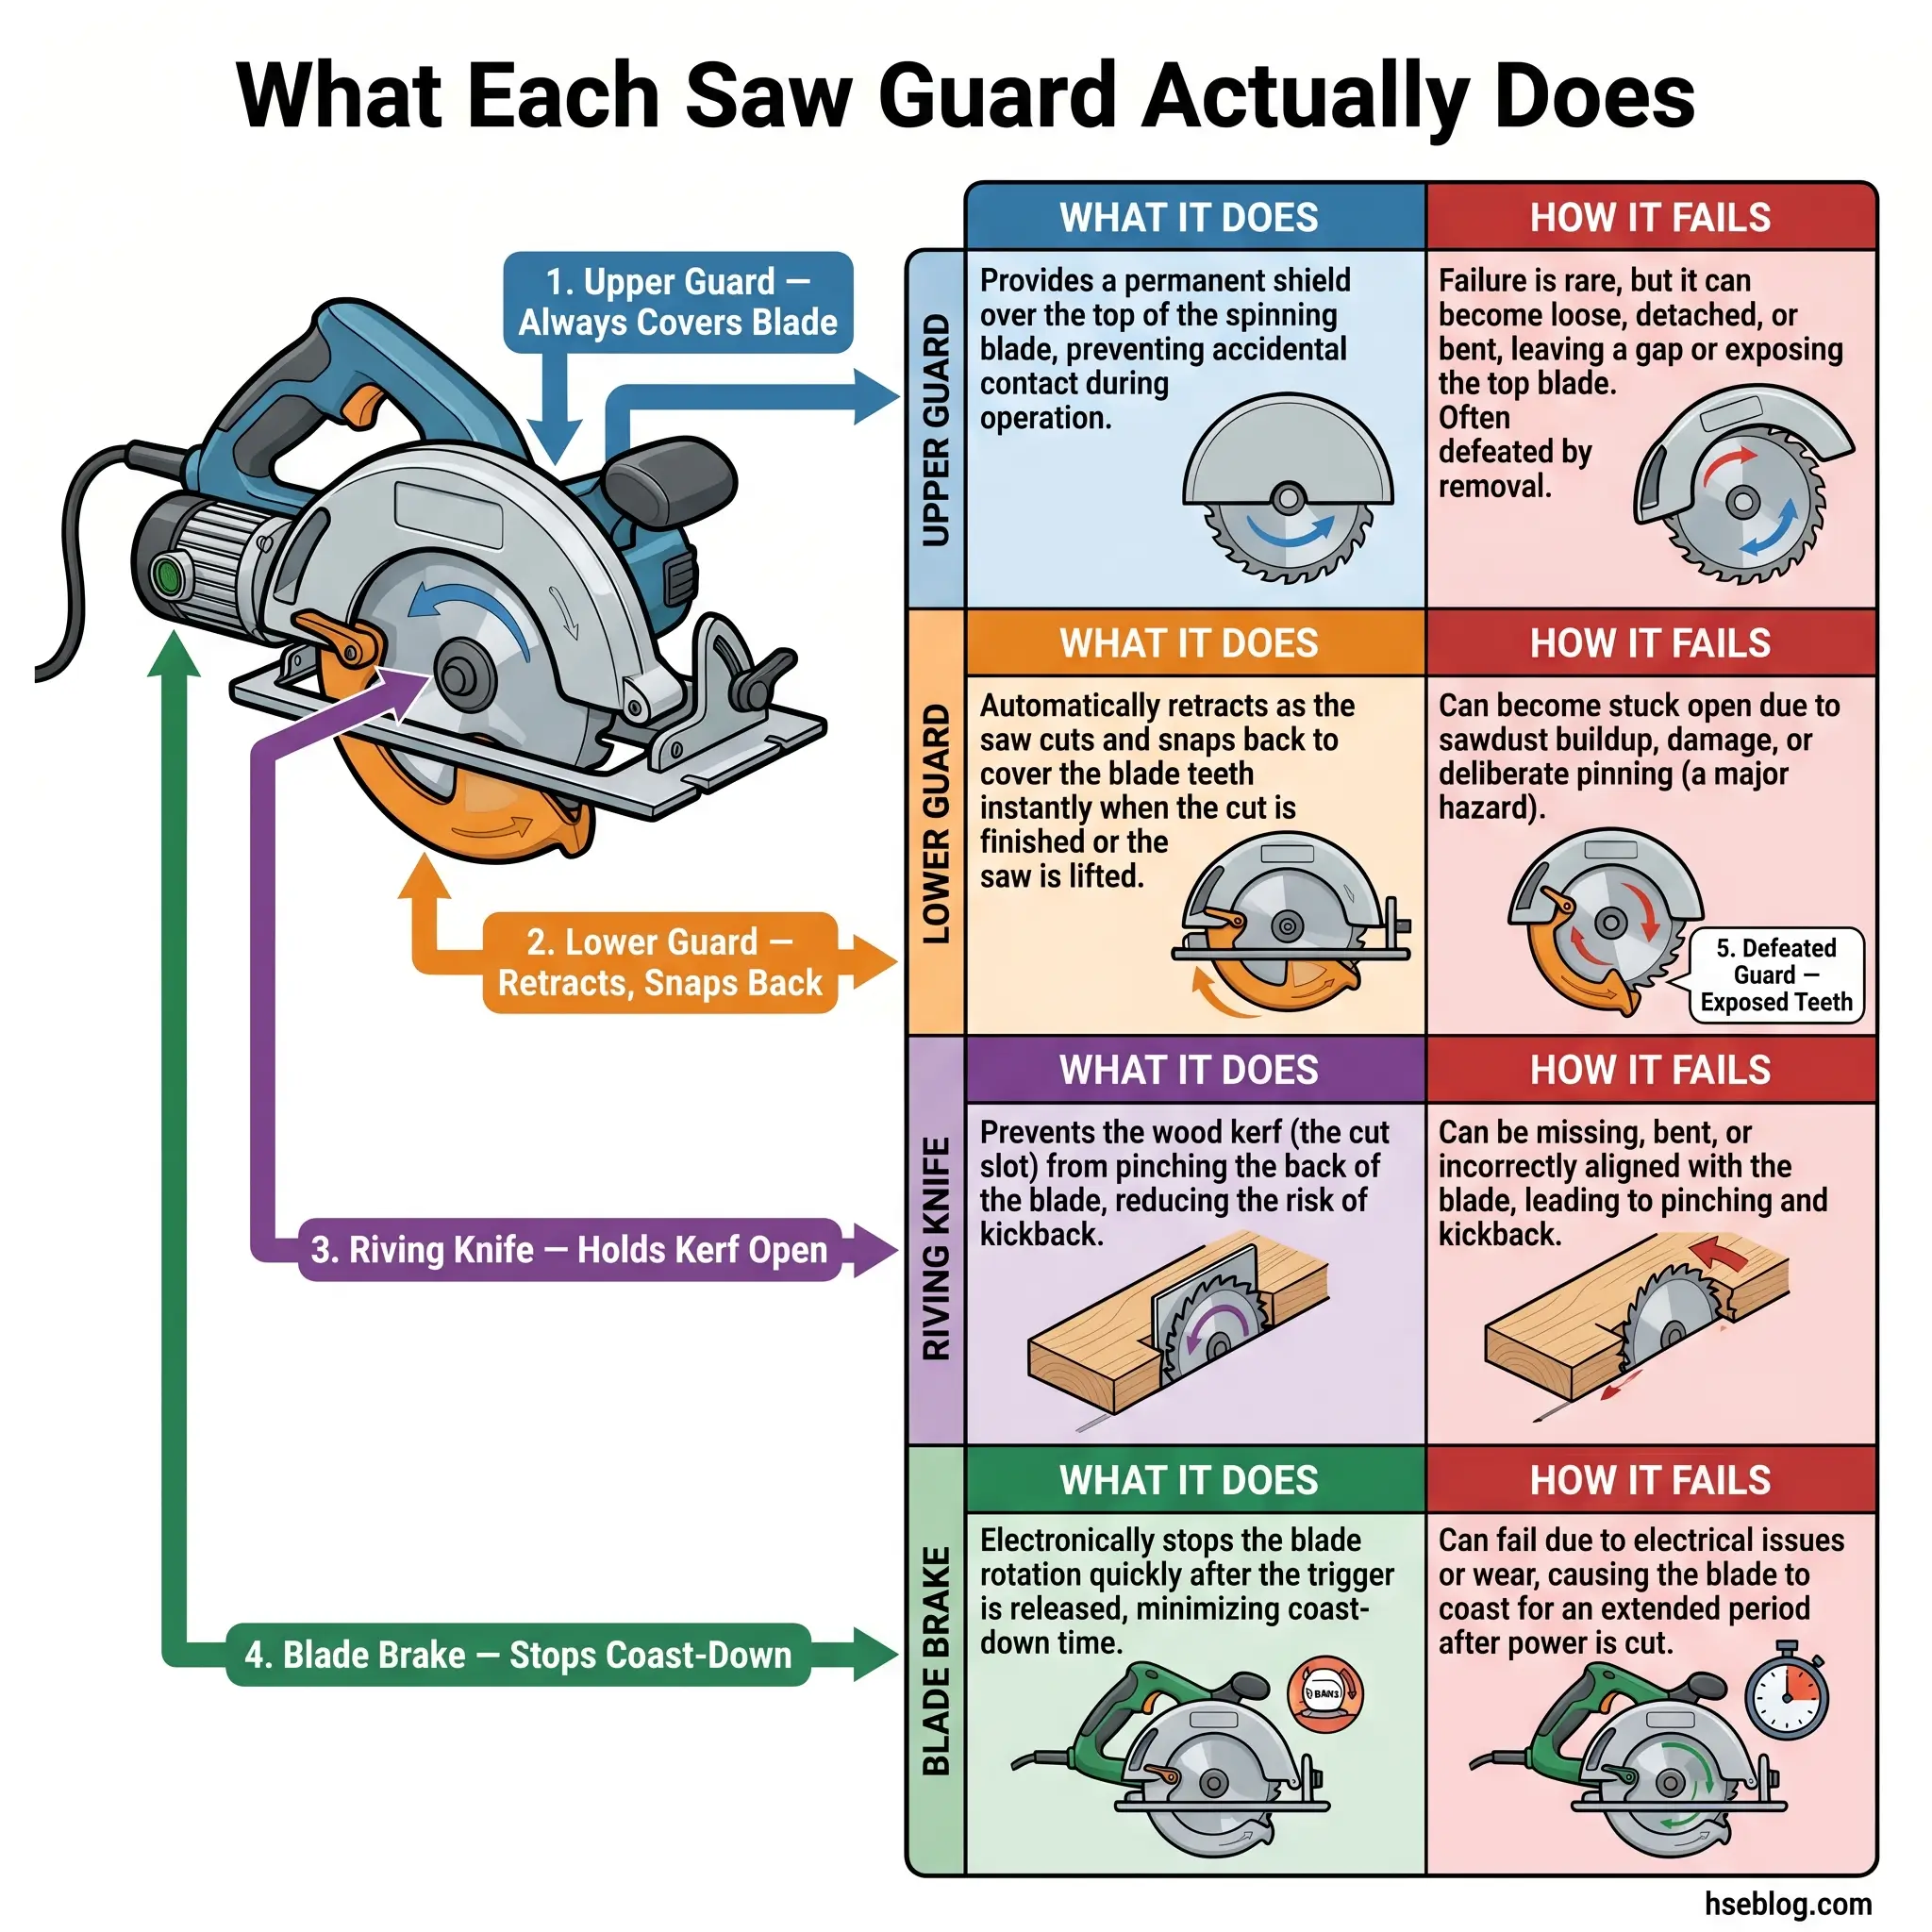
How Circular Saw Guards Work: Upper Guard, Lower Retracting Guard, and Riving Knife
Under OSHA’s portable powered tool guarding standard (1910.243), every portable circular saw with a blade over two inches must carry two guards — and one of them has to move. The components are not interchangeable; each defeats a different failure mode.
Upper (fixed) guard
The upper guard covers the blade down to tooth depth at all times, except the minimum arc needed to let the blade tilt for bevel cuts. It does not move during the cut.
Lower (retracting) guard
The lower guard is spring-loaded. It covers the teeth fully, retracts as the shoe meets the work, and must snap back to the covered position instantly and automatically the moment the saw clears the cut — a requirement written into both 1910.243 and 1926.304(d).
Riving knife / splitter
The riving knife sits behind the blade and holds the kerf open so the cut wood cannot pinch the blade. On a portable saw it is thinner than the kerf and recesses below the blade diameter. A fixed splitter does the same job but does not move with the blade, so it only works on through-cuts.
Electric blade brake
Modern and cordless saws often add an electric brake that stops blade coast-down in seconds. It is a supplementary control, not part of the legal guarding requirement.
| Component | What it does | Failure mode if defeated or neglected |
|---|---|---|
| Upper guard | Covers blade to tooth depth, always | Cracked housing exposes the upper arc |
| Lower retracting guard | Covers teeth, self-returns on withdrawal | Sticks open from caked sawdust/sap; leaves teeth exposed |
| Riving knife / splitter | Keeps kerf open, prevents pinch kickback | Removed for plunge cuts and not refitted |
| Electric blade brake | Stops blade coast-down | Worn brake lets the saw “walk” after release |
The field trap here is the guard that passes a visual check but fails under load. Sawdust and resin pack into the hub, and the lower guard returns sluggishly at the one moment it is needed — when you lift the running saw off the work.
Why You Must Never Tie Back or Wedge the Lower Guard
Tying back the lower guard is the single highest-risk thing an operator can do to a circular saw, and it is the most common serious violation. The frustration is real: on thin offcuts and steep bevels, the guard catches on the edge of the work and stalls the cut.
The answer is not to defeat it. Every portable saw has a guard lift lever (the small retracting tab near the handle) — use a thumb to ease the guard up at the start of the cut, then release it so it returns on its own. A guard wedged open with tape, a zip-tie, or a jammed twig has no way back, and the exposed blade keeps spinning across your body line every time you set the tool down.
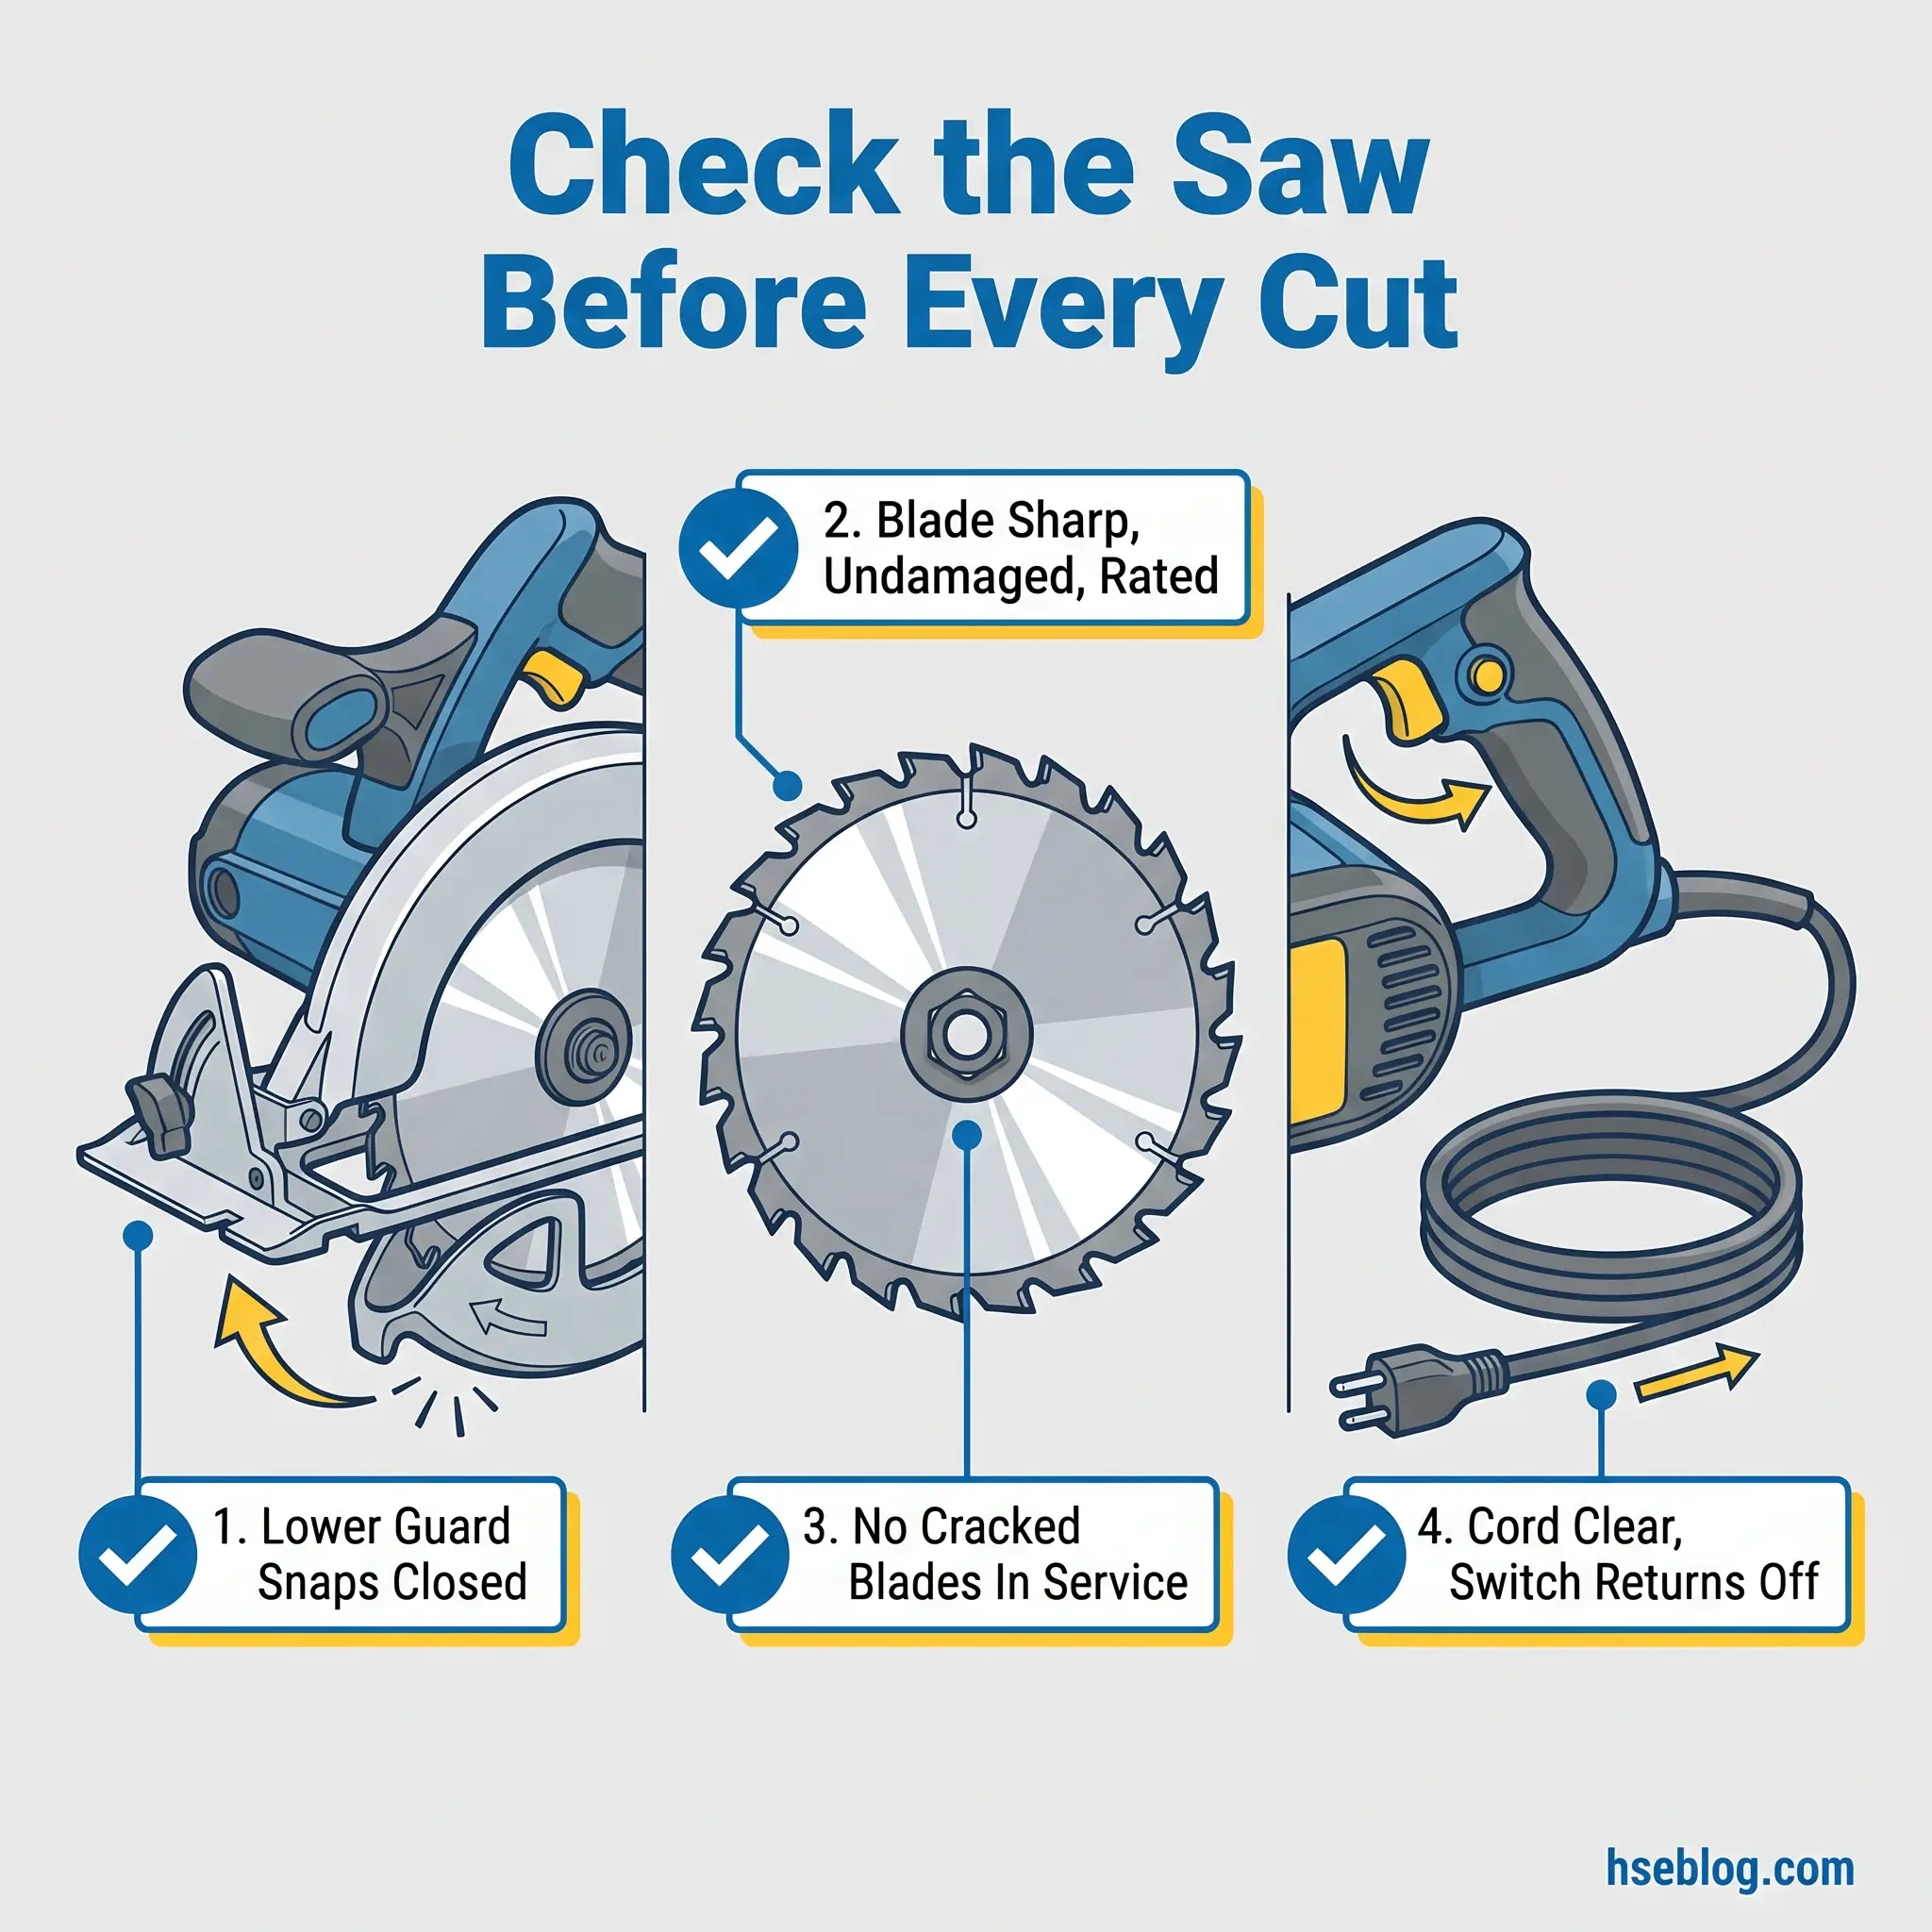
Pre-Operation Checks: Inspecting the Saw, Blade, and Guard Before Each Cut
The single check most likely to save a hand is also the one most often skipped: confirming the lower guard snaps fully closed under spring tension before the cut. A pre-use inspection is short, and each step maps to a specific hazard.
Guard checks
- Lower guard moves freely and snaps closed. Lift it by hand and release — it must return instantly, with no debris in the hub.
- Spring tension intact. A weak or stretched spring is the difference between a guard that closes and one that lags.
Blade checks
- Correct blade for the material, sharp and undamaged, with the right arbor size and a seated washer/flange.
- RPM rating equals or exceeds the saw’s no-load speed. An under-rated blade can shatter.
- Cracked blades come out of service. This is mandatory, not a judgment call — a hairline crack ends in a thrown fragment.
Power and set-up checks
- Cord or extension lead is clear of the cut path; on cordless, confirm the brake engages.
- Trigger switch returns cleanly to off when released.
In practice the “check before each cut” instruction quietly degrades into “check at start of shift.” The reason it is written per-cut is the bent lower guard from a saw dropped mid-shift — exactly the damage a start-of-shift check never catches.
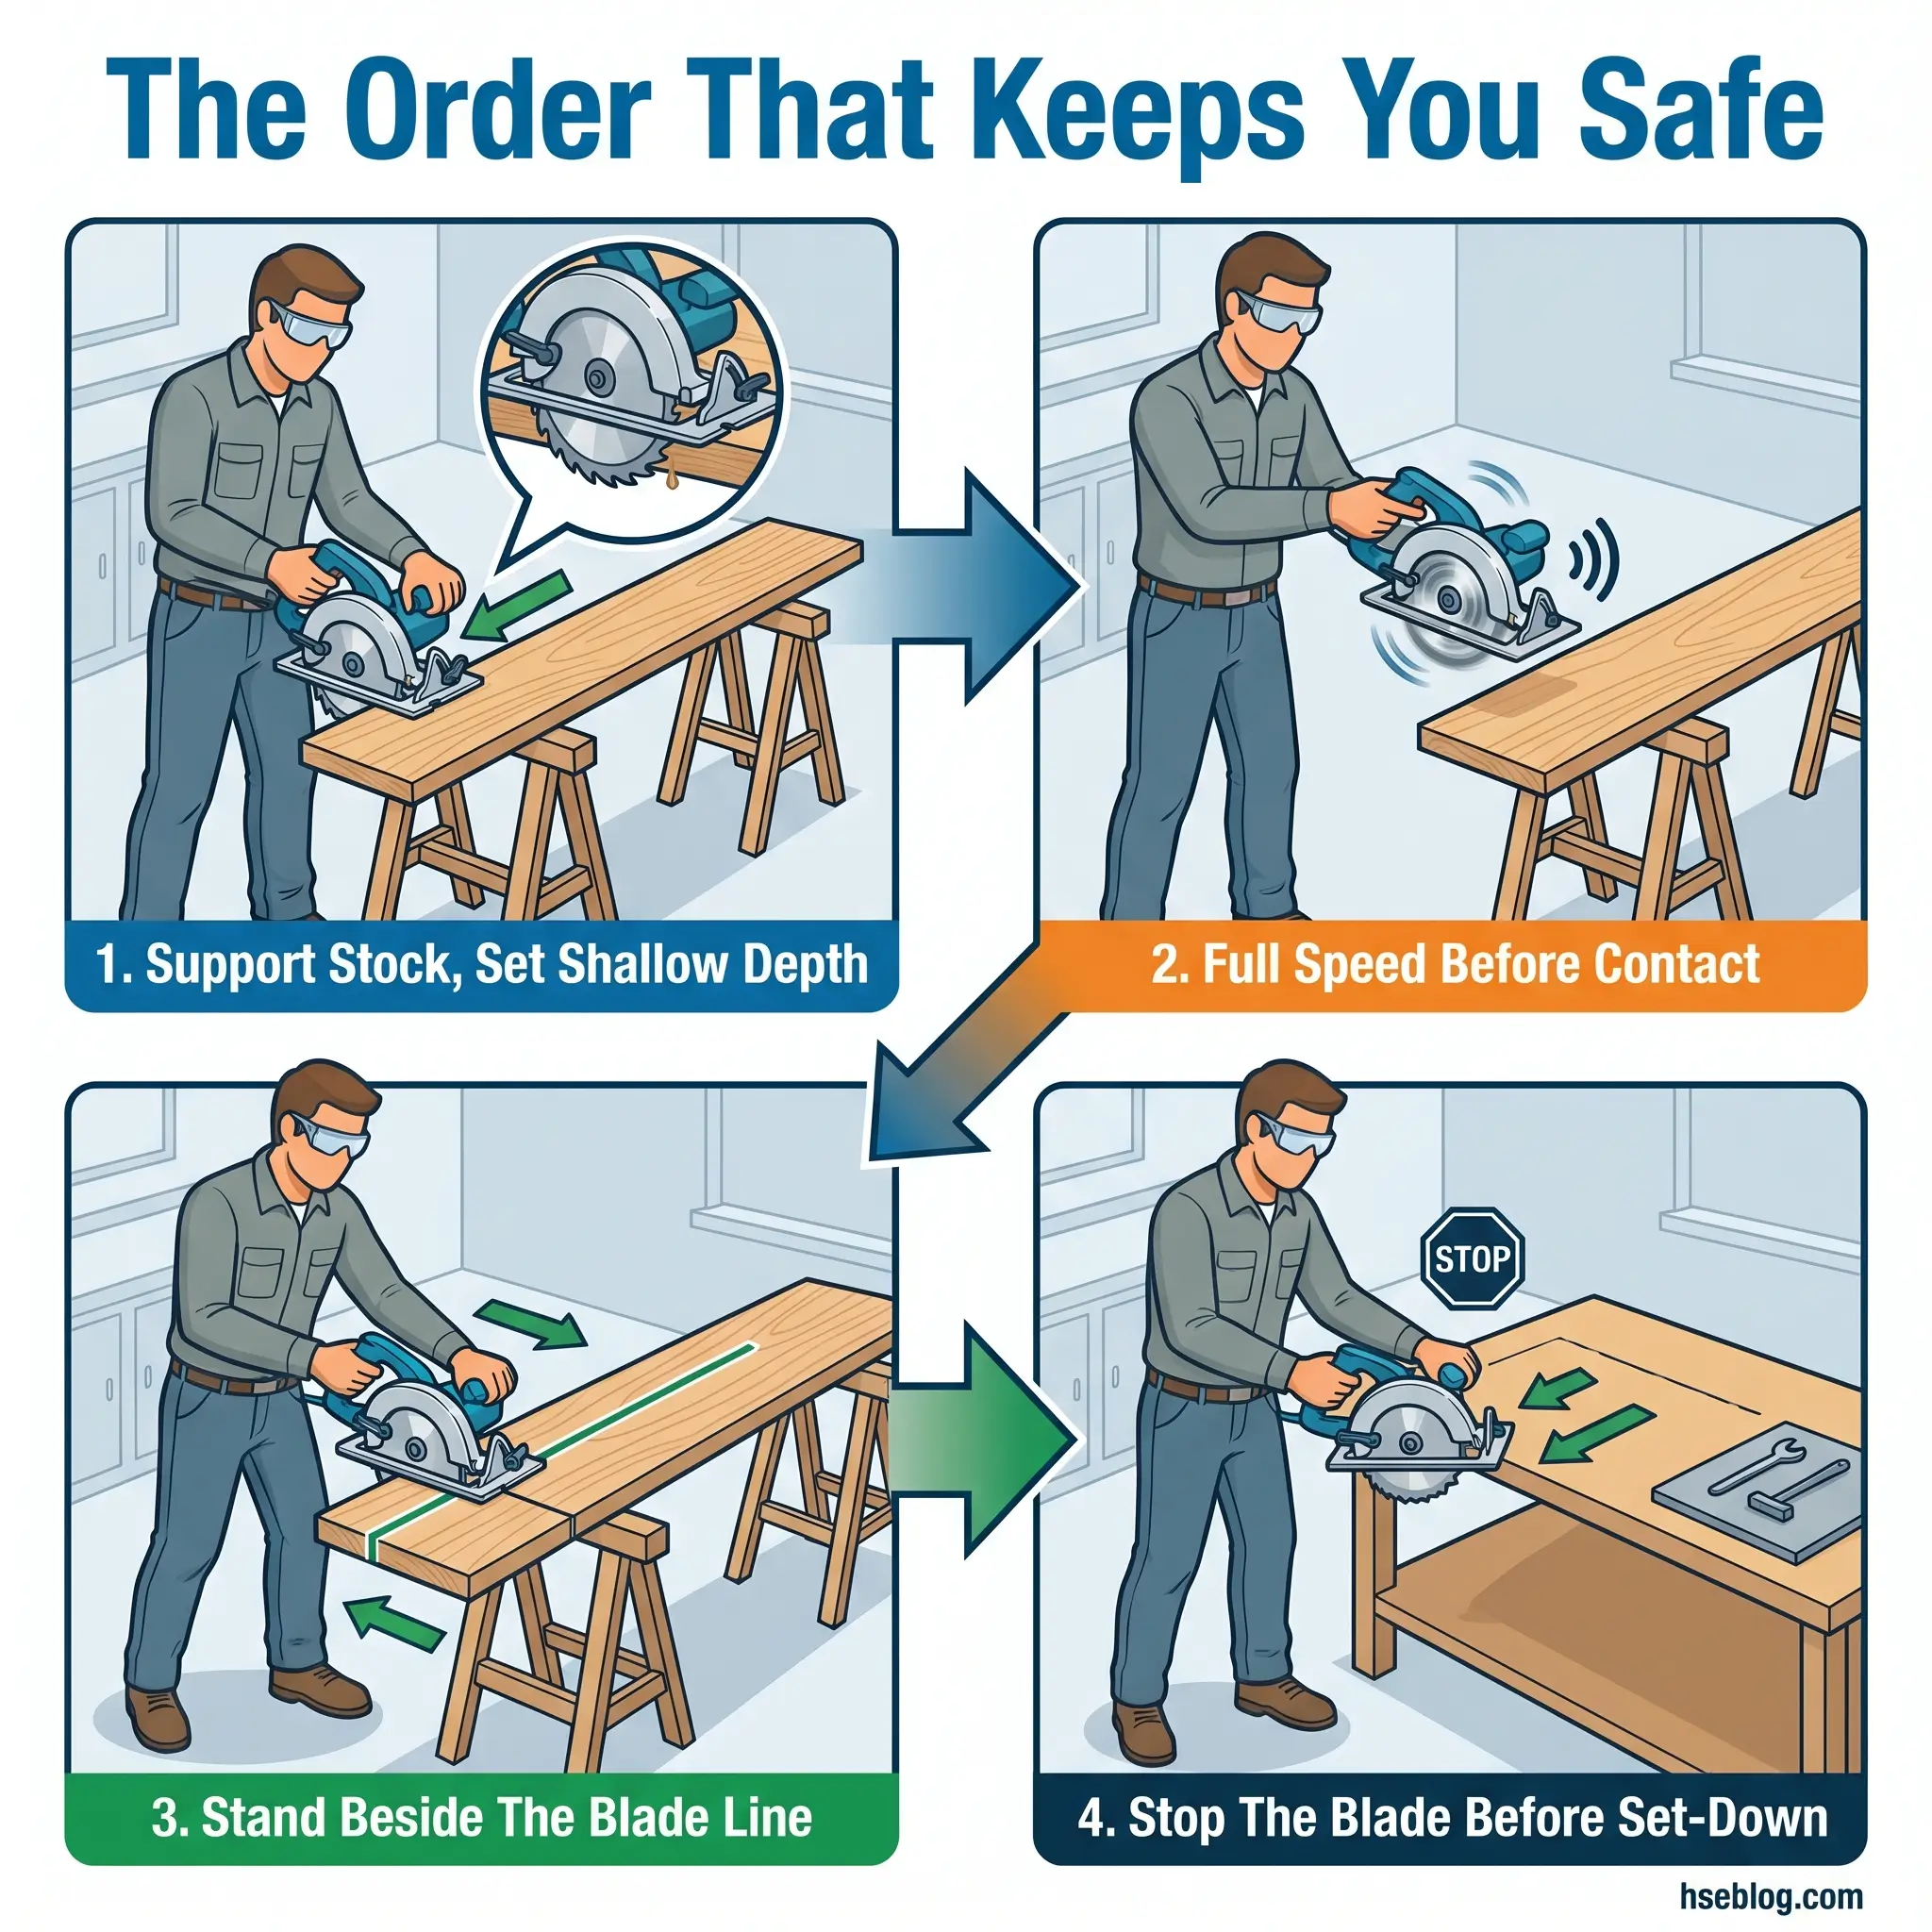
Safe Operating Procedure: Step-by-Step Circular Saw Use
A correct circular saw operating procedure runs in one direction — set up, cut, complete, set down — and the discipline is in the transitions, not the cut itself. The sequence below mirrors CCOHS guidance on safe circular saw operation and is written so it could seed a method statement.
- Support the workpiece on both sides. On large panels, prevent sag — unsupported stock closes the kerf and pinches the blade. Never freehand small offcuts.
- Set the blade depth shallow. Adjust so the blade projects only about a tooth’s depth — commonly cited as around a quarter inch — below the material. This limits exposed blade and reduces the pinch surface.
- Bring the blade to full speed before contact. Starting the cut against the work loads a stationary blade and invites a jolt.
- Position your body to the side of the blade line, never directly behind it. Use both hands, keep your footing, and never overreach.
- On a partial cut or power loss, release the trigger and let the blade stop fully before withdrawing. Pulling a running blade backward out of a kerf is a classic kickback trigger.
- Wait for the blade to stop before setting the saw down, and never carry the saw with the trigger live or the blade turning.
- Never reach under the shoe or workpiece to clear offcuts while the blade is moving.
The pattern that injures people here is the “walking saw.” A blade still coasting when the tool is set on the bench drives the saw across the surface, cutting cord, hand, or whatever is in its path — which is exactly why the blade-brake habit and the set-down rule are non-negotiable.
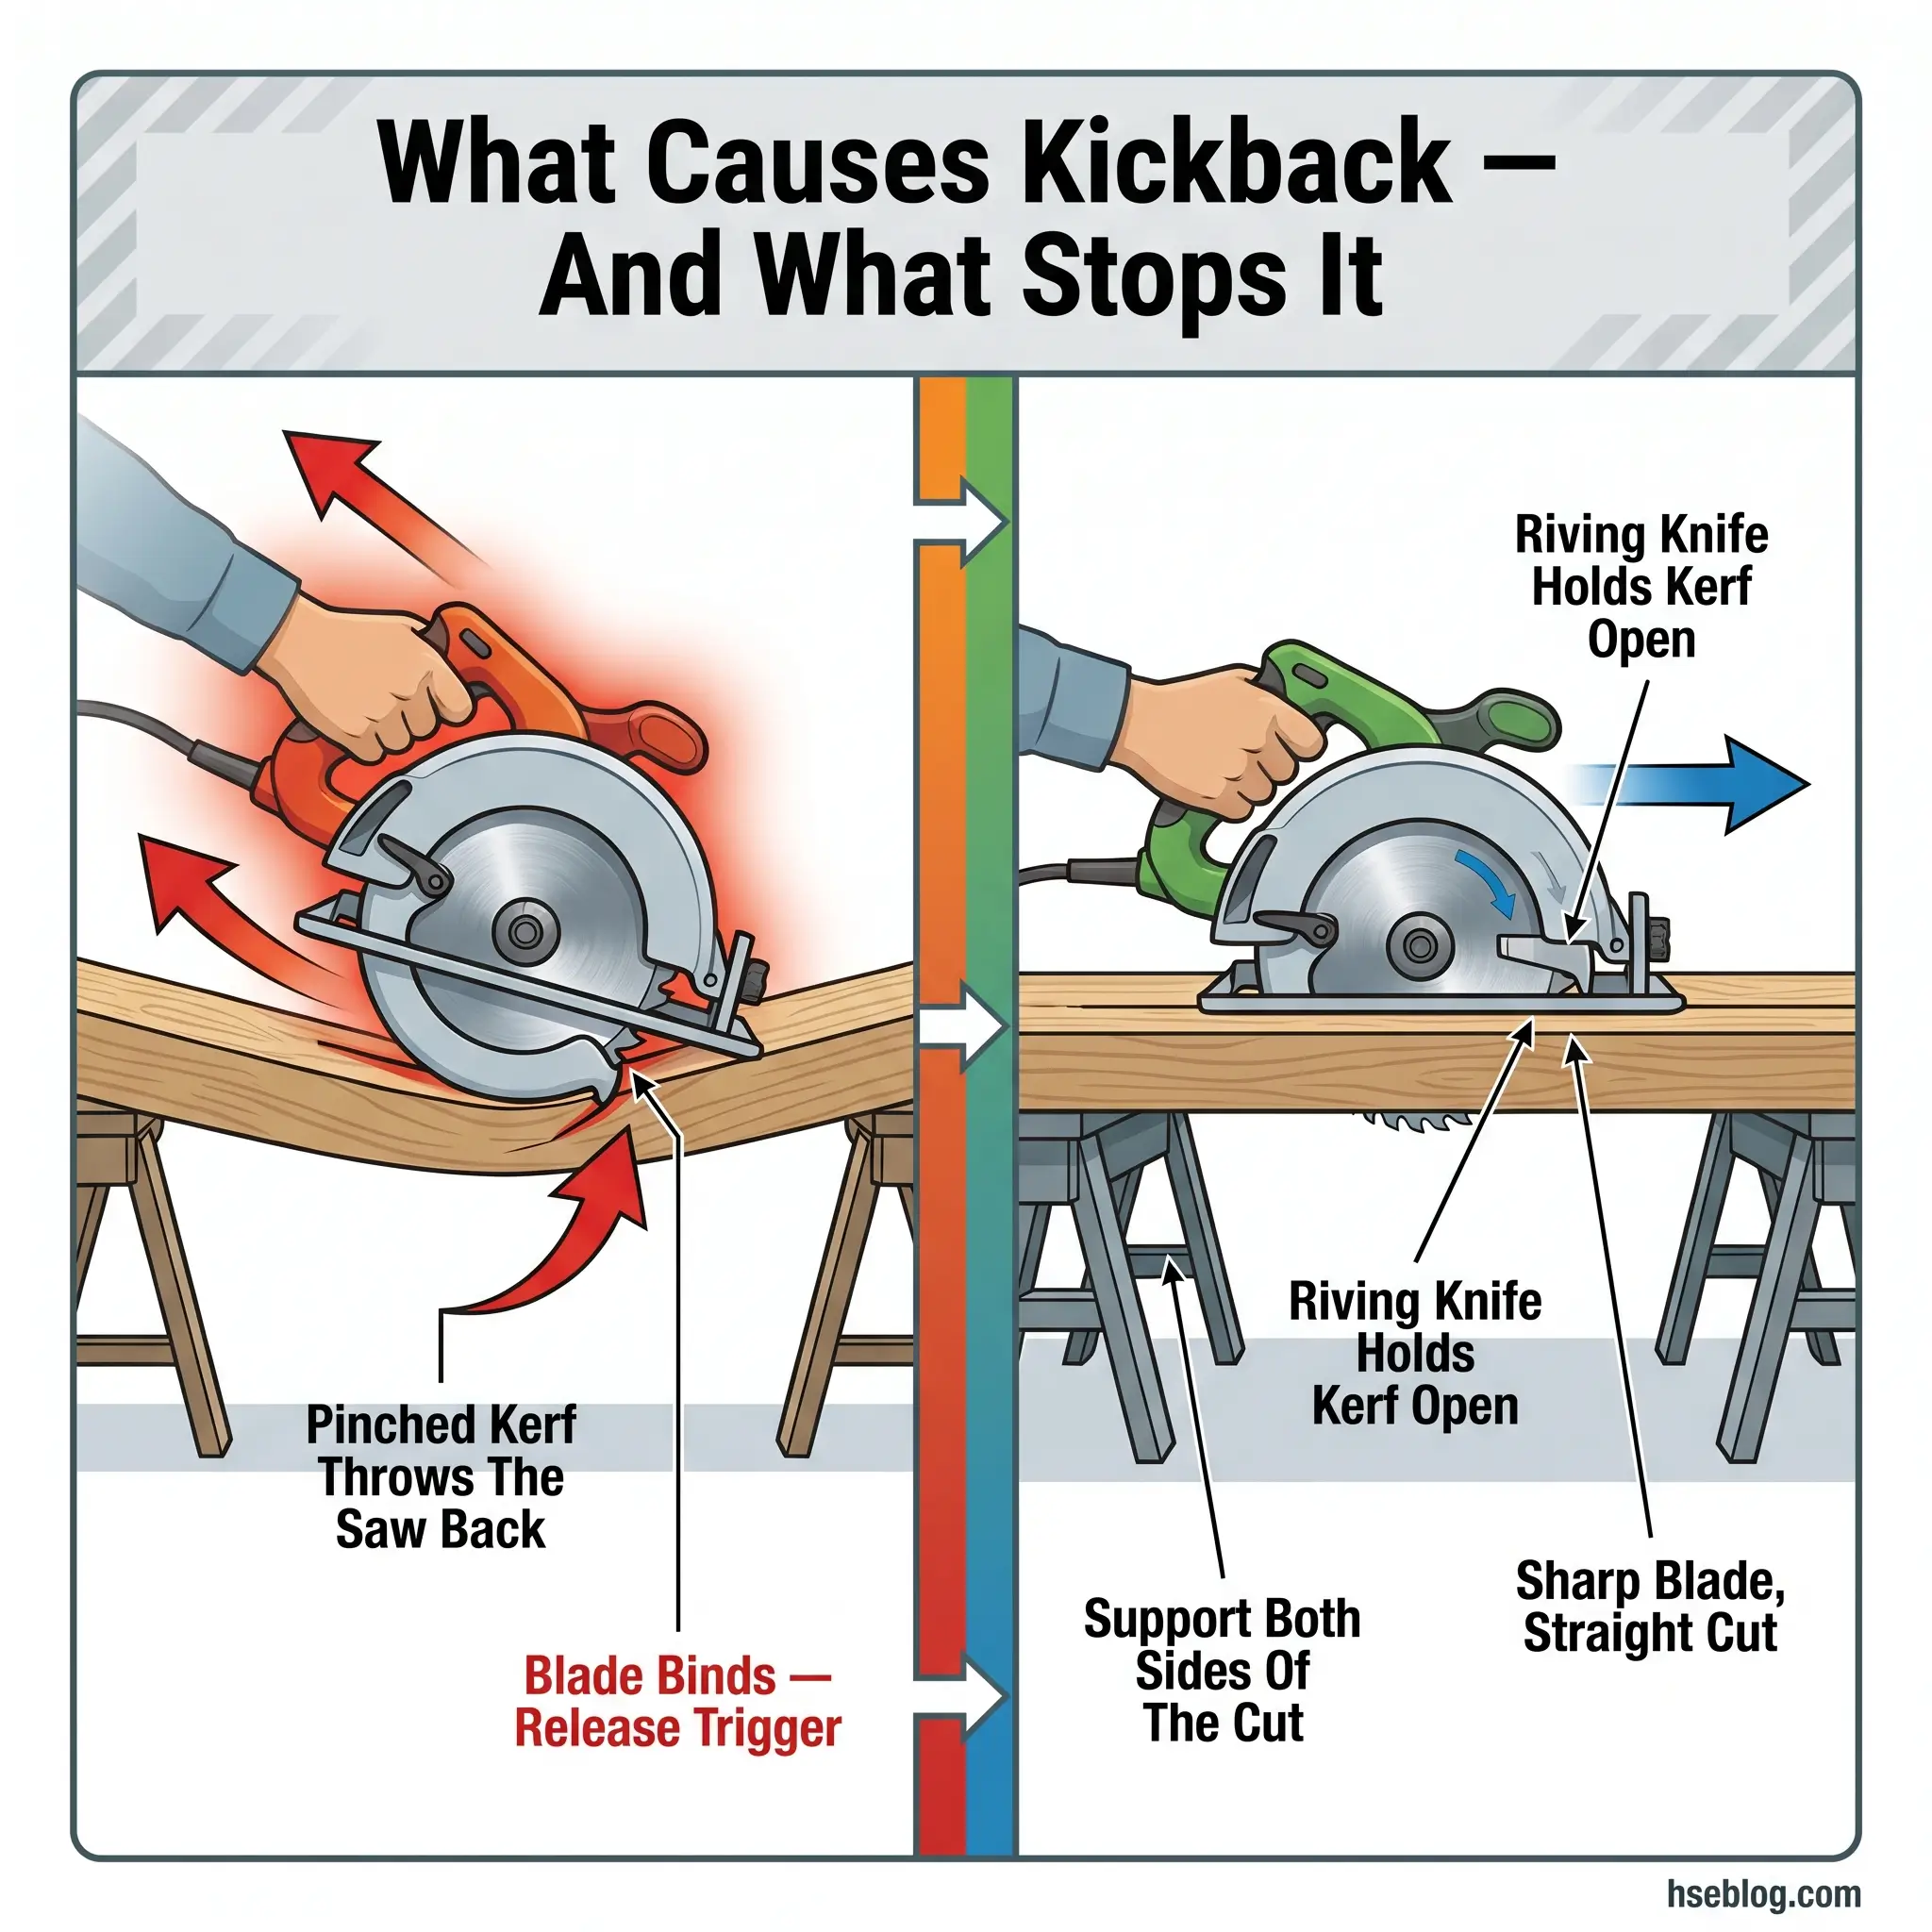
How Do You Prevent Circular Saw Kickback?
Prevent circular saw kickback by keeping the blade sharp and clean, using a riving knife, and setting the blade to project only about a tooth’s depth below the material. Support the workpiece fully on both sides, cut in straight lines, and never withdraw a spinning blade backward — and if the blade binds, release the trigger immediately.
Kickback is not one event. It splits into two mechanisms, and the controls differ slightly between them.
Pinch kickback
The kerf closes on the blade as the cut progresses — usually because the workpiece sags, warps, or is unsupported on the offcut side. The riving knife is the primary defense, holding the kerf open behind the blade.
Bind kickback
The blade jams from misalignment, a dull or gummed edge, or twisting the saw in the cut. A sharp blade with proper tooth set and a straight, unforced cut prevents most of it.
Ripping along the grain is higher-risk than crosscutting because the longer cut gives the kerf more chance to close — a point reinforced by OSHA’s woodworking kickback eTool.
If the blade binds mid-cut:
- Release the trigger immediately — do not muscle through it.
- Do not pull the saw backward while the blade is turning.
- Find and fix the cause — re-center the blade in the kerf, add support — before restarting.
The recurring misattribution worth flagging: “the saw jumped.” More often the root cause was an offcut left unsupported, sagging closed on the blade. The tool gets blamed for what was a workpiece-support failure.
PPE for Circular Saw Use: What to Wear — and What Not to Wear
Across the incident record, PPE rarely prevents the serious circular saw injury — it sits at the bottom of the hierarchy of control, below guarding and safe procedure, and it is the last layer, never the first. The right kit still matters, but the most dangerous saw on site is a well-guarded one used by someone treating goggles as their main safeguard.
| PPE item | Status | Note |
|---|---|---|
| Eye protection | Required | Safety glasses with side shields, or goggles |
| Hearing protection | For sustained use | Cumulative noise from extended cutting |
| Respiratory protection | Material-dependent | Wood dust is a sensitizer and carcinogen risk |
| Loose gloves | Often not advised near the blade | Entanglement risk — defer to task risk assessment |
| Loose clothing / jewelry | Remove | Entanglement; tie back long hair |
The glove point deserves care. A loose glove near a rotating blade is an entanglement hazard, so a blanket “always wear gloves” instruction can increase risk — the call belongs to the manufacturer guidance and the employer’s task risk assessment, not a slogan.
The misconception to correct directly: PPE is not the primary safeguard. A guarded saw used barehanded but correctly is safer than a saw with full PPE and a guard tied open.

Blade Selection and Maintenance: Matching the Blade to the Cut
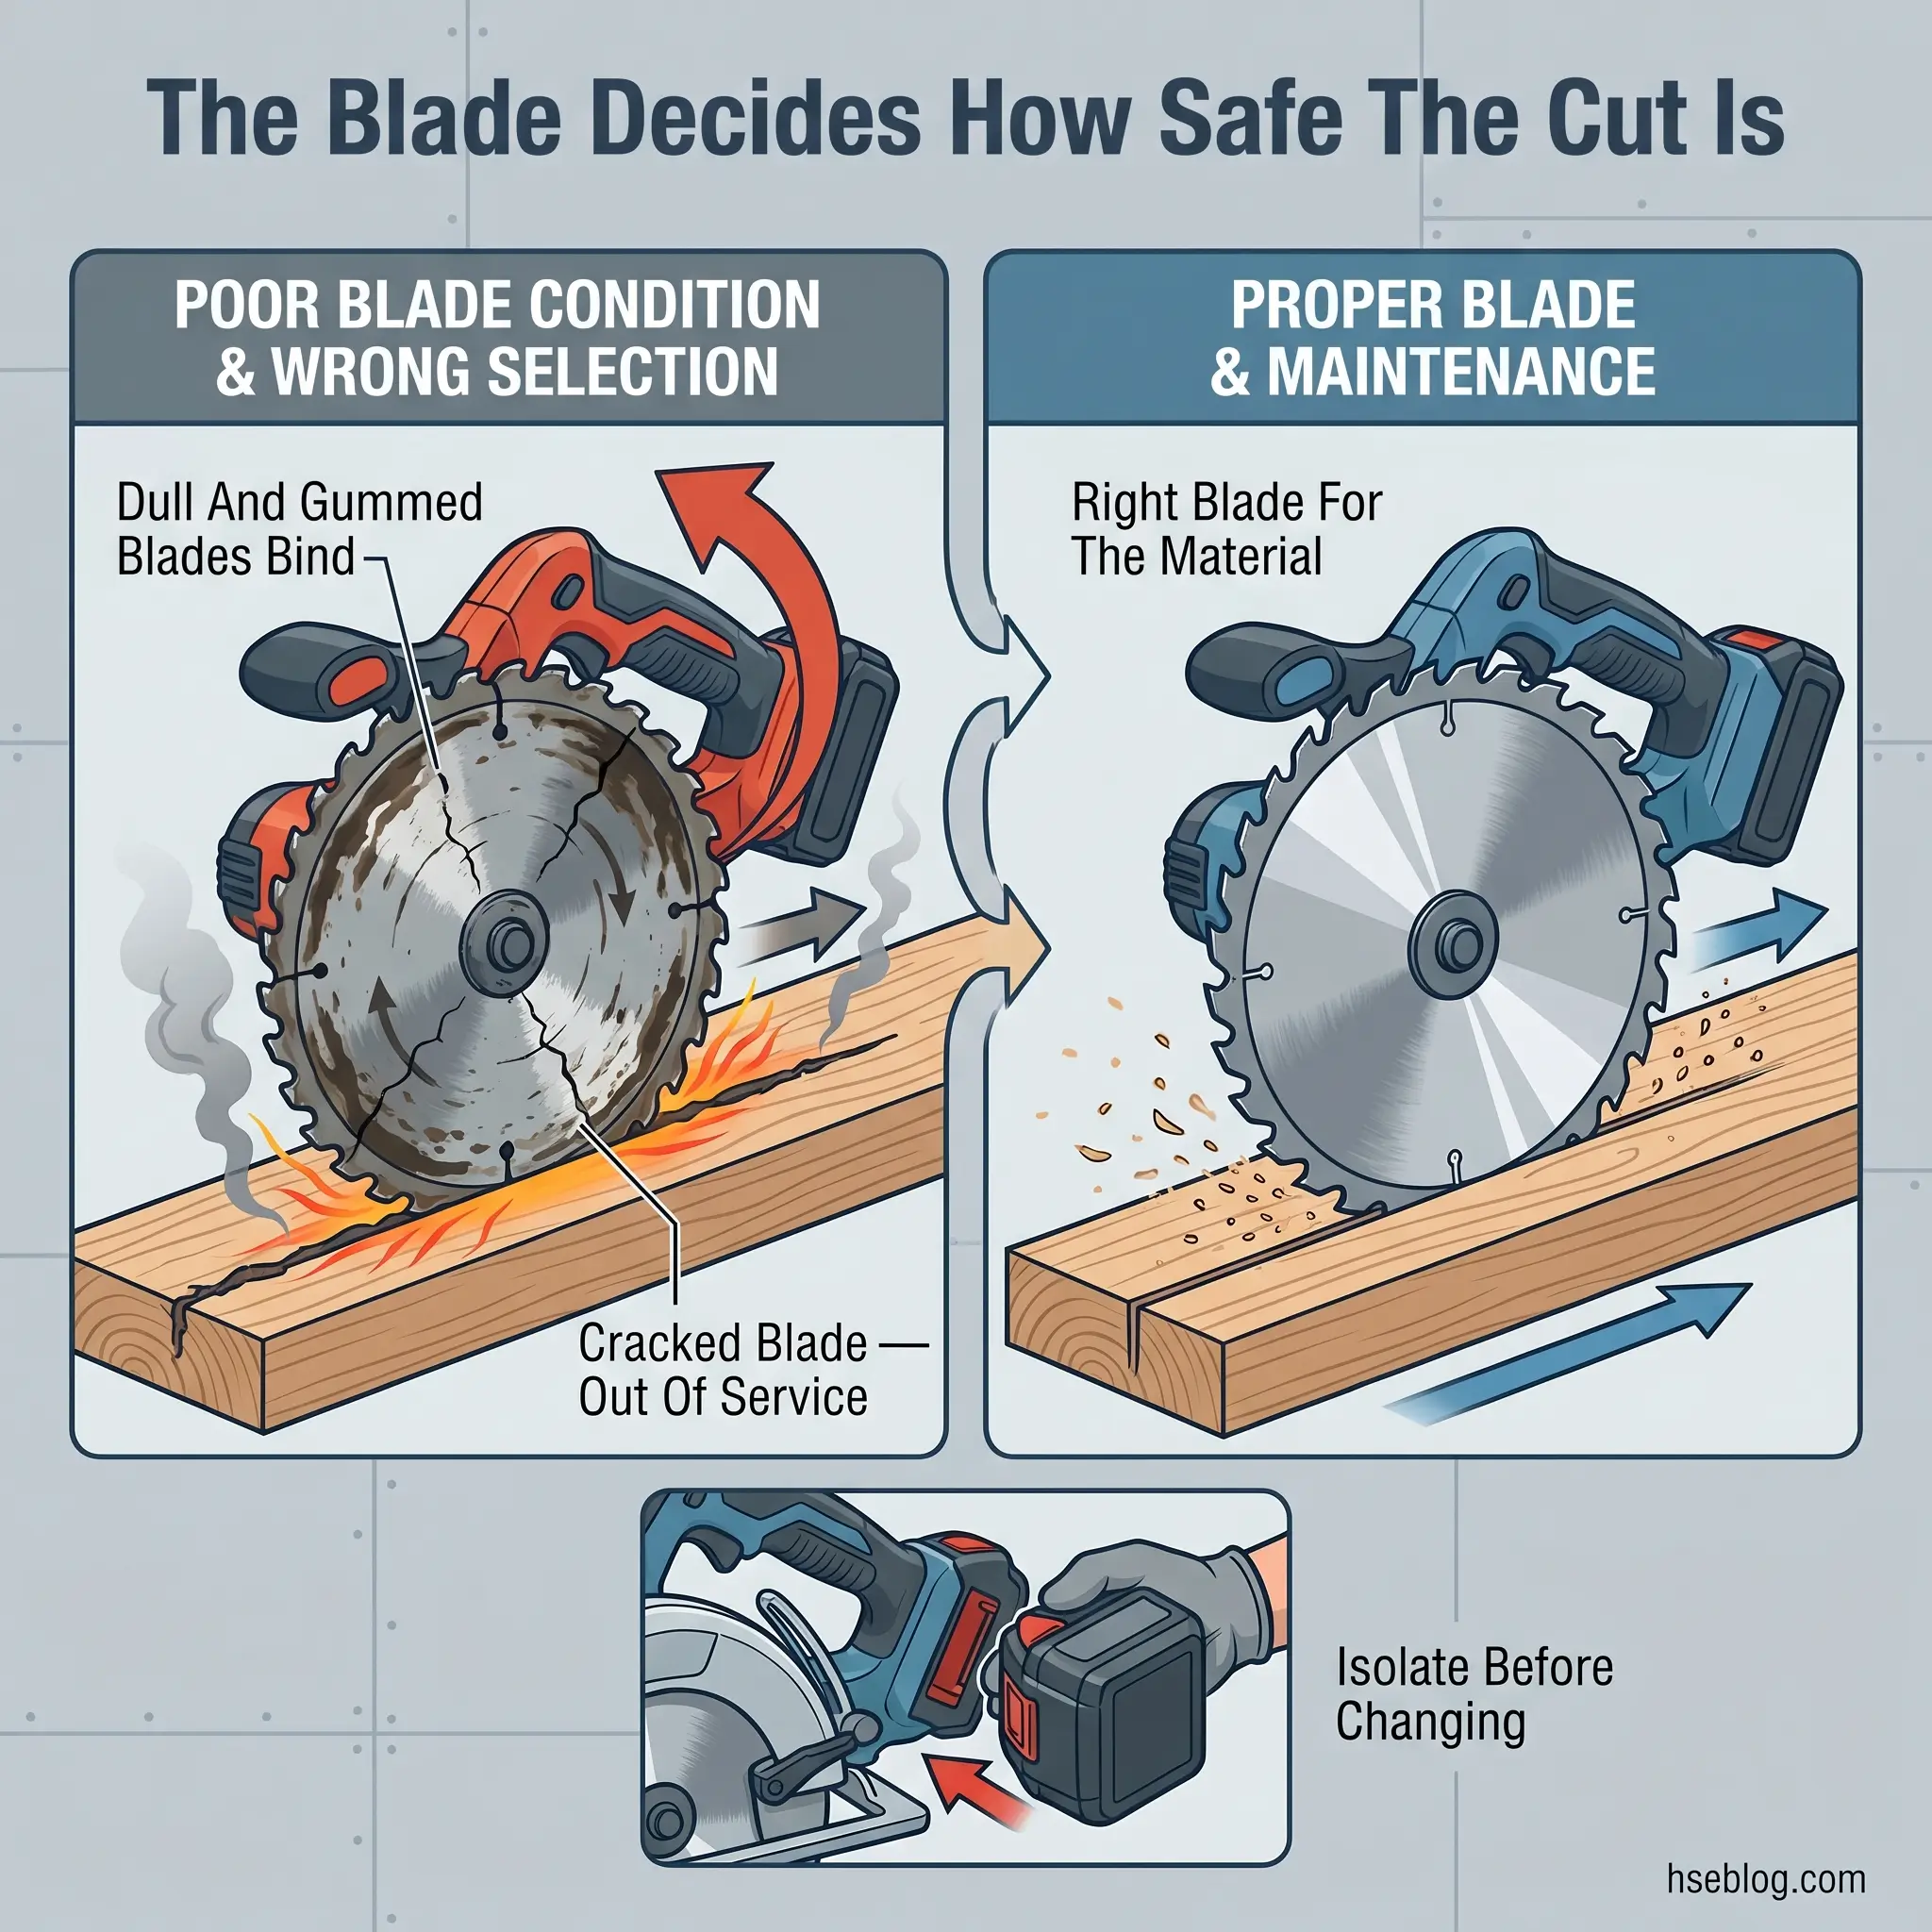
A dull or wrong blade is a kickback waiting to happen, not just a slow cut. Blade condition links directly to the hazard set: dull and gummed blades bind, stall, overheat, and warp — and a warped blade pulls in the kerf.
- Match the blade to the material and the cut. Crosscut, rip, and material-specific blades are not interchangeable, and no blade should run beyond its rated capacity.
- Keep the blade sharp and clean. Resin buildup increases friction and heat; a hot blade distorts and binds.
- Confirm correct arbor fit and seated flanges. A blade that is not concentric runs out and chatters.
- Remove cracked blades from service immediately. A fractured blade at speed becomes a projectile.
- Isolate before changing blades. Unplug or remove the battery first, then clean the guard hub and store blades dry.
The false economy I see repeatedly is a crew running a blade well past its useful life to dodge a change-out, then blaming the resulting bind on the timber. The blade was the cause; the workpiece took the blame.
Regulatory Requirements and Competent-Person Duties: OSHA, PUWER and Training
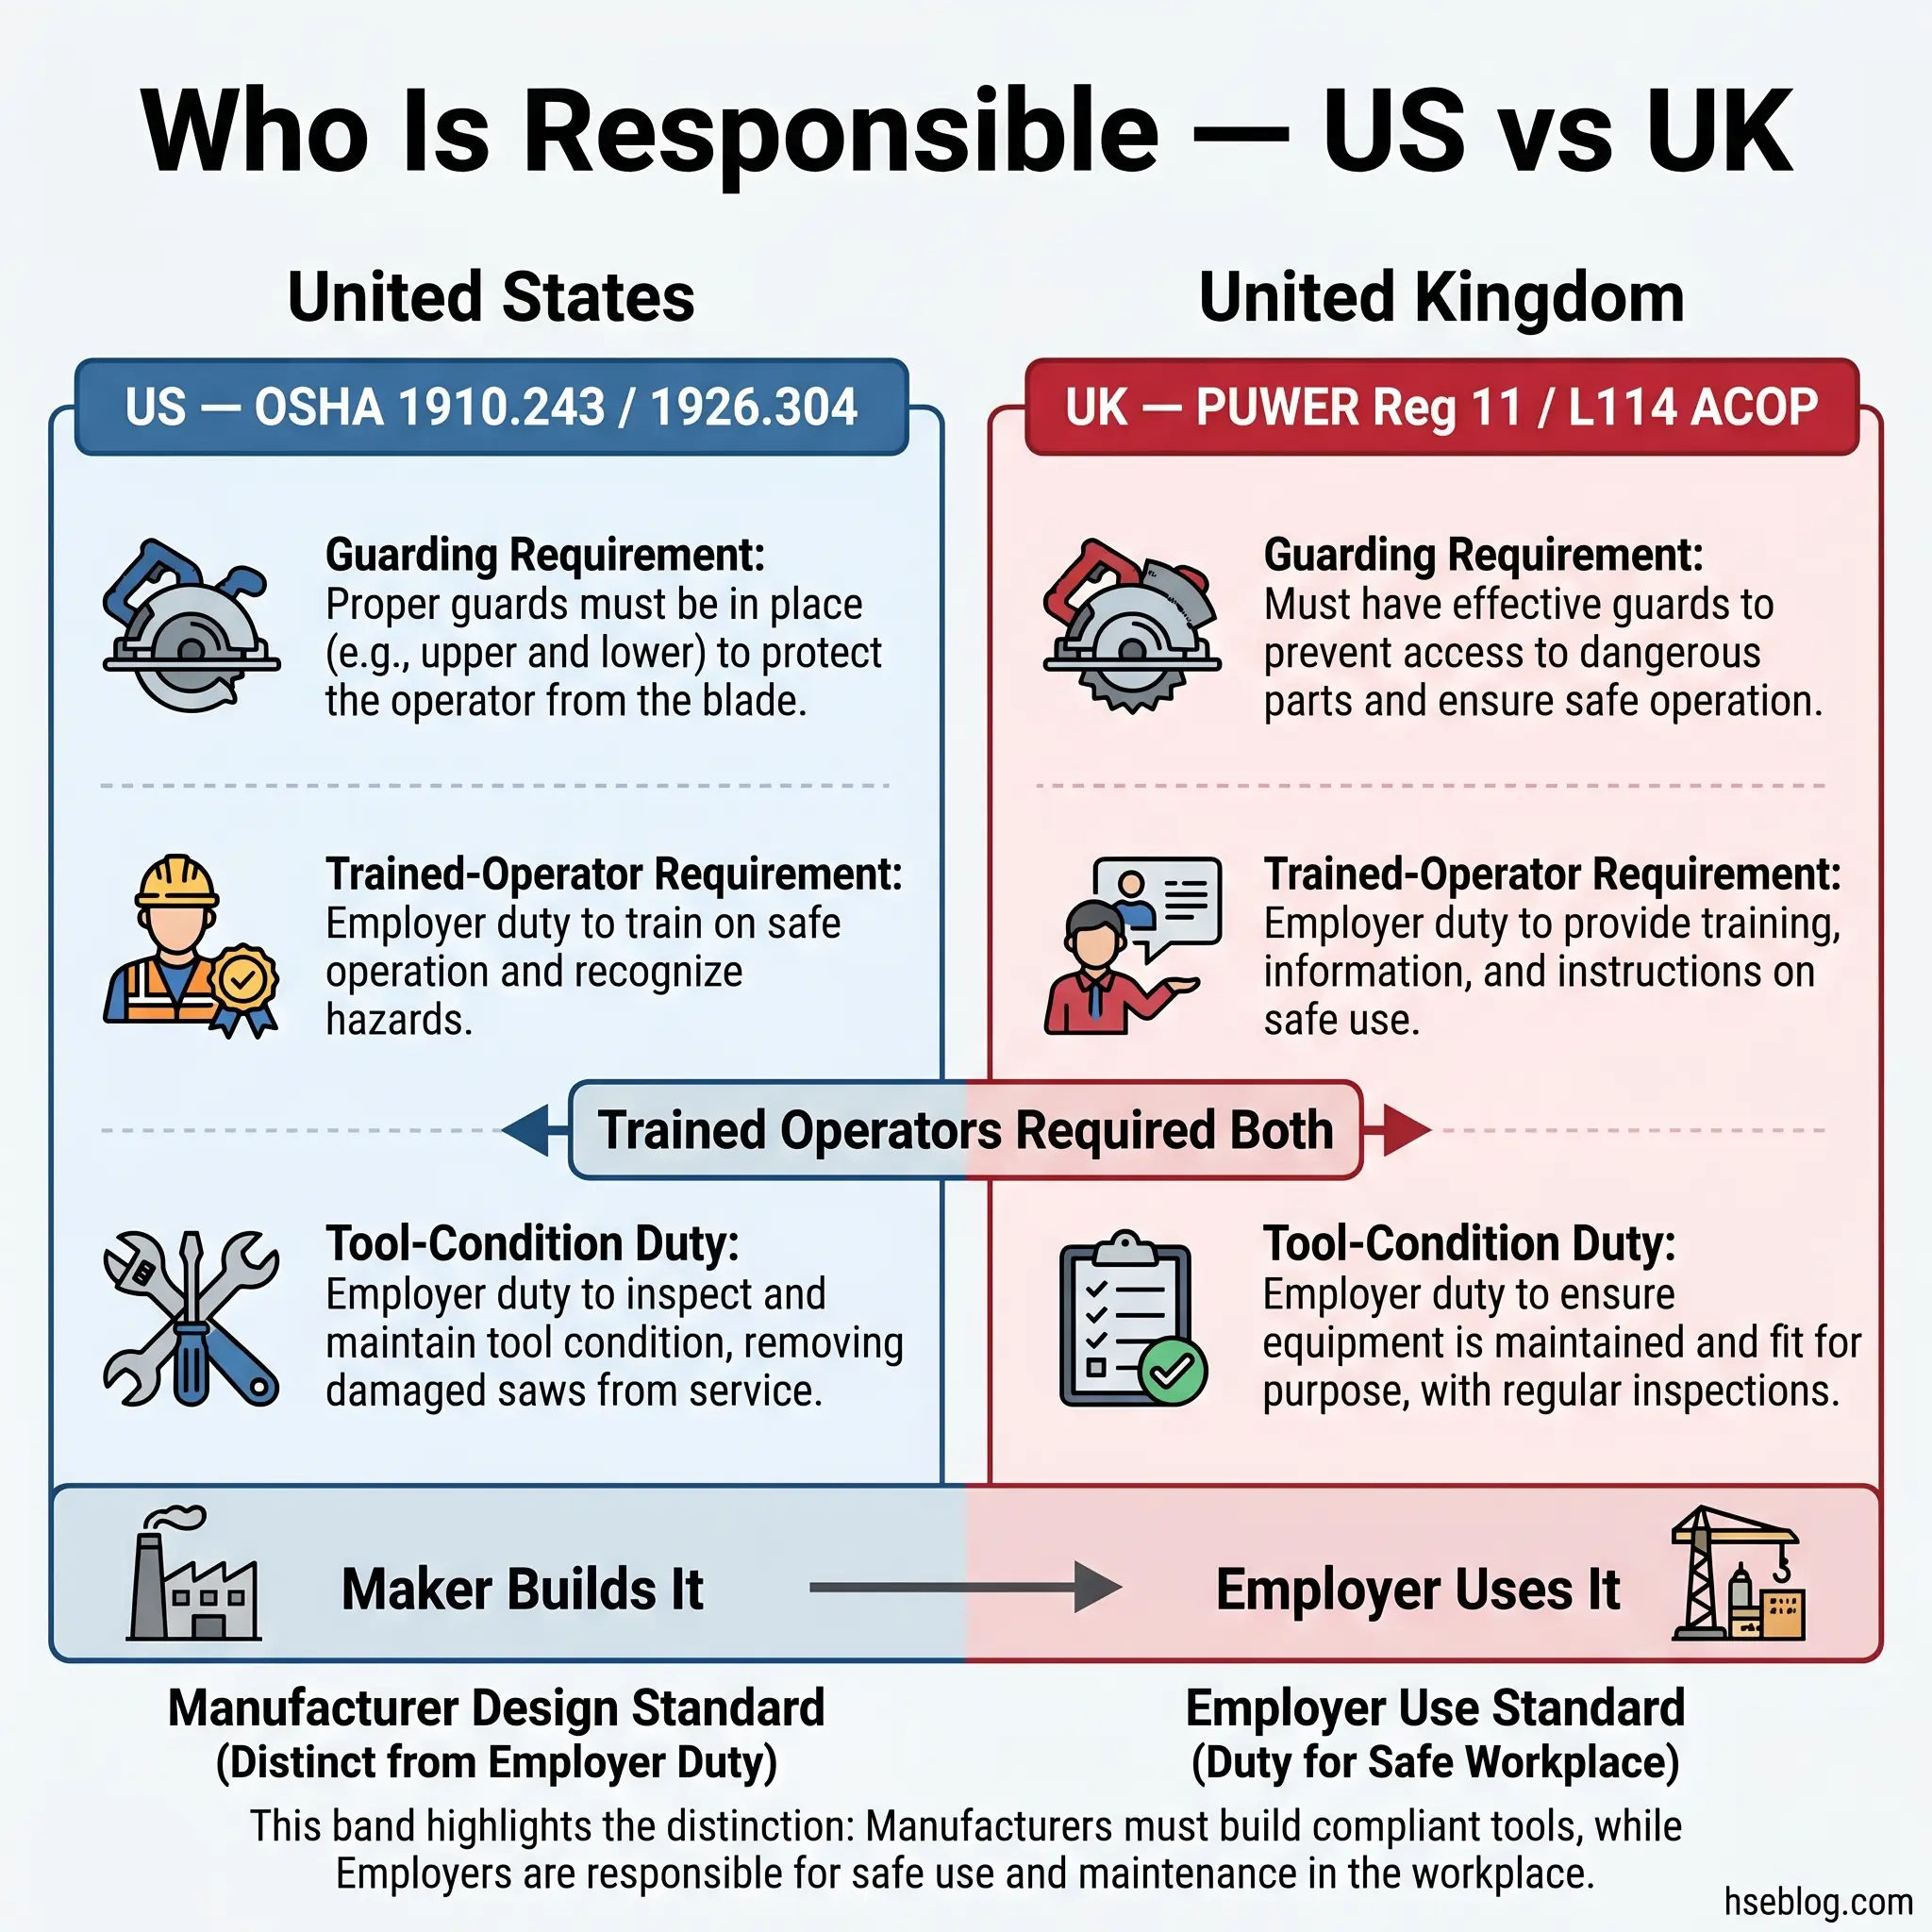
The law splits cleanly into two layers: what the manufacturer must build, and what the employer must do with it. A perfectly compliant saw can still be operated unlawfully if the employer fails its use, maintenance, or training duty.
Regulatory content here reflects general HSE professional understanding of US and UK requirements as of 2025. It is not legal advice. Specific compliance questions, enforcement situations, or prosecution risk should be directed to qualified legal counsel in the applicable jurisdiction. Regulatory content last reviewed: [Month YYYY — to be filled at publish].
| Layer | United States (OSHA) | United Kingdom (HSE / PUWER) |
|---|---|---|
| Guarding requirement | 1910.243(a)(1) (general industry); 1926.304(d) (construction) — upper and lower guards on blades over 2 in., lower guard self-returns instantly | PUWER 1998 reg 11 — prevent access to dangerous parts as far as possible; where the blade can’t be enclosed, use a safe system of work |
| Tool condition | 1926.300(a) / 1910.243 — tools maintained in safe condition | PUWER — equipment maintained, inspected, suitable for use |
| Operators | Trained and authorized persons | Use restricted to trained and appointed persons; L114 ACOP for woodworking machinery |
| Design standard | (Employer use-standard, not design) | EN/IEC 62841-2-5 governs manufacturer construction — verify current edition |
The practical reading on most sites: the stricter operational requirement — a per-cut guard check and a trained-operator restriction — should govern regardless of which jurisdiction you sit in. The HSE notes the woodworking sector carries a major-injury rate above the manufacturing industry average (HSE, L114), which is why the UK leans hard on the safe-system-of-work duty. The HSE Woodworking Information Sheets and circular saw poster are the UK-side primary references.
Training is a legal duty, not a courtesy — and “assumed experience” is not a defense. A 2025 OSHA enforcement matter (Secretary of Labor v. Sunbelt Rentals Scaffold Services), arising from a battery circular saw hand injury, has been cited in industry summaries as a reminder that prior experience does not satisfy the duty to provide hazard-specific saw training. Recognized pathways — NEBOSH, IOSH, and OSHA outreach training, or regional equivalents — are how that duty is usually met.
Where Circular Saw Guarding Falls Short: Active Injury Mitigation and Its Limits
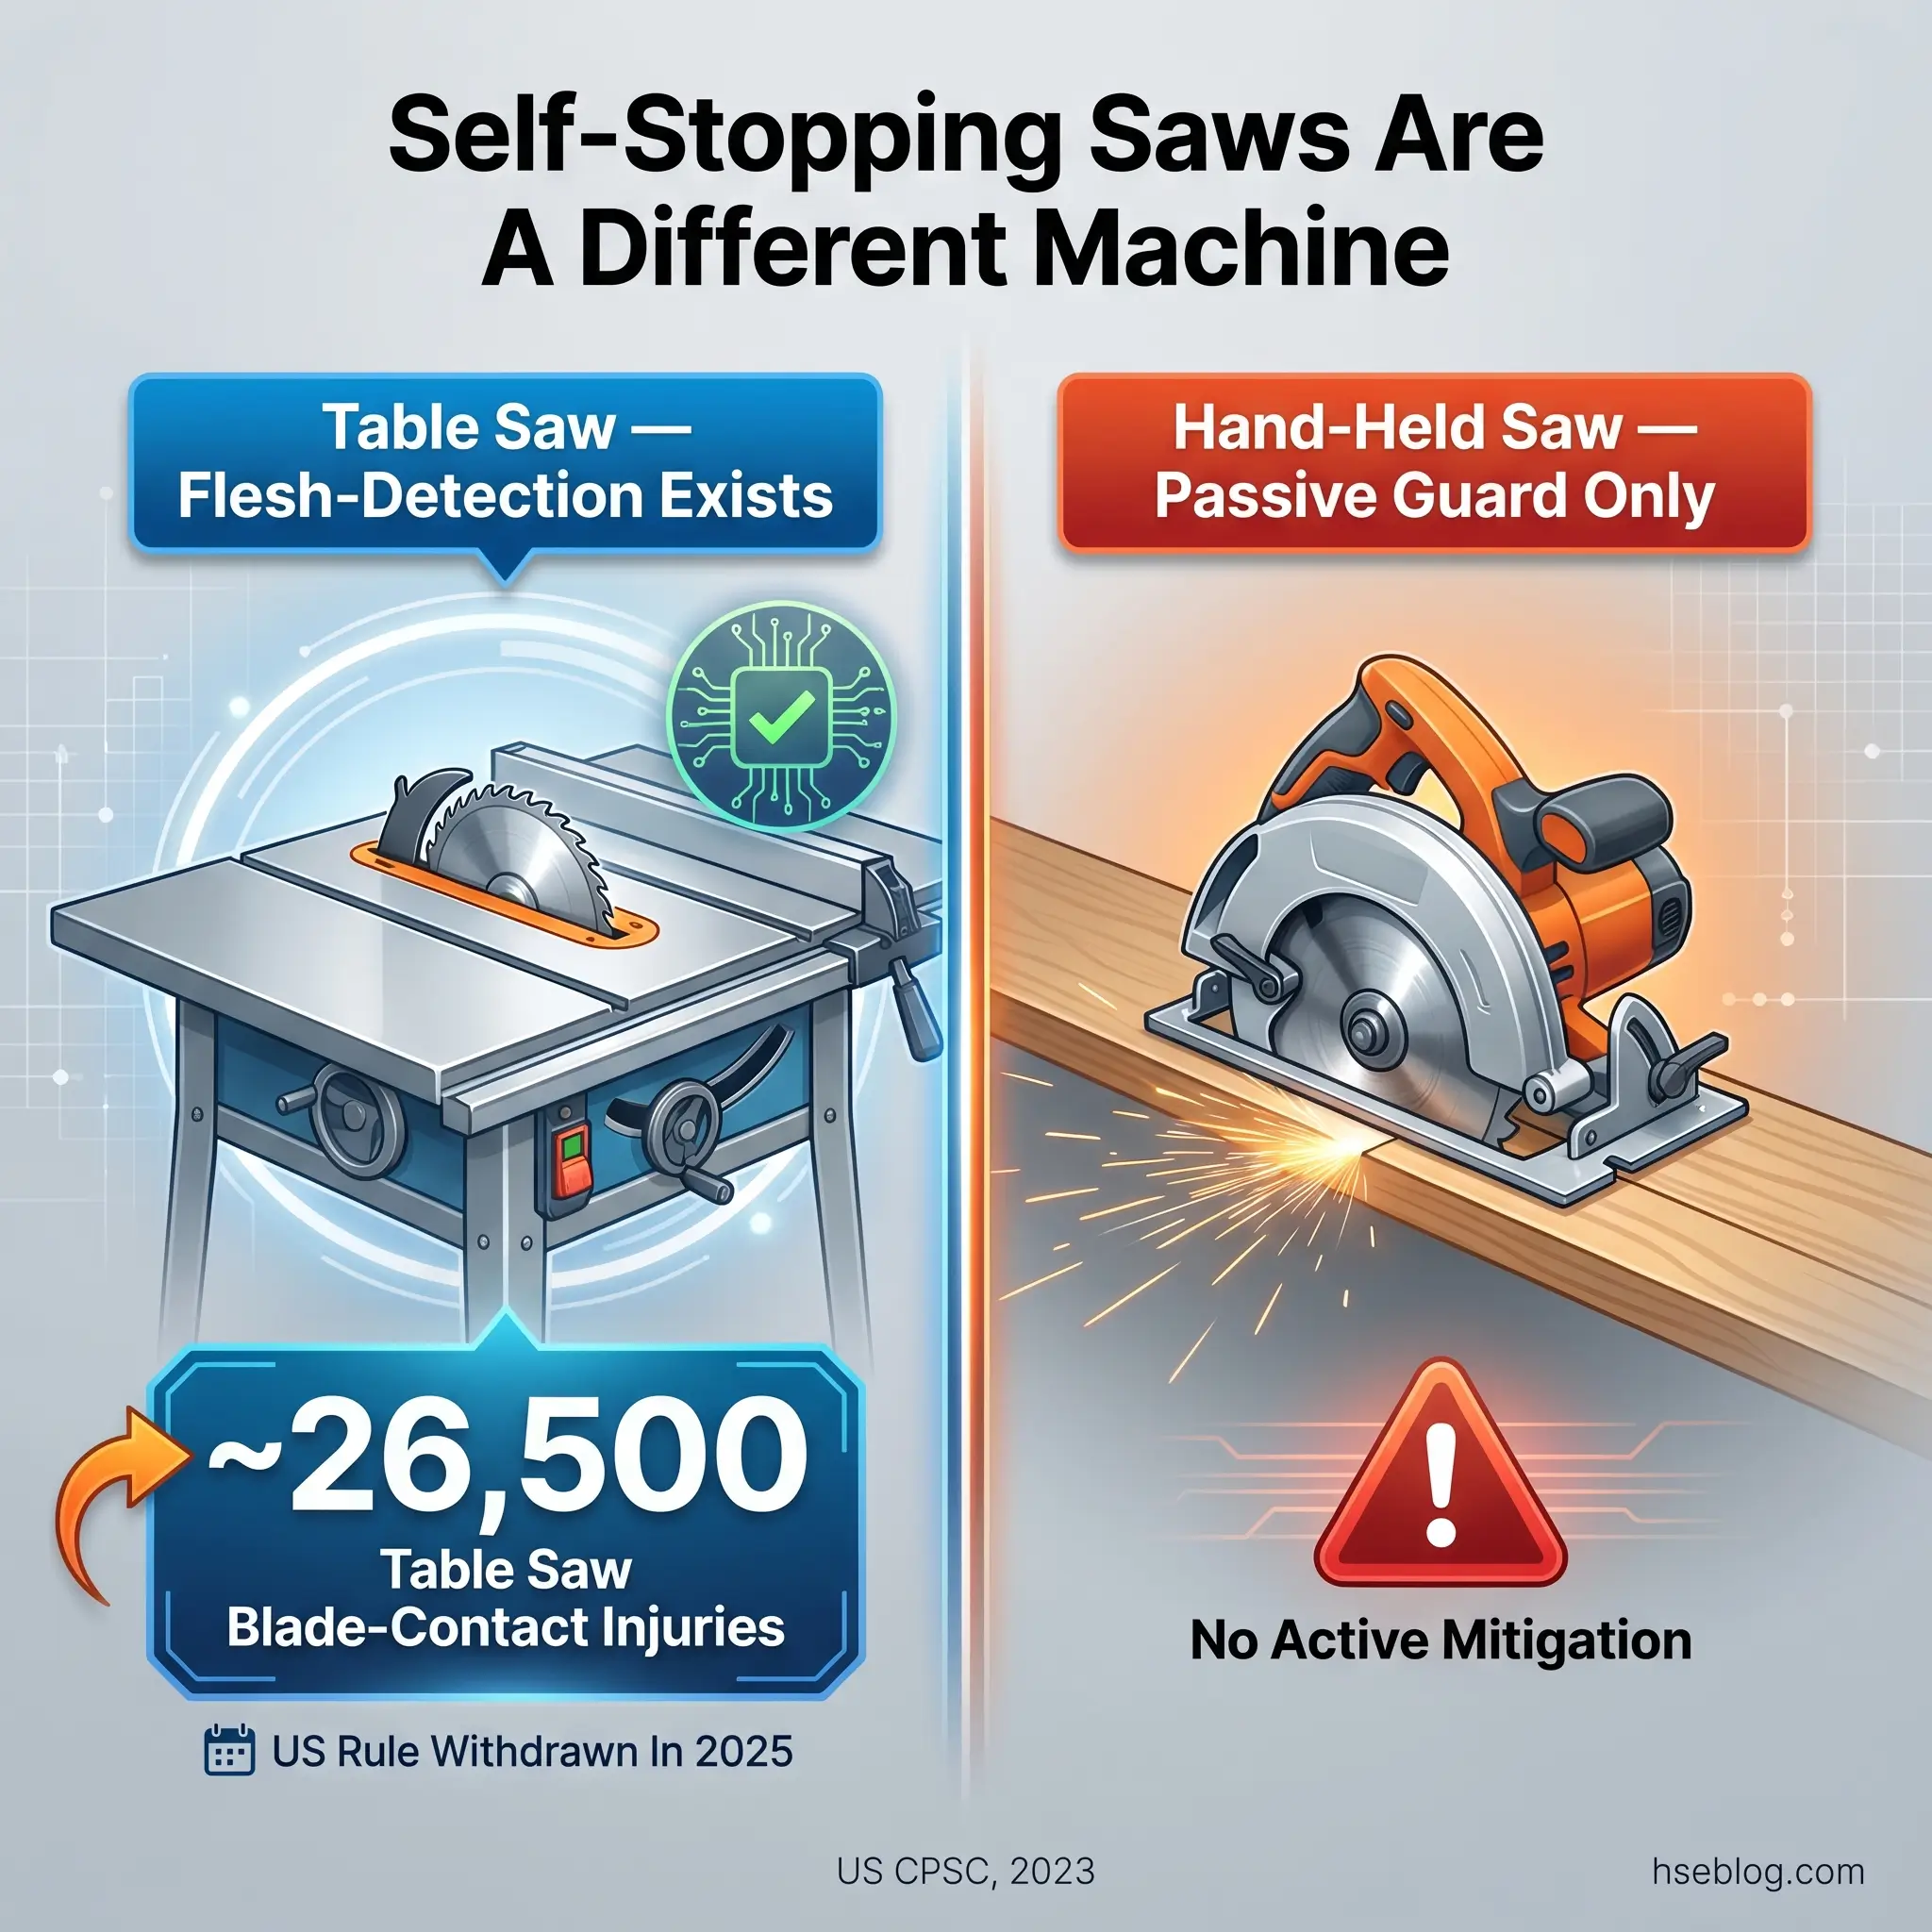
The honest limit of the portable circular saw is this: passive guarding cannot prevent contact at the point of cut, so procedure remains the primary control — there is no flesh-detection technology on a hand-held saw. That gap is where a lot of current confusion lives.
The “self-stopping saw” headlines belong to a different machine. Flesh-detecting active injury mitigation — SawStop, and proximity systems from makers like Altendorf and Felder — exists for stationary table saws, governed in the US under a separate standard (1910.213). It is not built into the hand-held circular saw a carpenter carries.
- What your portable saw has: the retracting lower guard, the riving knife, and — on newer or cordless models — an electric blade brake that shortens coast-down.
- What it does not have: any system that senses skin and stops the blade on contact.
The scale of the table-saw blade-contact problem is what drove the regulatory debate. A CPSC special study estimated about 26,500 emergency-department-treated table saw blade-contact injuries in one year, 96.4% involving the finger and roughly 10.7% amputations — around 2,800 (US Consumer Product Safety Commission, 2023, reporting 2017 data). The agency estimated its proposed rule would have prevented or mitigated over 49,000 injuries annually (US CPSC, 2023). Those are table-saw figures, not portable-saw counts — read them as the scale of harm across the machine family.
The freshness point that resolves the confusion: in 2025 the CPSC withdrew its proposed table-saw active-injury-mitigation rule, ending the near-term federal push to mandate flesh-detection (US CPSC, 2025, via Woodworking Network). For the hand-held circular saw, the standard of care has not changed and is not about to — guarding plus disciplined procedure is the control. The dangerous assumption is letting table-saw marketing bleed across into the belief that “new saws basically stop themselves.” On the tool in your hand, they do not.
Frequently Asked Questions
Conclusion
The industry’s recurring mistake with circular saw safety is treating the guard as an obstacle to good work rather than the thing that lets the work continue tomorrow. The lower guard that gets tied back for a “cleaner” cut, the blade run a week past its life, the offcut left unsupported — these are not bad luck. They are the predictable failures behind most serious blade-contact and kickback events.
If there is one highest-impact change, it is restoring the per-cut guard check as a non-negotiable habit and pairing it with full workpiece support. Those two together neutralize the failure modes the published record keeps surfacing. Everything else — PPE, blade choice, training — is real and required, but it stacks on top of a working guard and a supported cut, not in place of them.
What has not changed, and will not in the near term, is the standard of care for the hand-held saw: passive guarding plus disciplined procedure, operated by someone trained to do it. The flesh-detection headlines belong to the table saw on the other side of the shop. The saw in your hands still depends entirely on the operator’s habits — which makes circular saw safety, in the end, a question of whether the right procedure survives the hundredth cut of the day as intact as it was on the first.