
TL;DR
- Identify every buried service before breaking ground — desktop utility records alone are unreliable. On-site detection using CAT/Genny and GPR must verify and supplement them.
- The permit to dig is a live document, not a one-time form — it requires revalidation whenever scope, location, or ground conditions change during work.
- Briefing is where most permit systems fail — the operative holding the breaker must know where the nearest service runs and what to do if struck, not just sign an attendance sheet.
- Notification failure is the single largest root cause of utility damage — accounting for approximately 24–31% of all incidents in the US (Common Ground Alliance, 2022–2024).
- Competent-person oversight is non-negotiable — both UK and US frameworks require a qualified individual with site-specific knowledge and authority to halt work.
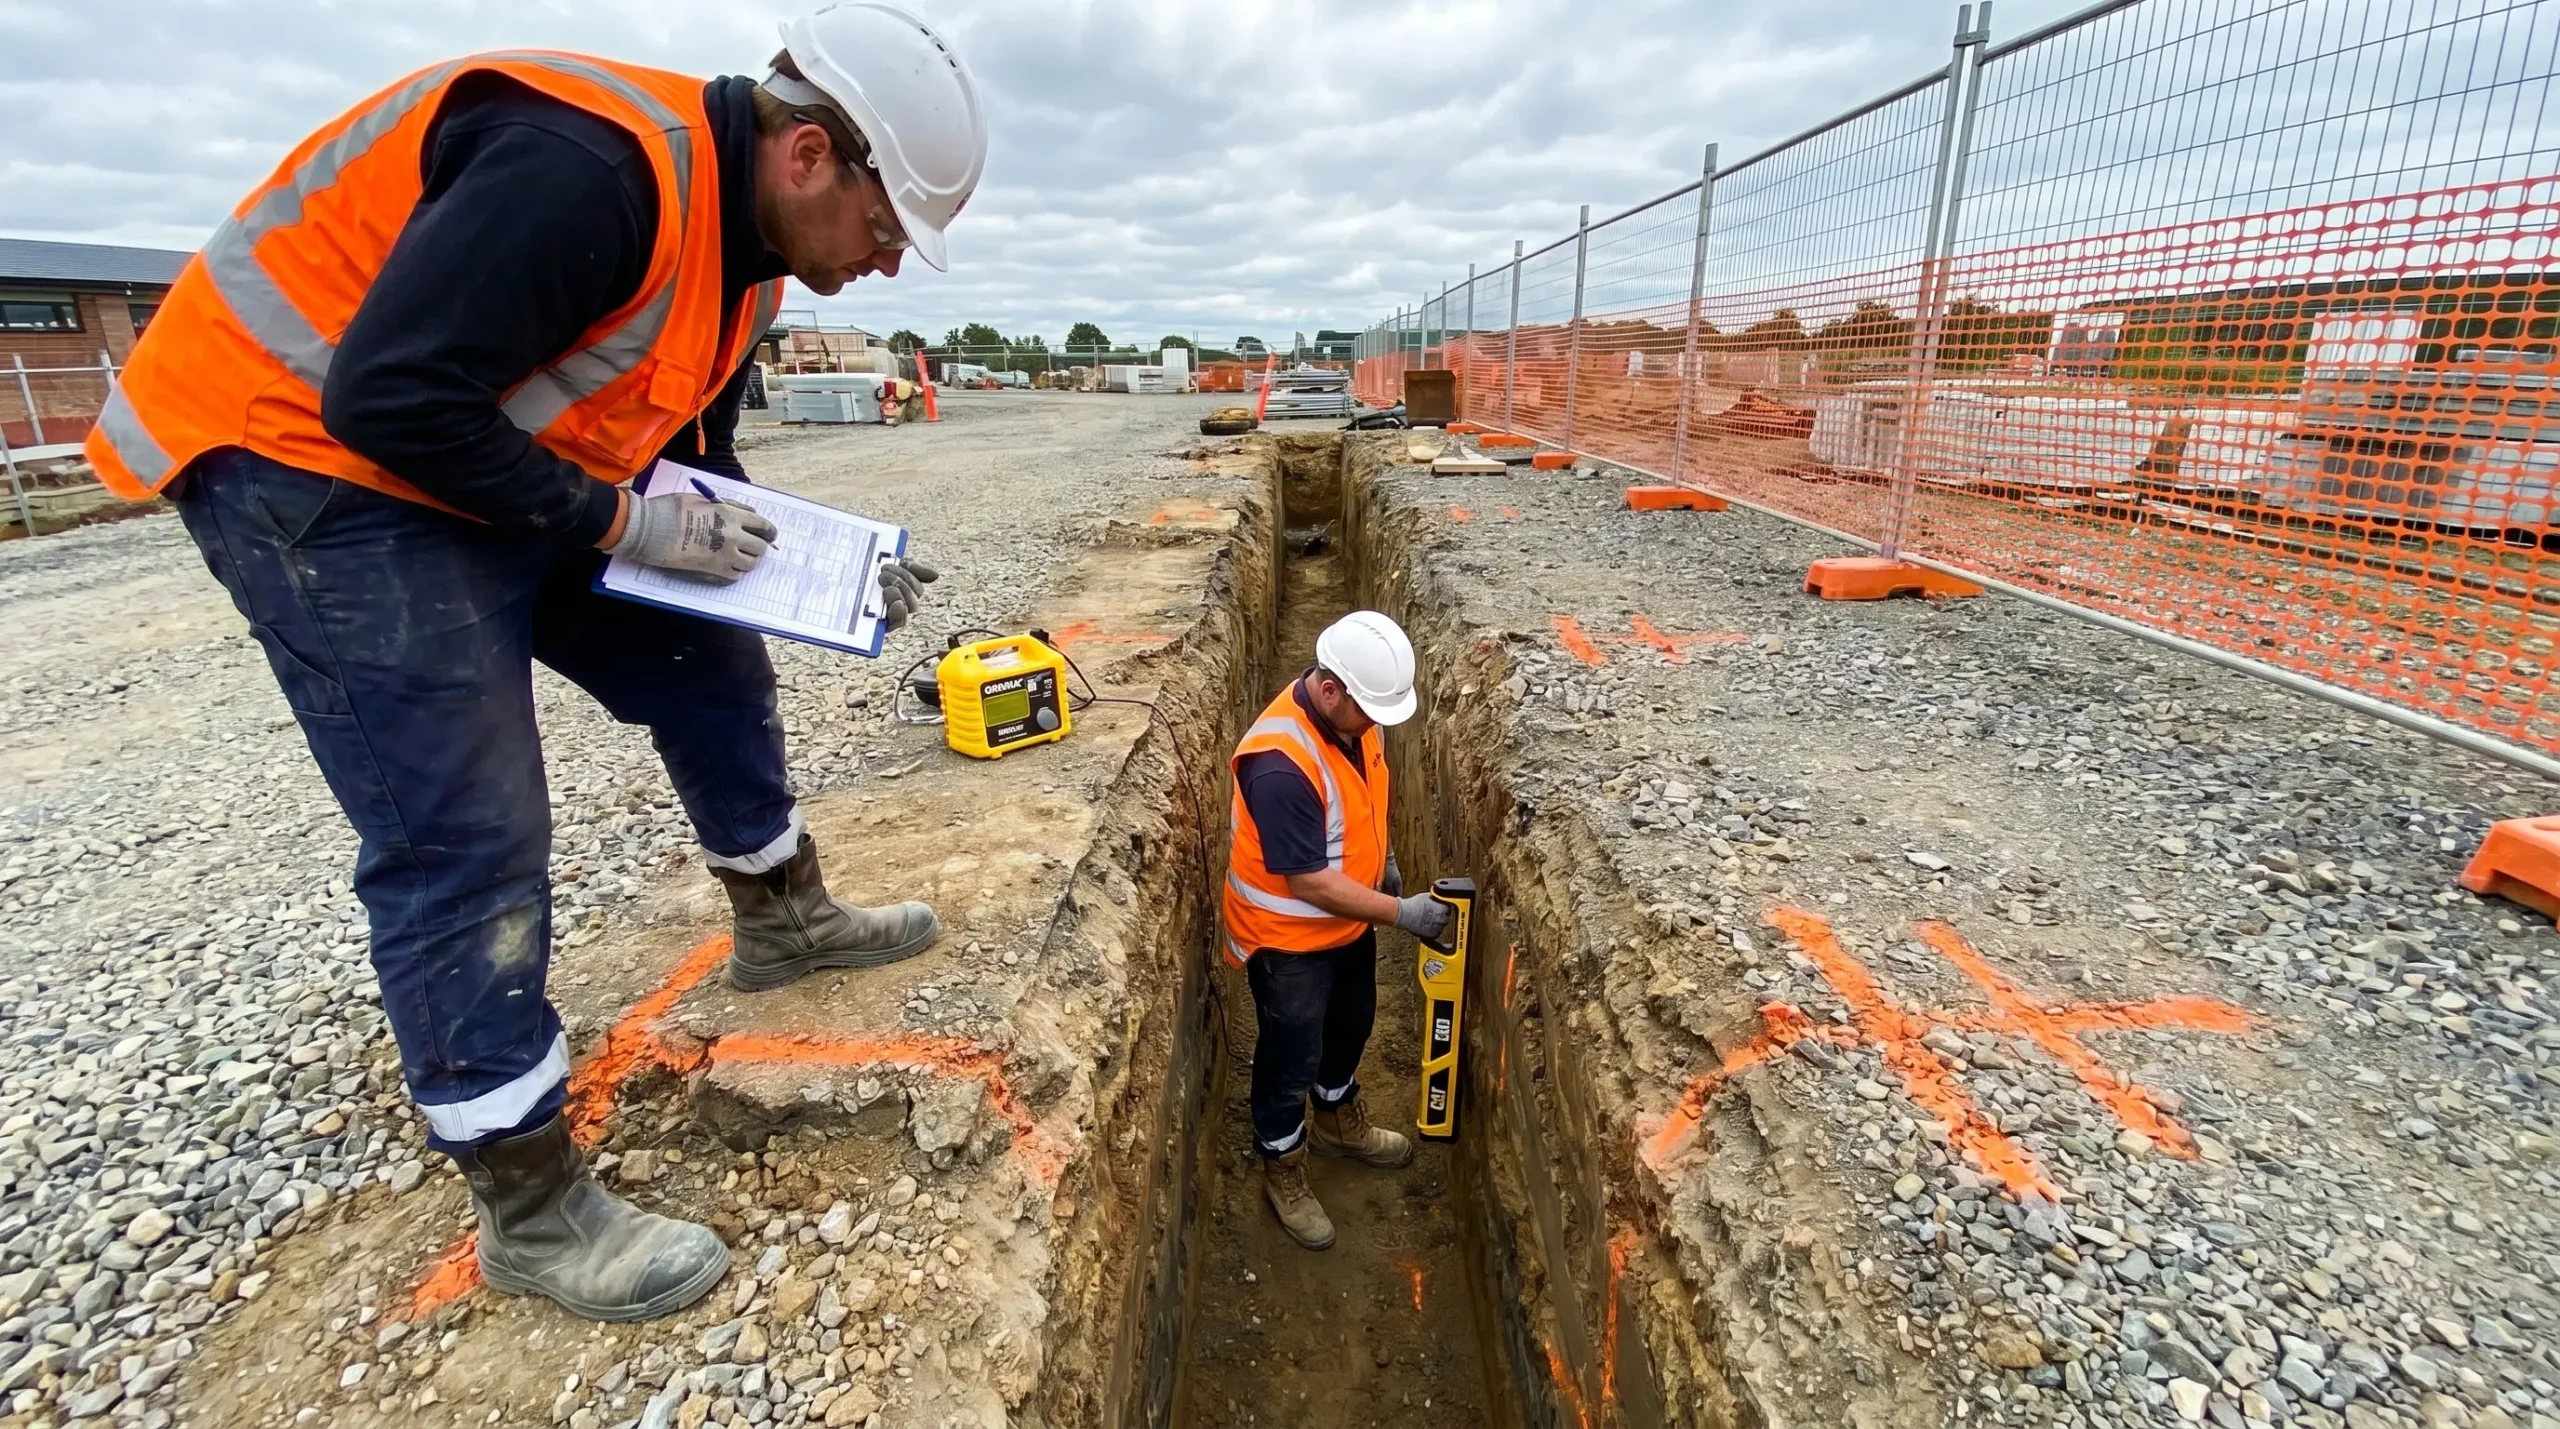
A permit to dig is a formal safety control document used to manage the risks of any ground penetration work — including excavation, drilling, and driving posts — before it begins. It requires identifying all underground services, assessing hazards, specifying safe digging methods, and obtaining authorisation from a competent person. It sits within the broader permit-to-work system used on construction and infrastructure sites.
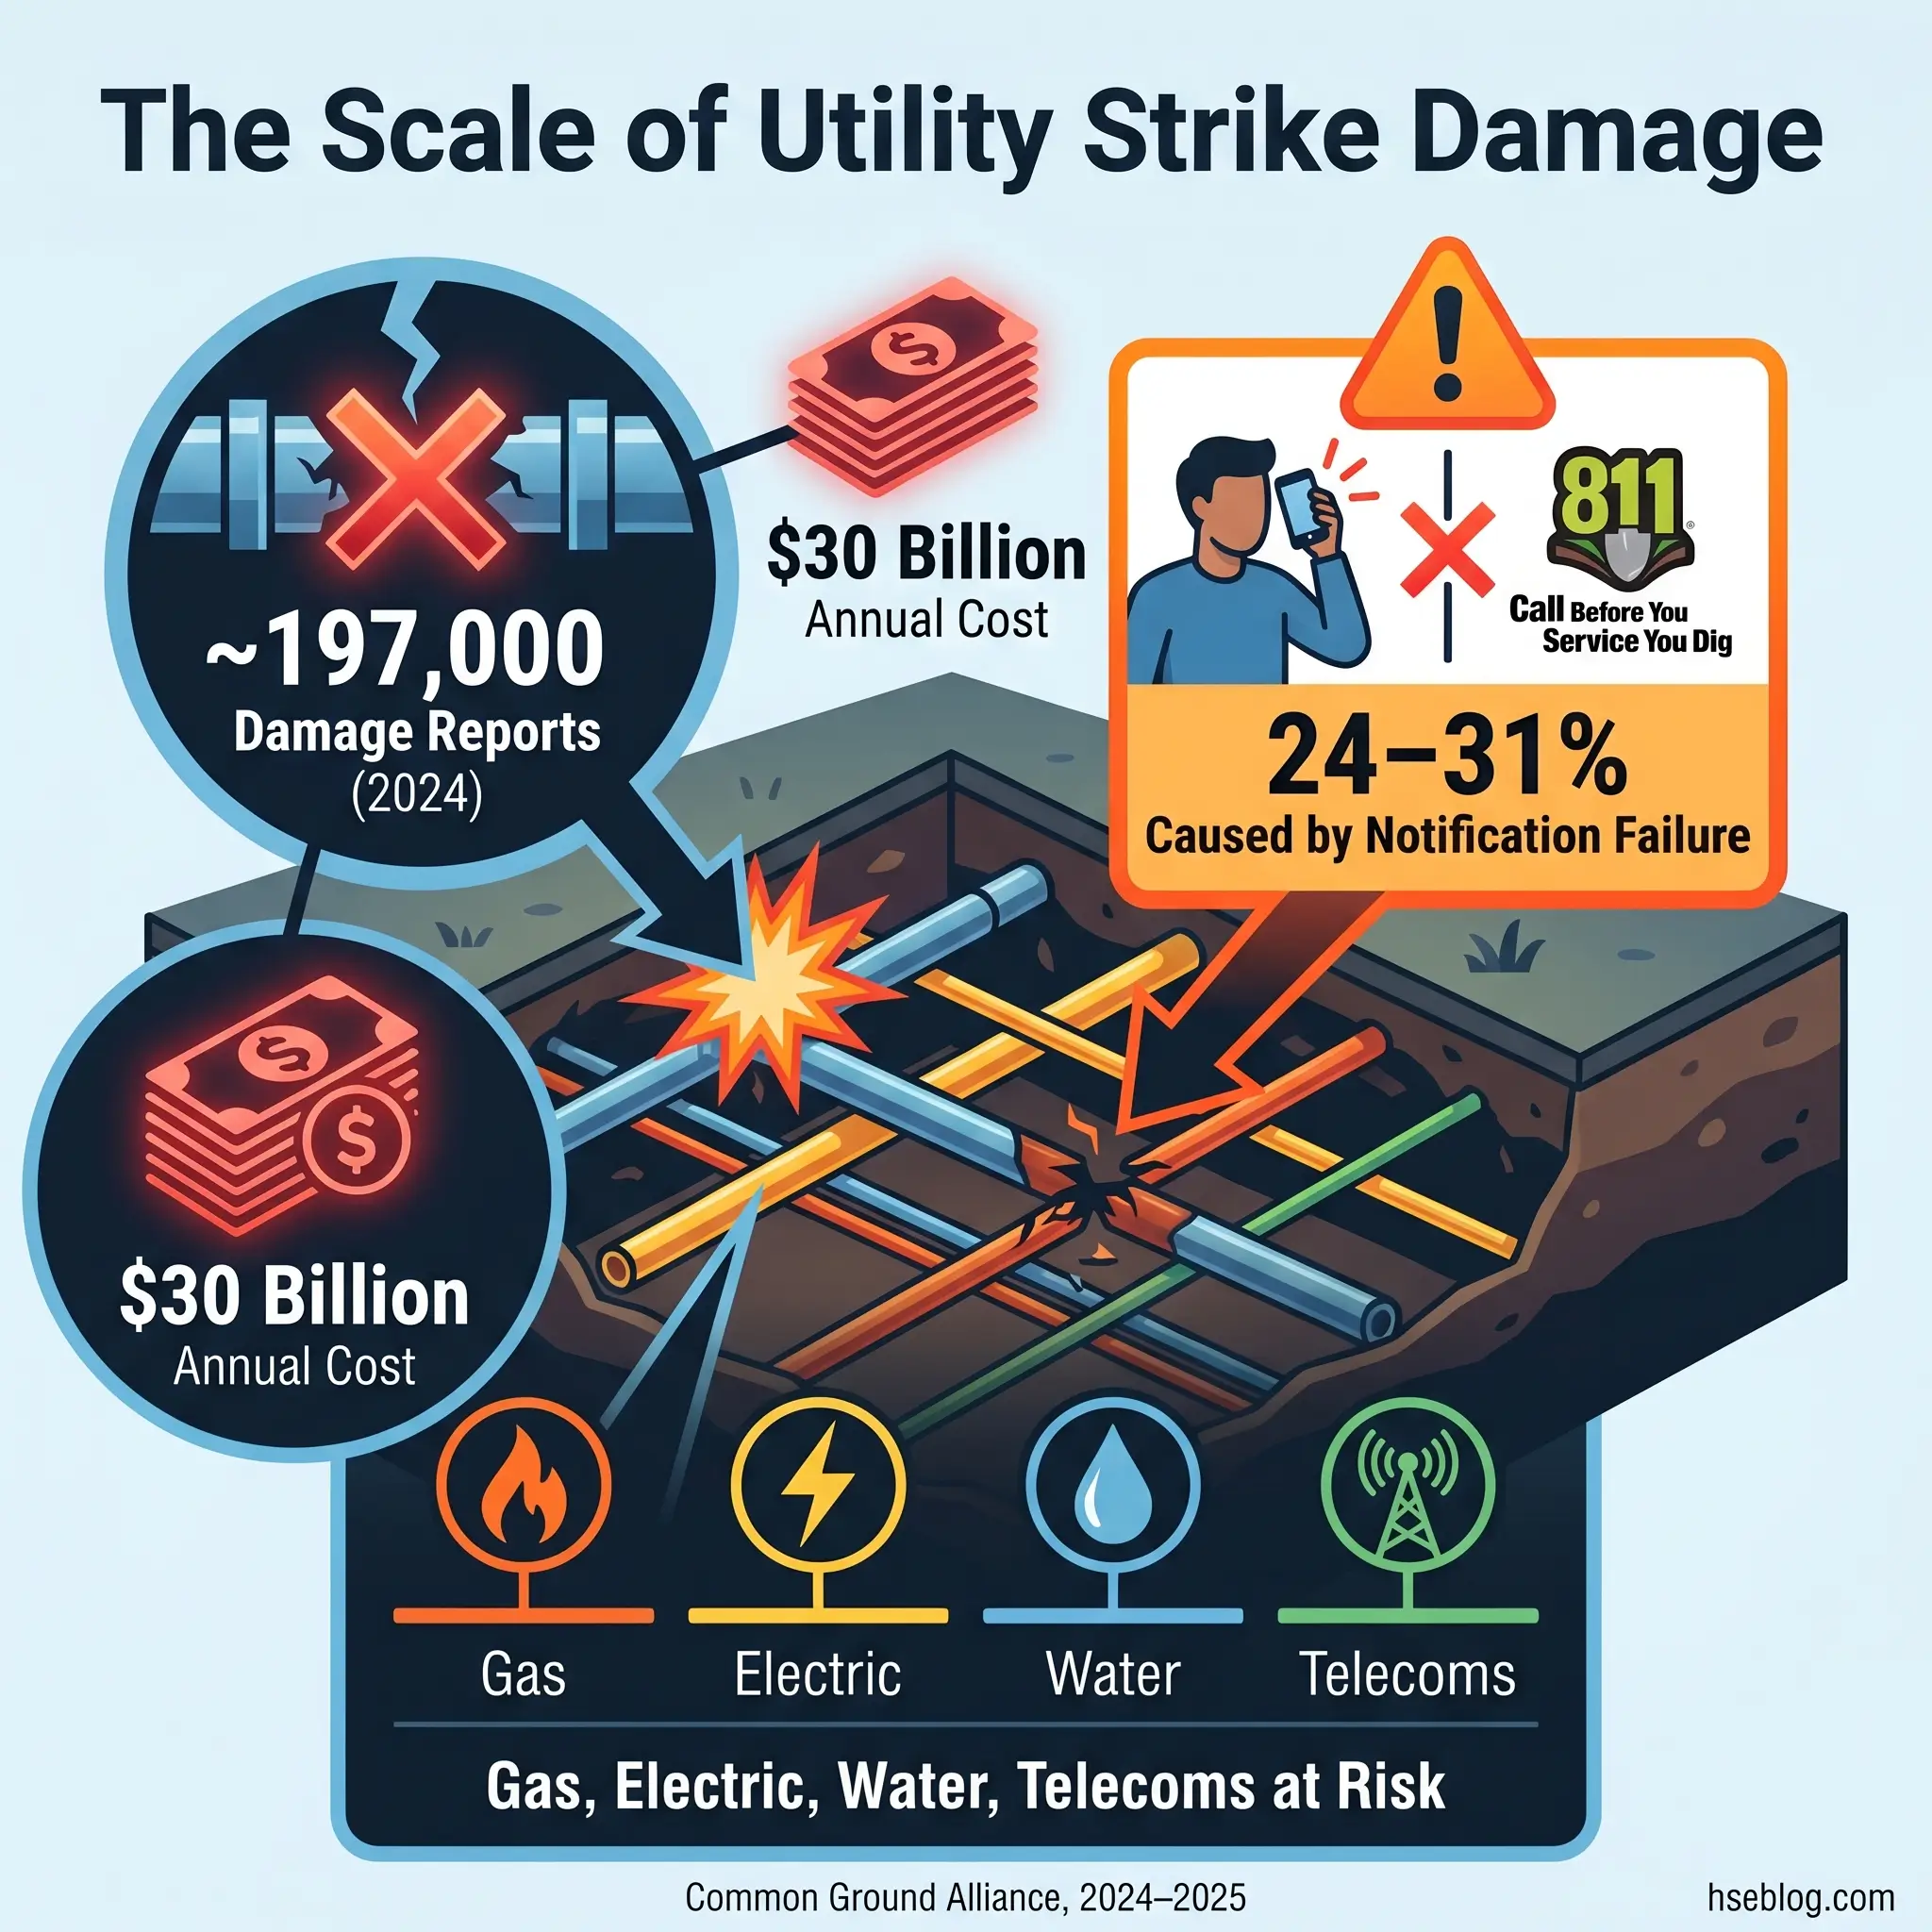
Between 400,000 and 800,000 underground utility strikes occur annually in the United States alone, generating an estimated $30 billion in societal costs (Common Ground Alliance, 2024). Each of those numbers represents a ruptured gas line, a severed fibre-optic trunk, a live cable exposed by a bucket tooth — and in the worst cases, a worker who never came home. The scale of the problem is not declining. The 2024 CGA DIRT Report documented 196,977 unique damage incidents and showed the CGA Index rising from 94.0 to 96.7, meaning the industry is moving backward on damage prevention despite increased awareness efforts (Common Ground Alliance, 2025).
The permit to dig exists to interrupt that pattern. It is the structured control that forces a project team to answer three questions before any ground penetration begins: what is buried here, how will we avoid it, and who has verified the information? This article explains what a permit to dig contains, why each element matters, who holds responsibility under UK and US regulatory frameworks, and — critically — where permit systems break down in practice. Whether you manage excavation permits under HSG47 or OSHA’s Subpart P, the procedural logic and failure modes are remarkably consistent.
What Is a Permit to Dig?
A permit to dig is a site-specific safety control document that must be completed and authorised before any form of ground penetration begins. It covers mechanical excavation, hand digging, post-hole boring, piling, horizontal directional drilling, and even activities as seemingly minor as driving kerb pins or stakes. Its purpose is preventing damage to buried services — gas, electricity, water, telecommunications, sewerage — and protecting workers from the hazards that follow when those services are struck.
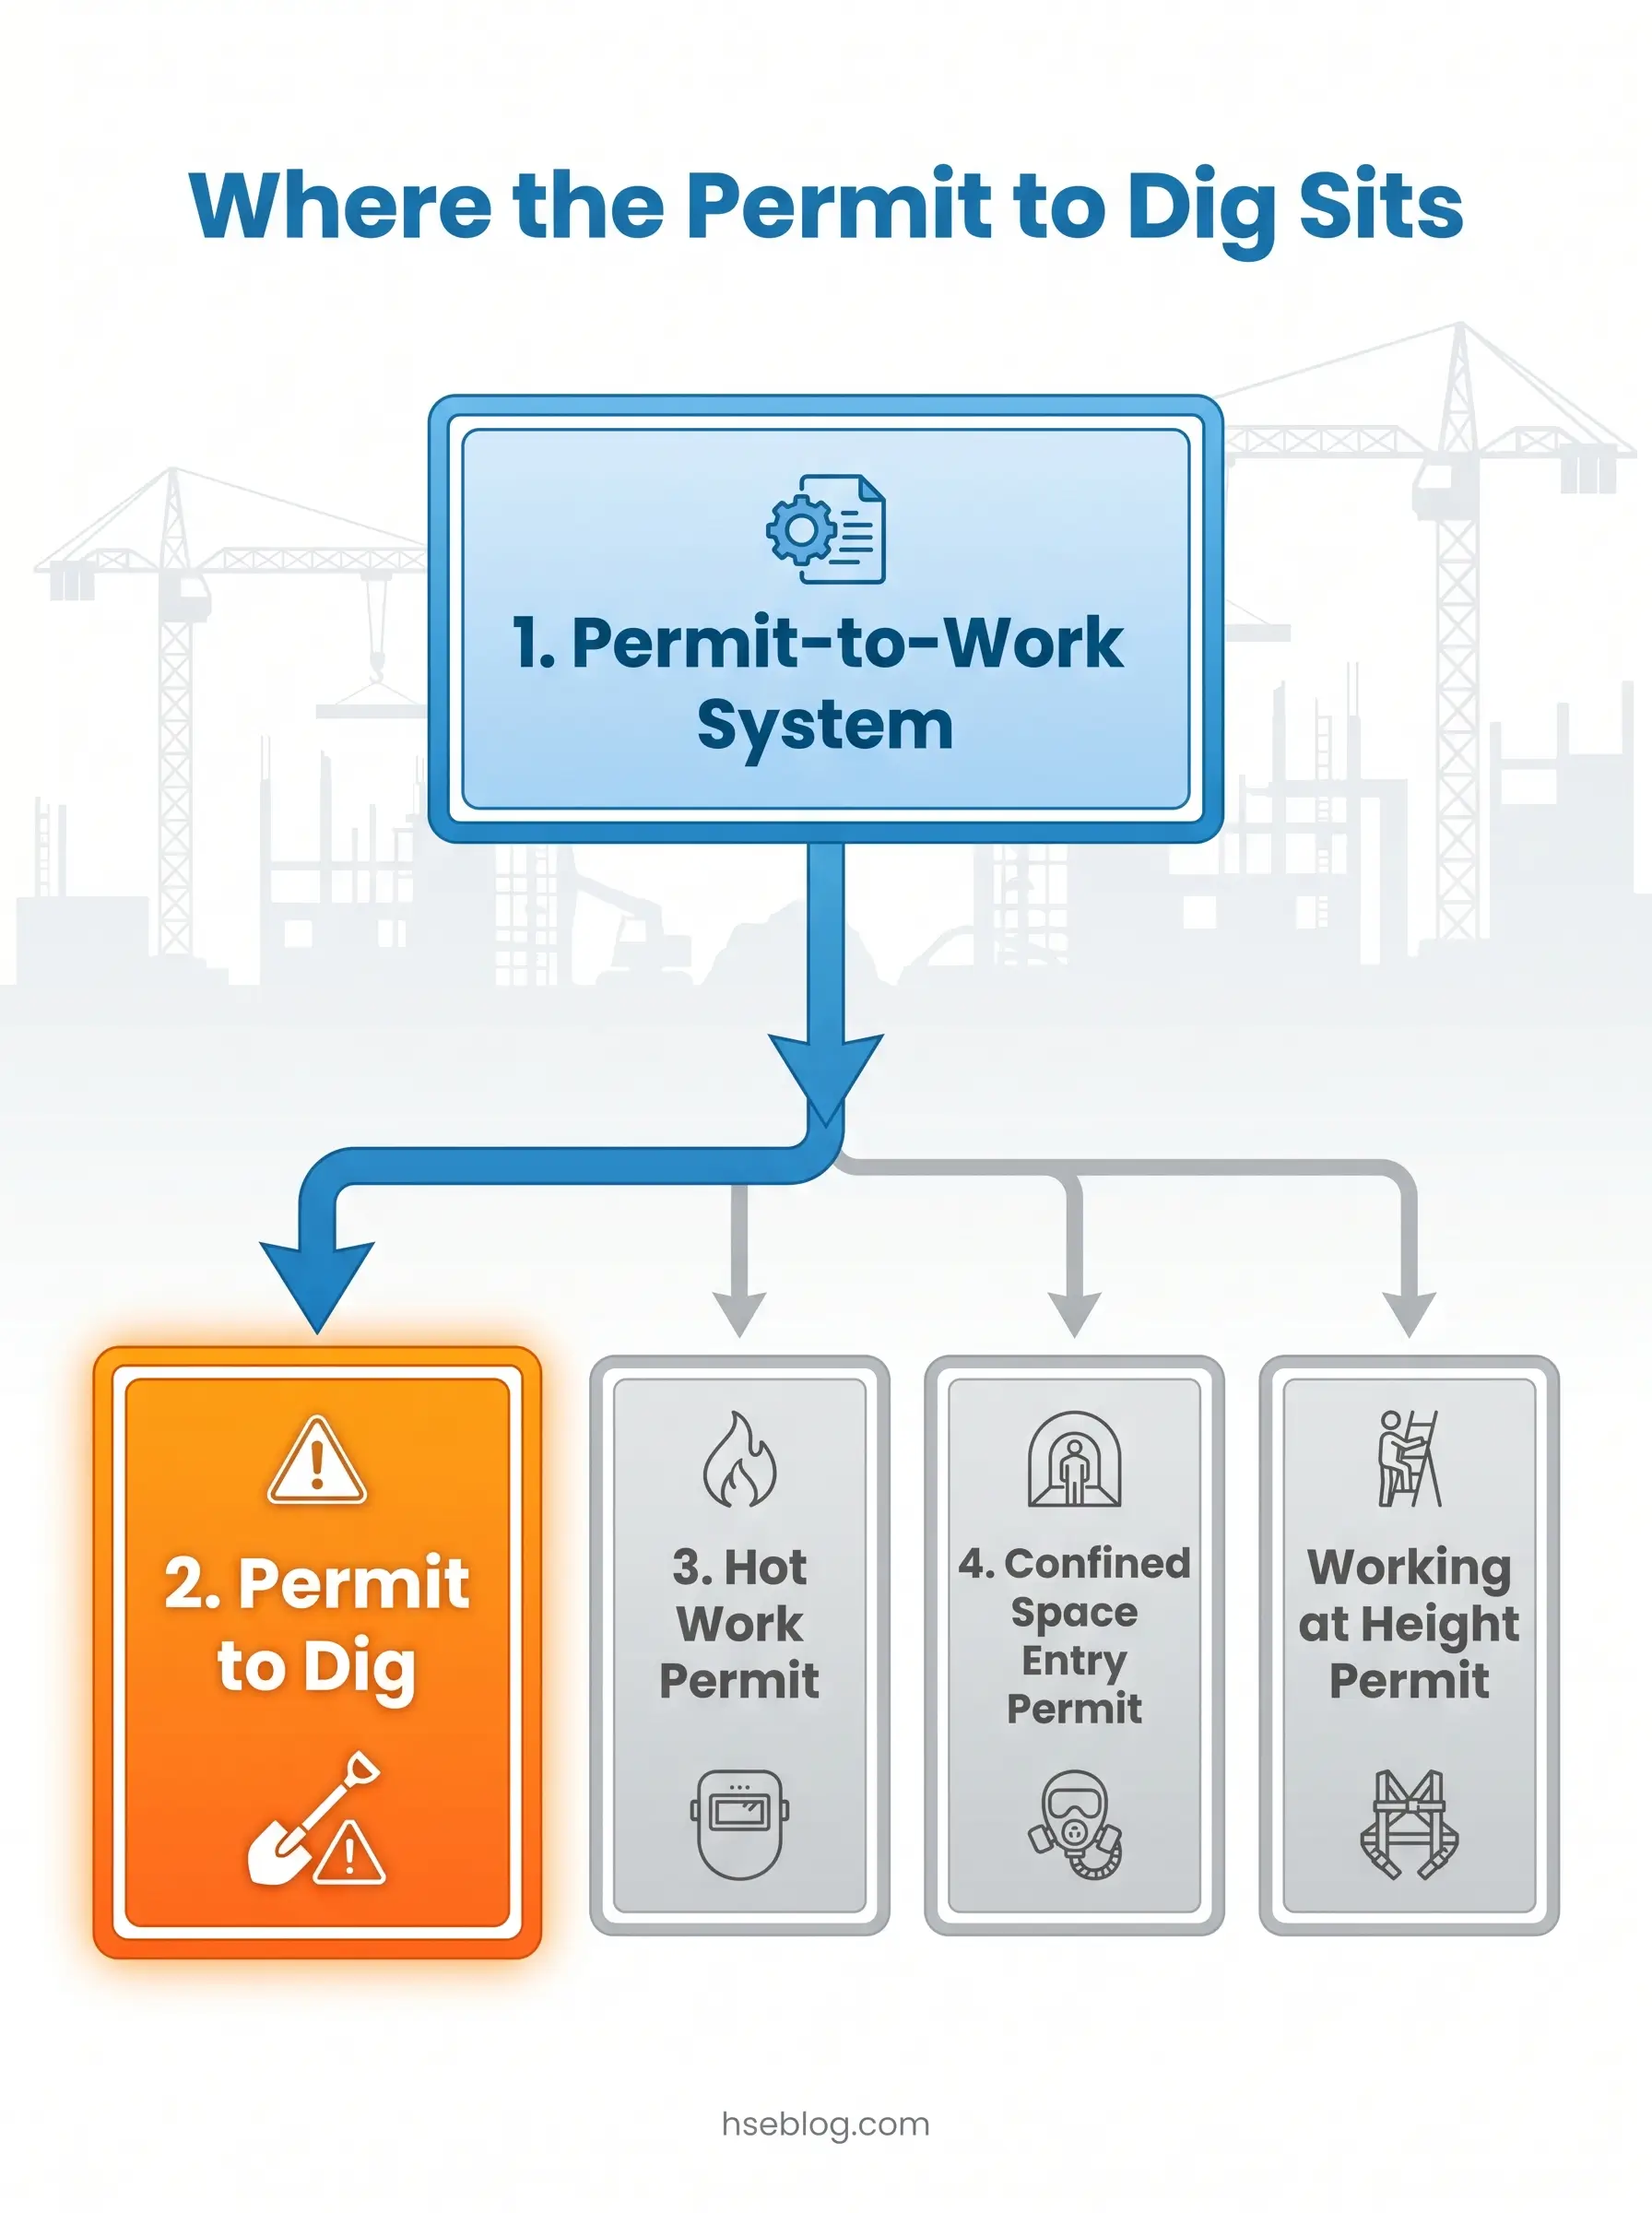
The permit sits within the permit-to-work hierarchy alongside hot work permits, confined space entry permits, and other high-risk activity controls. It is not a regulatory submission to a local authority. It is an internal safety management tool that operationalises the legal duties placed on employers and duty holders to manage excavation risks systematically. The CITB GD12 template, widely adopted across UK construction, provides the standard four-section structure — project details, precautions, completion, and cancellation — but the permit’s value lies entirely in how thoroughly and honestly each section is completed.
A common practitioner error is treating the permit to dig as a one-time form-fill at project start — a document completed in the site office during mobilisation and then filed. In reality, it is a live document. When the dig area shifts by even a few metres, when weather alters ground conditions, when new service information emerges mid-project, the permit requires revalidation. A permit issued on Monday for a trench alignment that changed on Wednesday is not a valid permit on Wednesday.
Permit to Dig vs Excavation Permit: Understanding the Terminology
Terminology confusion plagues this topic across jurisdictions and across the top-ranking search results for this query. Clarity matters because the wrong interpretation can lead to a project team believing they are compliant when they are not.
In the UK, “permit to dig” refers exclusively to the internal safety document described above — the on-site control within the permit-to-work system. In the US, “excavation permit” can mean two entirely different things depending on context. It may refer to an internal safety permit equivalent to the UK permit to dig, or it may refer to a state-issued regulatory permit. California’s Division of Occupational Safety and Health (Cal/OSHA), for example, requires a separate state-issued excavation permit under Title 8 §341 for trenches five feet or deeper — a regulatory approval distinct from any internal safety documentation the contractor maintains.
The broader term “permit to excavate” is used internationally and generally aligns with the UK concept. Throughout this article, “permit to dig” refers to the internal safety control document unless otherwise specified.
Why Is a Permit to Dig Required?
The justification for the permit to dig is both legal and practical, and neither stands alone. The legal framework establishes the duty; the permit is the mechanism that discharges it.
The hazard profile that drives the requirement is severe. Cable strikes cause electrocution and arc-flash burns — approximately 30 workers are killed annually in electricity-related workplace accidents in the UK, with construction disproportionately represented (HSE UK, ongoing RIDDOR statistics). Gas line ruptures cause explosions with a blast radius that extends well beyond the excavation. Water main damage causes flooding and ground collapse that can undermine adjacent structures and trap workers. And the excavation itself presents cave-in risk — the hazard that prompted OSHA’s National Emphasis Program on Trenching and Excavation.
That enforcement programme has produced measurable results. Trench-collapse fatalities in the US declined from 39 in 2022 to 15 in 2023 and 12 in 2024, attributed directly to zero-tolerance enforcement (US Department of Labor / OSHA, November 2024). However, 2025 saw a concerning uptick, with at least 12 trench deaths by July alone — a reminder that enforcement pressure must be sustained, not assumed permanent.
In the UK, HSG47 establishes the three-element safe system of work for excavation: plan the work, locate and identify buried services, and excavate safely. CDM 2015 distributes duties across the supply chain — Regulation 4 requires clients to provide pre-construction information about underground services, Regulation 8 places duties on principal designers, and Regulation 13 requires principal contractors to plan, manage, and monitor health and safety on site.
In the US, OSHA 29 CFR 1926.651(b)(1) requires that the estimated location of all underground installations be determined prior to opening an excavation, and utility companies must be contacted within established timeframes. The Pipeline Safety Improvement Act of 2002 makes 811 notification a federal requirement — every state mandates that excavators contact the one-call centre at least two business days before digging.
Watch For: The most dangerous permit-to-dig failures are not the dramatic cable strikes. They are the quiet ones — a permit approved without anyone verifying whether the CAT survey matched the utility drawings, or a permit issued for “the car park area” that failed to account for a service diversion installed two years after the drawings were produced.
Key Components of a Permit to Dig
Every element on a well-constructed permit to dig exists because something went wrong when it was absent. Understanding the purpose behind each section — not just the field labels — is what separates a permit that protects workers from one that protects filing cabinets.
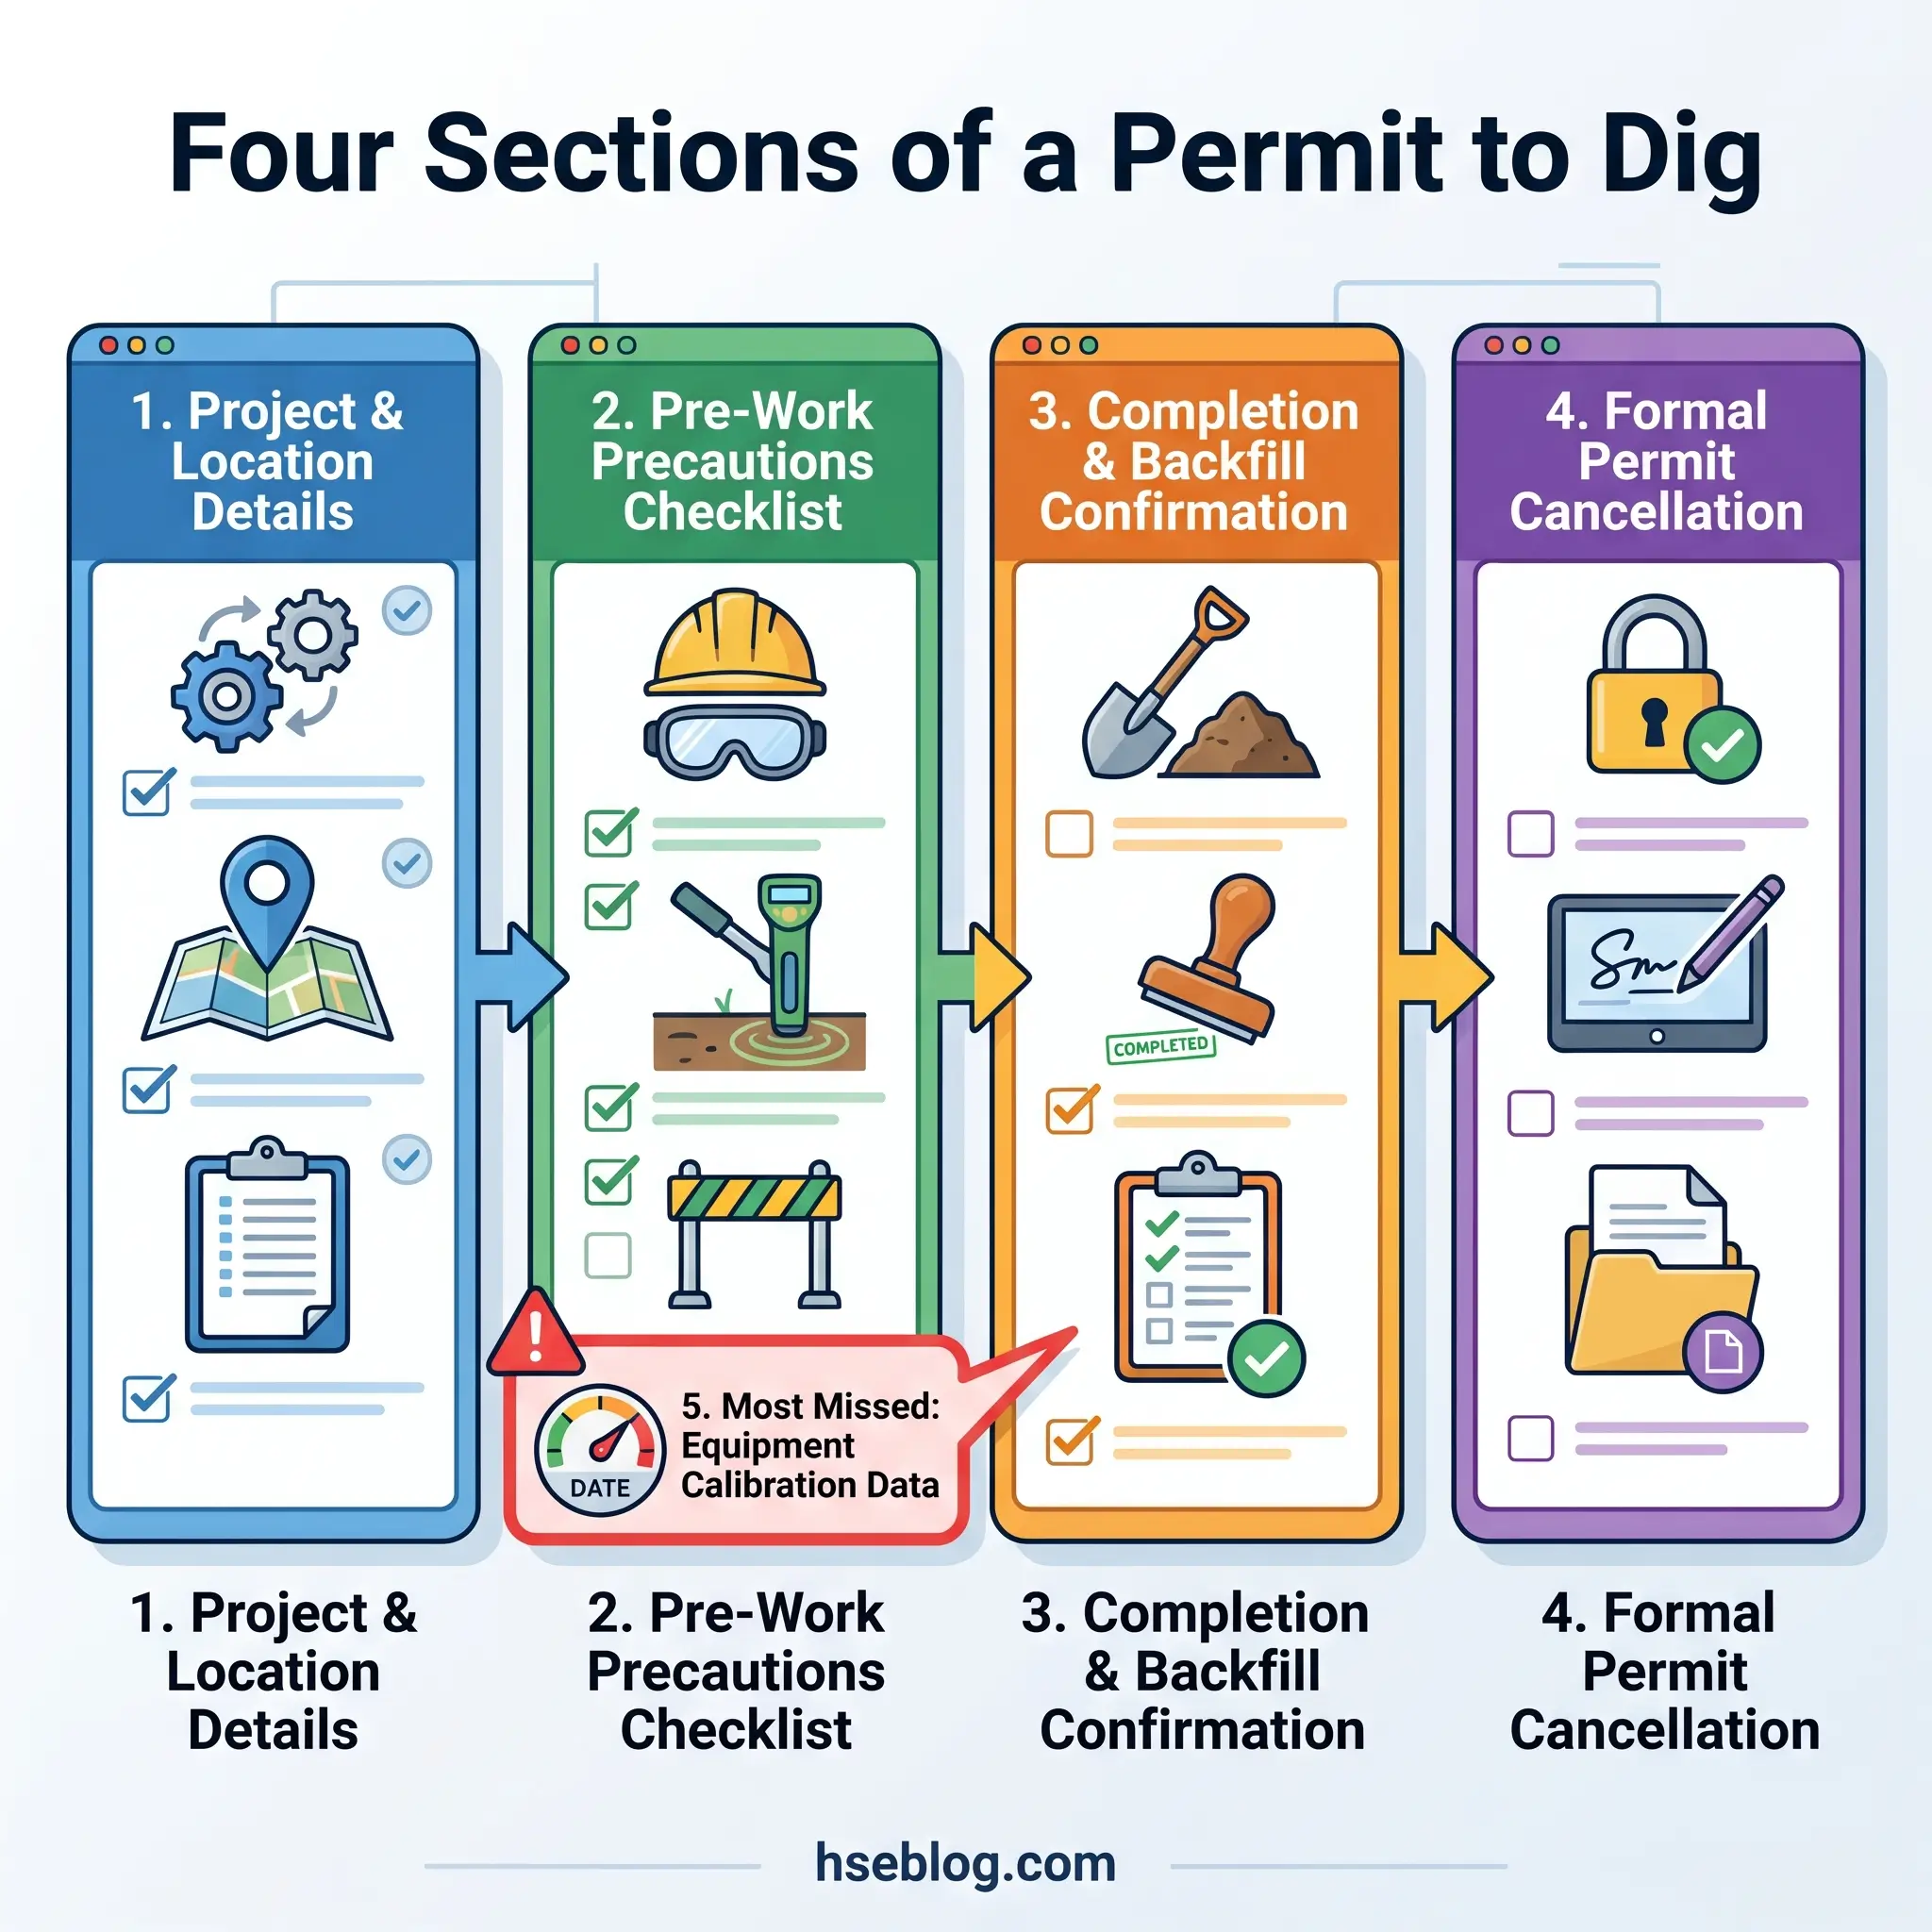
The CITB GD12 template provides the most widely adopted structure in UK construction, organised into four sections. The following breakdown uses that framework while noting how US excavation safety permits address equivalent requirements.
Section A: Project and Permit Details
This section establishes the who, where, when, and what. It captures the specific dig location (not a generic site area — a defined zone with reference points), the date and time of issue, the planned duration of work, and the scope of the excavation. Responsible persons are named individually — supervisor and operatives — not listed by role alone. The judgment call here is specificity versus practicality: a permit covering “Phase 2 south elevation, grid lines 4–7, within 1.5m of the eastern boundary wall” is operationally useful. A permit covering “the main site area” is operationally meaningless.
Section B: Pre-Work Precautions
This is the section that carries the most safety weight and receives the least attention in practice. It functions as a structured verification checklist confirming that the three-element safe system (plan, locate, excavate safely) has been followed.
The precautions that must be confirmed before authorisation include:
- Contract and utility drawings reviewed — sourced from all relevant asset owners, with drawing dates and reference numbers recorded on the permit
- On-site detection survey completed — CAT/Genny and/or GPR survey conducted by a competent operator, with survey coverage area, equipment serial numbers, and calibration dates recorded
- Live services identified and marked — both on the ground (paint, markers) and on the permit drawing
- Isolation of services — where possible and where the service owner has confirmed isolation
- Safe digging method specified — hand-dig exclusion zones around identified services, mechanical excavation permitted only outside tolerance zones
- PPE requirements confirmed — specific to the hazards present (e.g., insulated tools and arc-flash-rated PPE where live electrical services are within tolerance)
- Emergency procedures specified — and these must be hazard-specific: the response to a gas line rupture is fundamentally different from the response to a cable strike
The most frequently missing element on permits across the published inspection record is the calibration date and serial number of the cable avoidance equipment used. HSG47 requires this data because it underpins the reliability of the entire detection survey — without it, the chain of assurance collapses if a strike occurs and the question arises whether the equipment was functioning correctly.
Section C: Completion of Work
Confirms that the excavation is either safely backfilled or appropriately secured (fenced, covered, signed) if left open. This section is often treated as an afterthought, but an open excavation without formal handover is an uncontrolled hazard.
Section D: Cancellation and Closure
Formal cancellation of the permit, confirming all work is complete and the site is safe. The supervisor who issued the permit signs off — not a delegate, not the next shift. This closure prevents the common failure of “inherited” permits where a new crew works under a permit they did not receive a briefing for.
Service Detection Equipment and Methods
The permit to dig references detection data, so understanding the main technologies is essential for anyone reviewing or issuing permits.
Cable Avoidance Tools (CAT) detect electromagnetic signals from live cables and can be used with a Signal Generator (Genny) to apply a signal to pipes and cables that don’t carry their own. Ground Penetrating Radar (GPR) detects subsurface anomalies regardless of material or energisation status. Electromagnetic locators (EML) are used for deeper or more targeted detection.
PAS 128:2022 — published by BSI — defines survey quality levels from QL-D (desktop study only) through QL-A (physical verification by exposing the service). This framework is increasingly specified by UK clients and represents best practice for demonstrating compliance with HSG47 and CDM 2015 duties. The critical practitioner understanding is that no detection method is 100% reliable. That is precisely why the permit system exists as a layered control — detection informs the permit, and the permit specifies safe digging methods that account for detection uncertainty.
| Component | UK Framework (CITB GD12 / HSG47) | US Framework (OSHA Subpart P) |
|---|---|---|
| Pre-dig utility location | Utility drawings + CAT/Genny/GPR survey required | 811 notification + utility company markings required |
| Competent person | CDM 2015 duty-holder chain; site supervisor with HSG47 training | OSHA-defined competent person designated by employer |
| Permit document | CITB GD12 template widely adopted; not legally mandated by name | No federally prescribed form; functional requirements under §1926.651 |
| Detection standard | PAS 128:2022 quality levels (voluntary but increasingly specified) | No equivalent national standard; ASCE 38 used in some states |
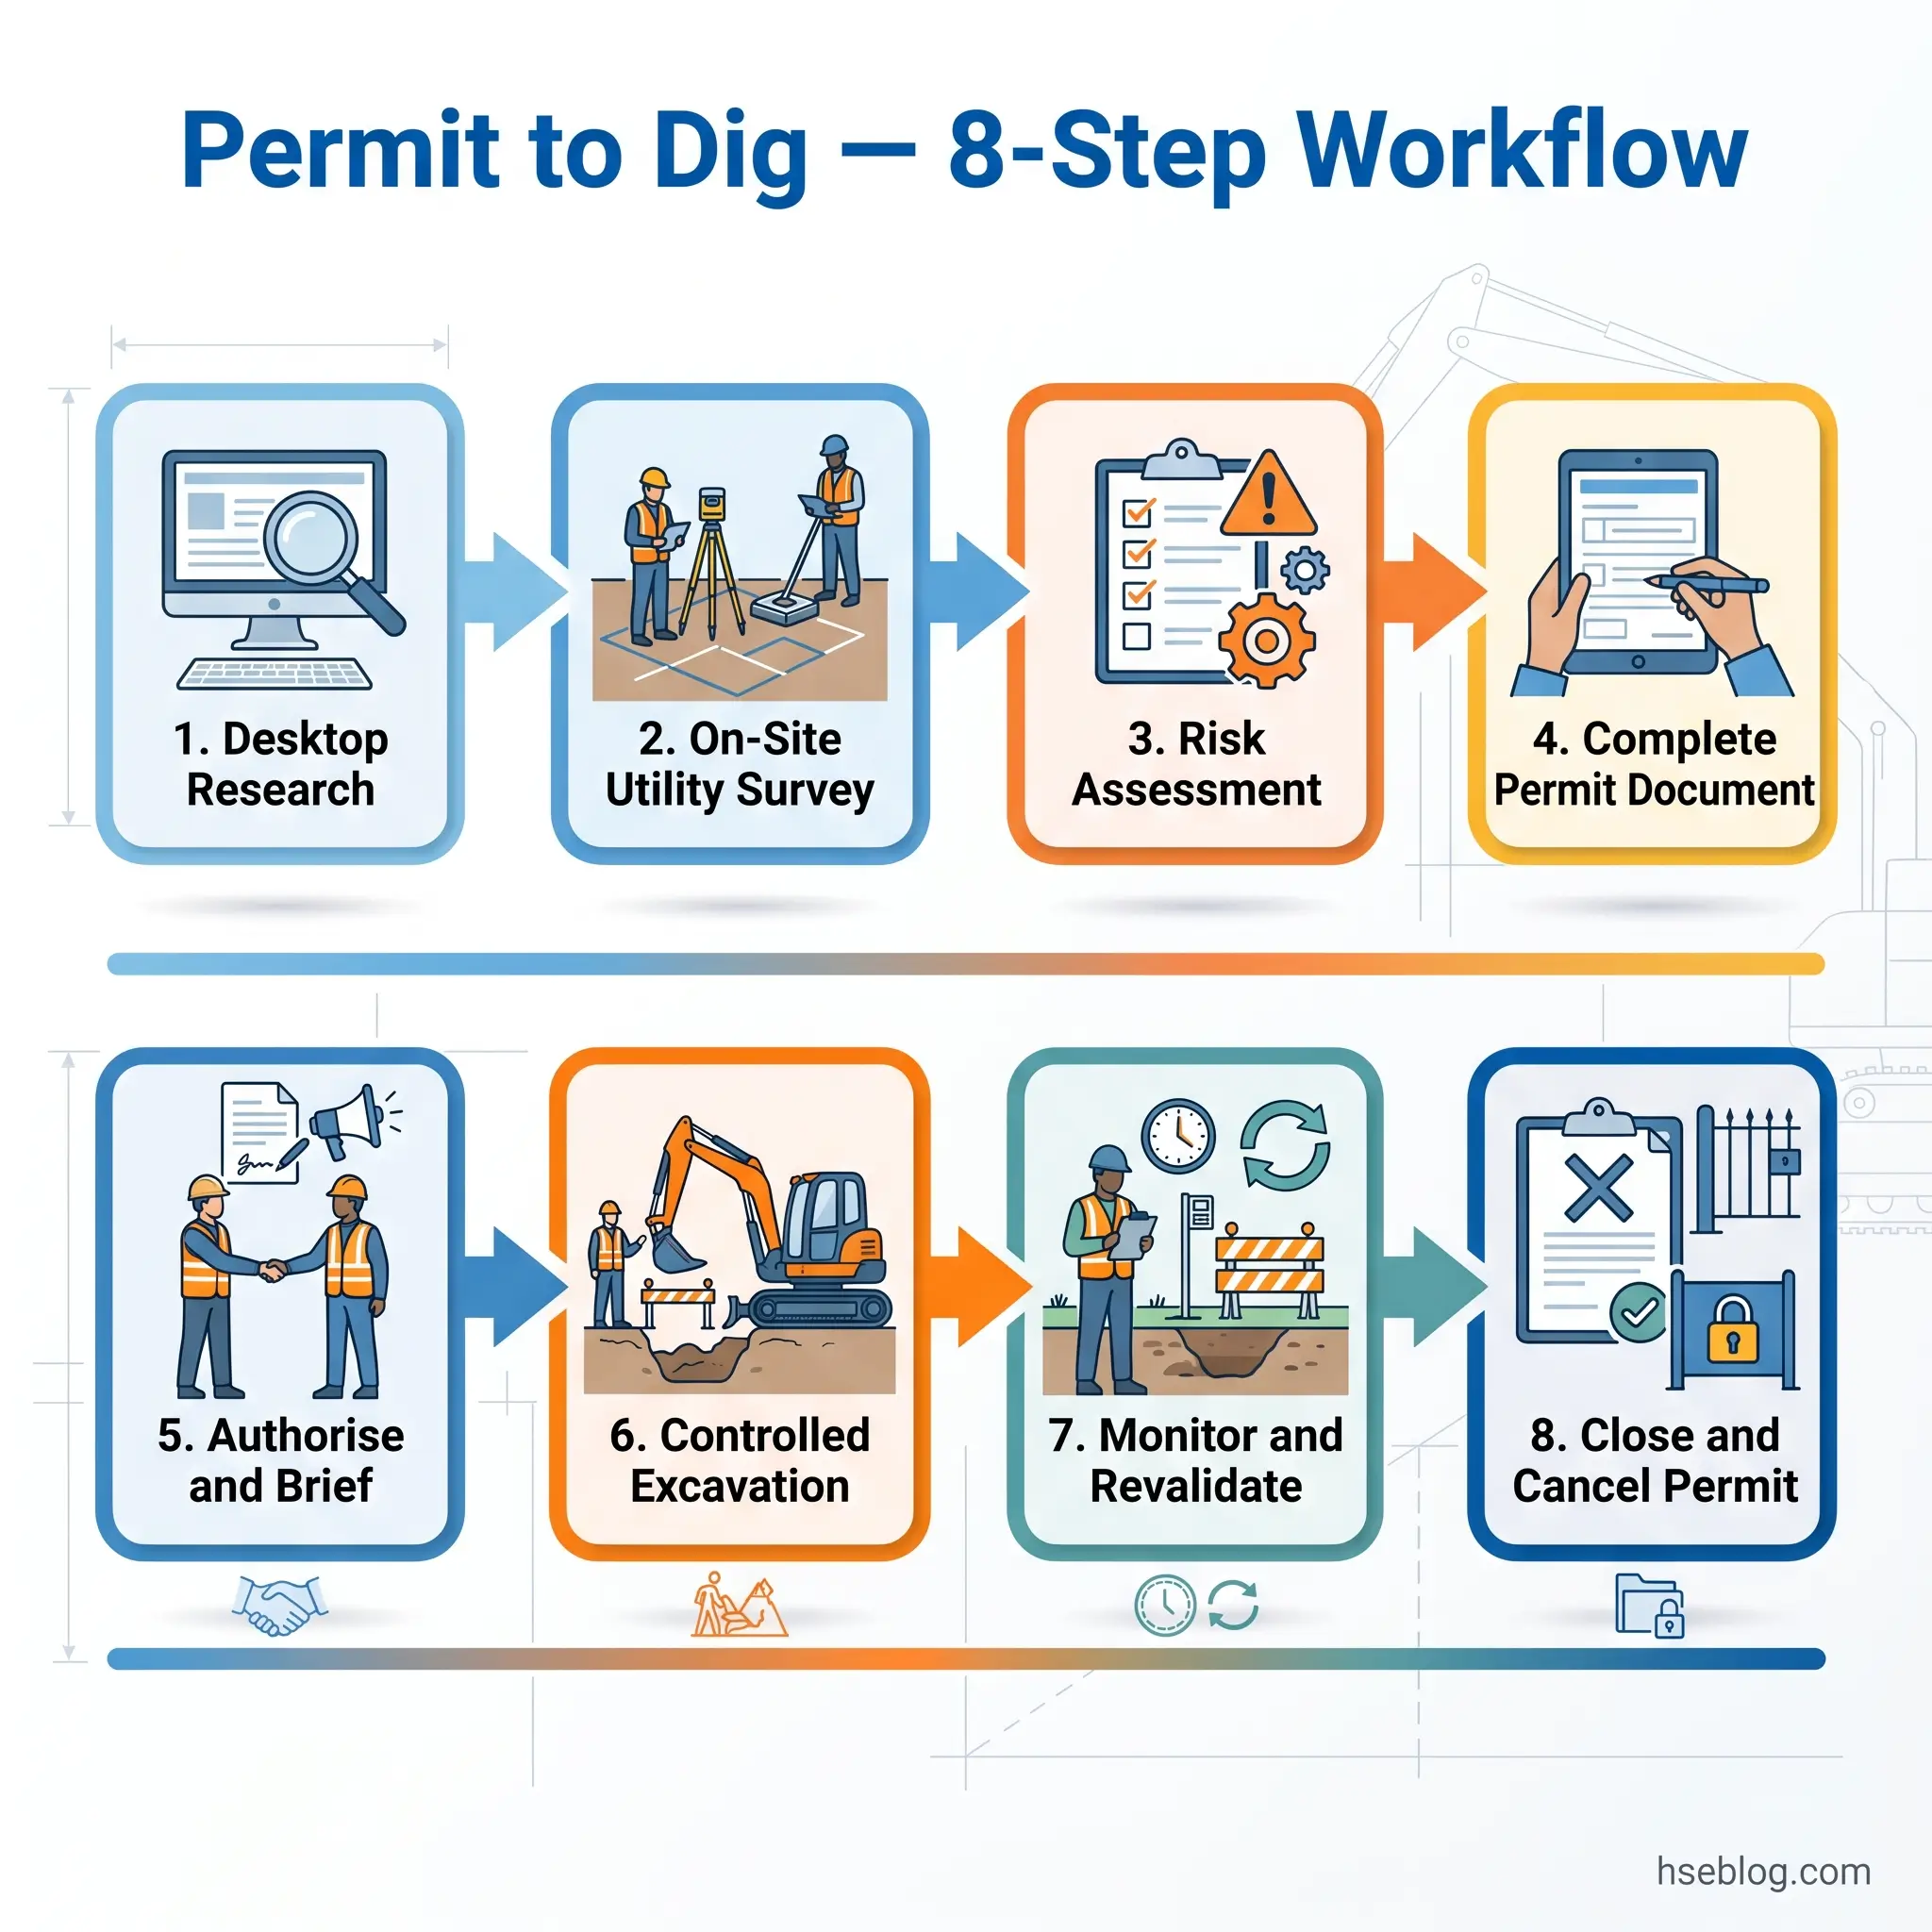
Step-by-Step Permit to Dig Procedure
The permit to dig procedure is a sequential workflow, not a checklist to be completed in any order. Each step produces information that feeds the next. Skipping or reordering steps creates gaps that the permit is specifically designed to prevent.
Step 1 — Pre-Planning and Desktop Research. Before anyone visits the site, obtain utility drawings from every asset owner with infrastructure in the area. Review historical site records for previous excavation damage, service diversions, or abandoned services. Cross-reference contract drawings with utility plans. The goal is to build the most complete picture possible before deploying detection equipment — because detection surveys without desktop context produce results that cannot be properly interpreted.
Step 2 — On-Site Utility Survey. Deploy CAT/Genny and/or GPR to verify and supplement desktop information. Mark up service locations on the ground using paint or markers and on the permit drawings. Record the equipment used, including serial numbers and calibration dates. The survey must cover the entire proposed dig area plus a buffer — typically a minimum of one metre beyond the excavation boundary, though this varies by service type and depth.
Step 3 — Risk Assessment. Assess each identified service for type (gas, electric, water, telecoms), voltage or pressure rating, estimated depth, and proximity to the proposed excavation. Determine the safe digging method for each zone — hand-dig within exclusion zones near identified services, mechanical excavation only outside defined tolerance zones.
Step 4 — Complete the Permit Document. Fill in all sections with site-specific information. Attach survey data, utility drawings with marked-up service positions, and photographic evidence of ground markings. A permit completed without attachments is a statement of intent, not a verified control document.
Step 5 — Authorisation and Briefing. The competent person reviews the completed permit, verifies that the information is consistent and complete, and authorises commencement. Every operative who will work within or adjacent to the excavation is then briefed — not generically on excavation safety, but specifically on the hazards, service locations, safe digging techniques, and emergency procedures relevant to this permit.
Audit Point: Effective briefing means the operative in the trench can describe where the nearest buried service runs and what action to take if it is struck. If they cannot, the briefing has failed regardless of what the attendance sheet says.
Step 6 — Controlled Excavation. Digging proceeds using the methods specified on the permit. Hand-dig within exclusion zones. Mechanical excavation only in areas cleared by the survey and risk assessment. The competent person monitors progress, particularly as the excavation approaches the estimated depth of identified services.
Step 7 — Ongoing Monitoring and Revalidation. Conditions are checked throughout. If the scope changes, the location shifts, ground conditions deteriorate, or previously unidentified services are encountered, work stops and the permit is reissued. This is not a discretionary step — it is the mechanism that prevents scope drift from turning a valid permit into an expired one.
Step 8 — Completion, Inspection, and Permit Closure. The excavation is inspected, backfilled or secured, and the permit formally cancelled with the issuing supervisor’s sign-off. Any services discovered during excavation that were not on the original drawings are recorded and fed back to the project records and, where applicable, to the asset owner.
Who Is Responsible for Issuing a Permit to Dig?
Responsibility structures differ between jurisdictions, but the underlying principle is consistent: a qualified individual with site-specific knowledge and the authority to halt work must own the permit process.
UK Duty-Holder Chain Under CDM 2015
CDM 2015 distributes excavation-related duties across the project supply chain. The client must provide pre-construction information about known underground services — a duty under Regulation 4 that is frequently under-fulfilled when clients provide generic site plans rather than comprehensive utility records. The principal designer must ensure that excavation risks are addressed in the pre-construction design phase. The principal contractor manages the permit system on site, and the contractor’s site supervisor issues and manages individual permits for specific dig activities.
The practical reading of this chain is that the permit to dig is the point where design-stage information meets operational reality. If the client’s pre-construction information was incomplete, the permit process is where that gap becomes visible — or, dangerously, where it doesn’t.
US Competent Person Under OSHA
OSHA’s framework under 29 CFR 1926.650–652 centres on the competent person — defined as someone capable of identifying existing and predictable hazards and authorised to take prompt corrective measures to eliminate them. The employer must designate this individual. For excavation work, the competent person inspects conditions daily, before each shift, and after any event that could affect stability or safety. They have the authority — and the obligation — to stop work.
The Distinction That Matters
Across both frameworks, there is a critical distinction between who issues the permit and who authorises it. On many sites, the site supervisor completes and issues the permit based on their direct knowledge of the dig location and the detection survey results. A project manager or site manager then authorises it, confirming that the organisational controls are in place. The operative who receives the permit — the permit receiver — accepts the conditions and confirms their understanding of the hazards and procedures.
A recurring failure pattern is assigning permit-issuing responsibility to a person who holds the training certificate but lacks site-specific knowledge. They can complete the form correctly but have never walked the actual dig area or compared the utility drawings against what is actually on the ground. The permit becomes administratively correct and operationally meaningless.
What Happens When You Dig Without a Permit?
The consequences of failing to use or properly complete a permit to dig operate on three levels, and each reinforces the others.
The safety consequences are immediate and severe. Cable strikes cause electrocution and arc-flash injuries. Gas main ruptures cause explosions. Water main breaches cause rapid flooding and ground instability that can collapse an excavation with workers inside. These are not theoretical risks — they represent recurring incident patterns across the published enforcement and investigation record.
The legal exposure is substantial and growing. In the US, OSHA’s zero-tolerance approach to unprotected trenches means citations are issued on first observation with no prior warning. Wilful violations carry penalties of up to $161,323 per violation (as adjusted for inflation). In the UK, prosecution under CDM 2015 and the Health and Safety at Work Act 1974 can result in unlimited fines for organisations and, in fatality cases, manslaughter charges against individuals. HSE UK’s guidance on excavation near electrical services makes the duty of care explicit.
The commercial consequences often prove the most persuasive argument at the decision-making level. Direct repair costs for a utility strike average approximately $4,000, but the indirect costs — project delays, service disruption to third parties, emergency response, regulatory investigation, insurance implications, reputational damage — multiply that figure by a factor of 29. A single gas main strike on a highway project can generate six-figure total costs and weeks of delay, far exceeding the cost of implementing the permit system properly.
Notification failure — not calling 811 before digging — remains the single largest root cause of utility damage in the US, accounting for approximately 24–31% of all incidents across multiple CGA DIRT reporting years (Common Ground Alliance, 2022–2024). This is a root cause that a functioning permit-to-dig system eliminates entirely, because the permit cannot be completed without confirming that notification has occurred.
Common Mistakes in Permit to Dig Implementation
Published incident analyses and enforcement patterns reveal consistent failure modes in permit-to-dig systems. These are not theoretical risks — they are observable, recurring patterns.
Relying solely on utility drawings without on-site verification. Utility company drawings show indicative positions — often derived from as-built records that may be decades old, recorded in imperial measurements on plans since converted to metric, or based on installation routes that were changed during construction without updating the drawings. A permit completed using desktop information alone provides a false sense of assurance. This is precisely the gap that HSG47’s three-element system is designed to close: drawings inform the survey, the survey informs the risk assessment, and the risk assessment determines the safe digging method.
Treating the permit as a single-issue document. A permit issued on day one for a trench alignment that changes on day three is no longer a valid permit. The conditions it assessed and the service locations it identified may no longer apply. Revalidation is not bureaucratic excess — it is the mechanism that prevents scope drift from turning controlled work into uncontrolled work. Scope drift — where a permit issued for trench A is tacitly used to cover trench B because “it’s the same area” — is the mechanism behind a significant proportion of service strikes on large sites.
Failing to account for private or abandoned services. Utility company records cover their own assets. Private service connections — from meter boxes to buildings, between buildings on private land, or legacy infrastructure from previous site uses — may not appear on any utility plan. Abandoned services present a particular hazard: they may still be energised if disconnection was never completed, or they may have been repurposed by a subsequent owner.
Completing the detection survey without recording equipment data. Conducting a CAT/Genny sweep but not recording the calibration date, serial number, or survey coverage area on the permit removes the ability to verify detection reliability retrospectively. If a strike occurs, the first question in any investigation is whether the equipment was within calibration — and if that data isn’t on the permit, the answer defaults to “unknown.”
Issuing permits for broad areas rather than specific locations. A permit covering “Phase 2 site” tells the operative nothing about where the services are relative to their specific dig position. Permits must be location-specific to be operationally meaningful.
Briefing failures. The permit is signed in the site office. The operative in the trench with the breaker has never seen it. This disconnect between administrative completion and operational communication is the single most common failure mechanism in the permit-to-dig systems I review across industry incident reports.
The Fix That Works: Photograph the permit drawing, the ground markings, and the CAT survey positions. Show them to the operative at the dig location, not in the site office. A two-minute visual briefing at the trench edge transfers more safety-critical information than a twenty-minute toolbox talk in a cabin.
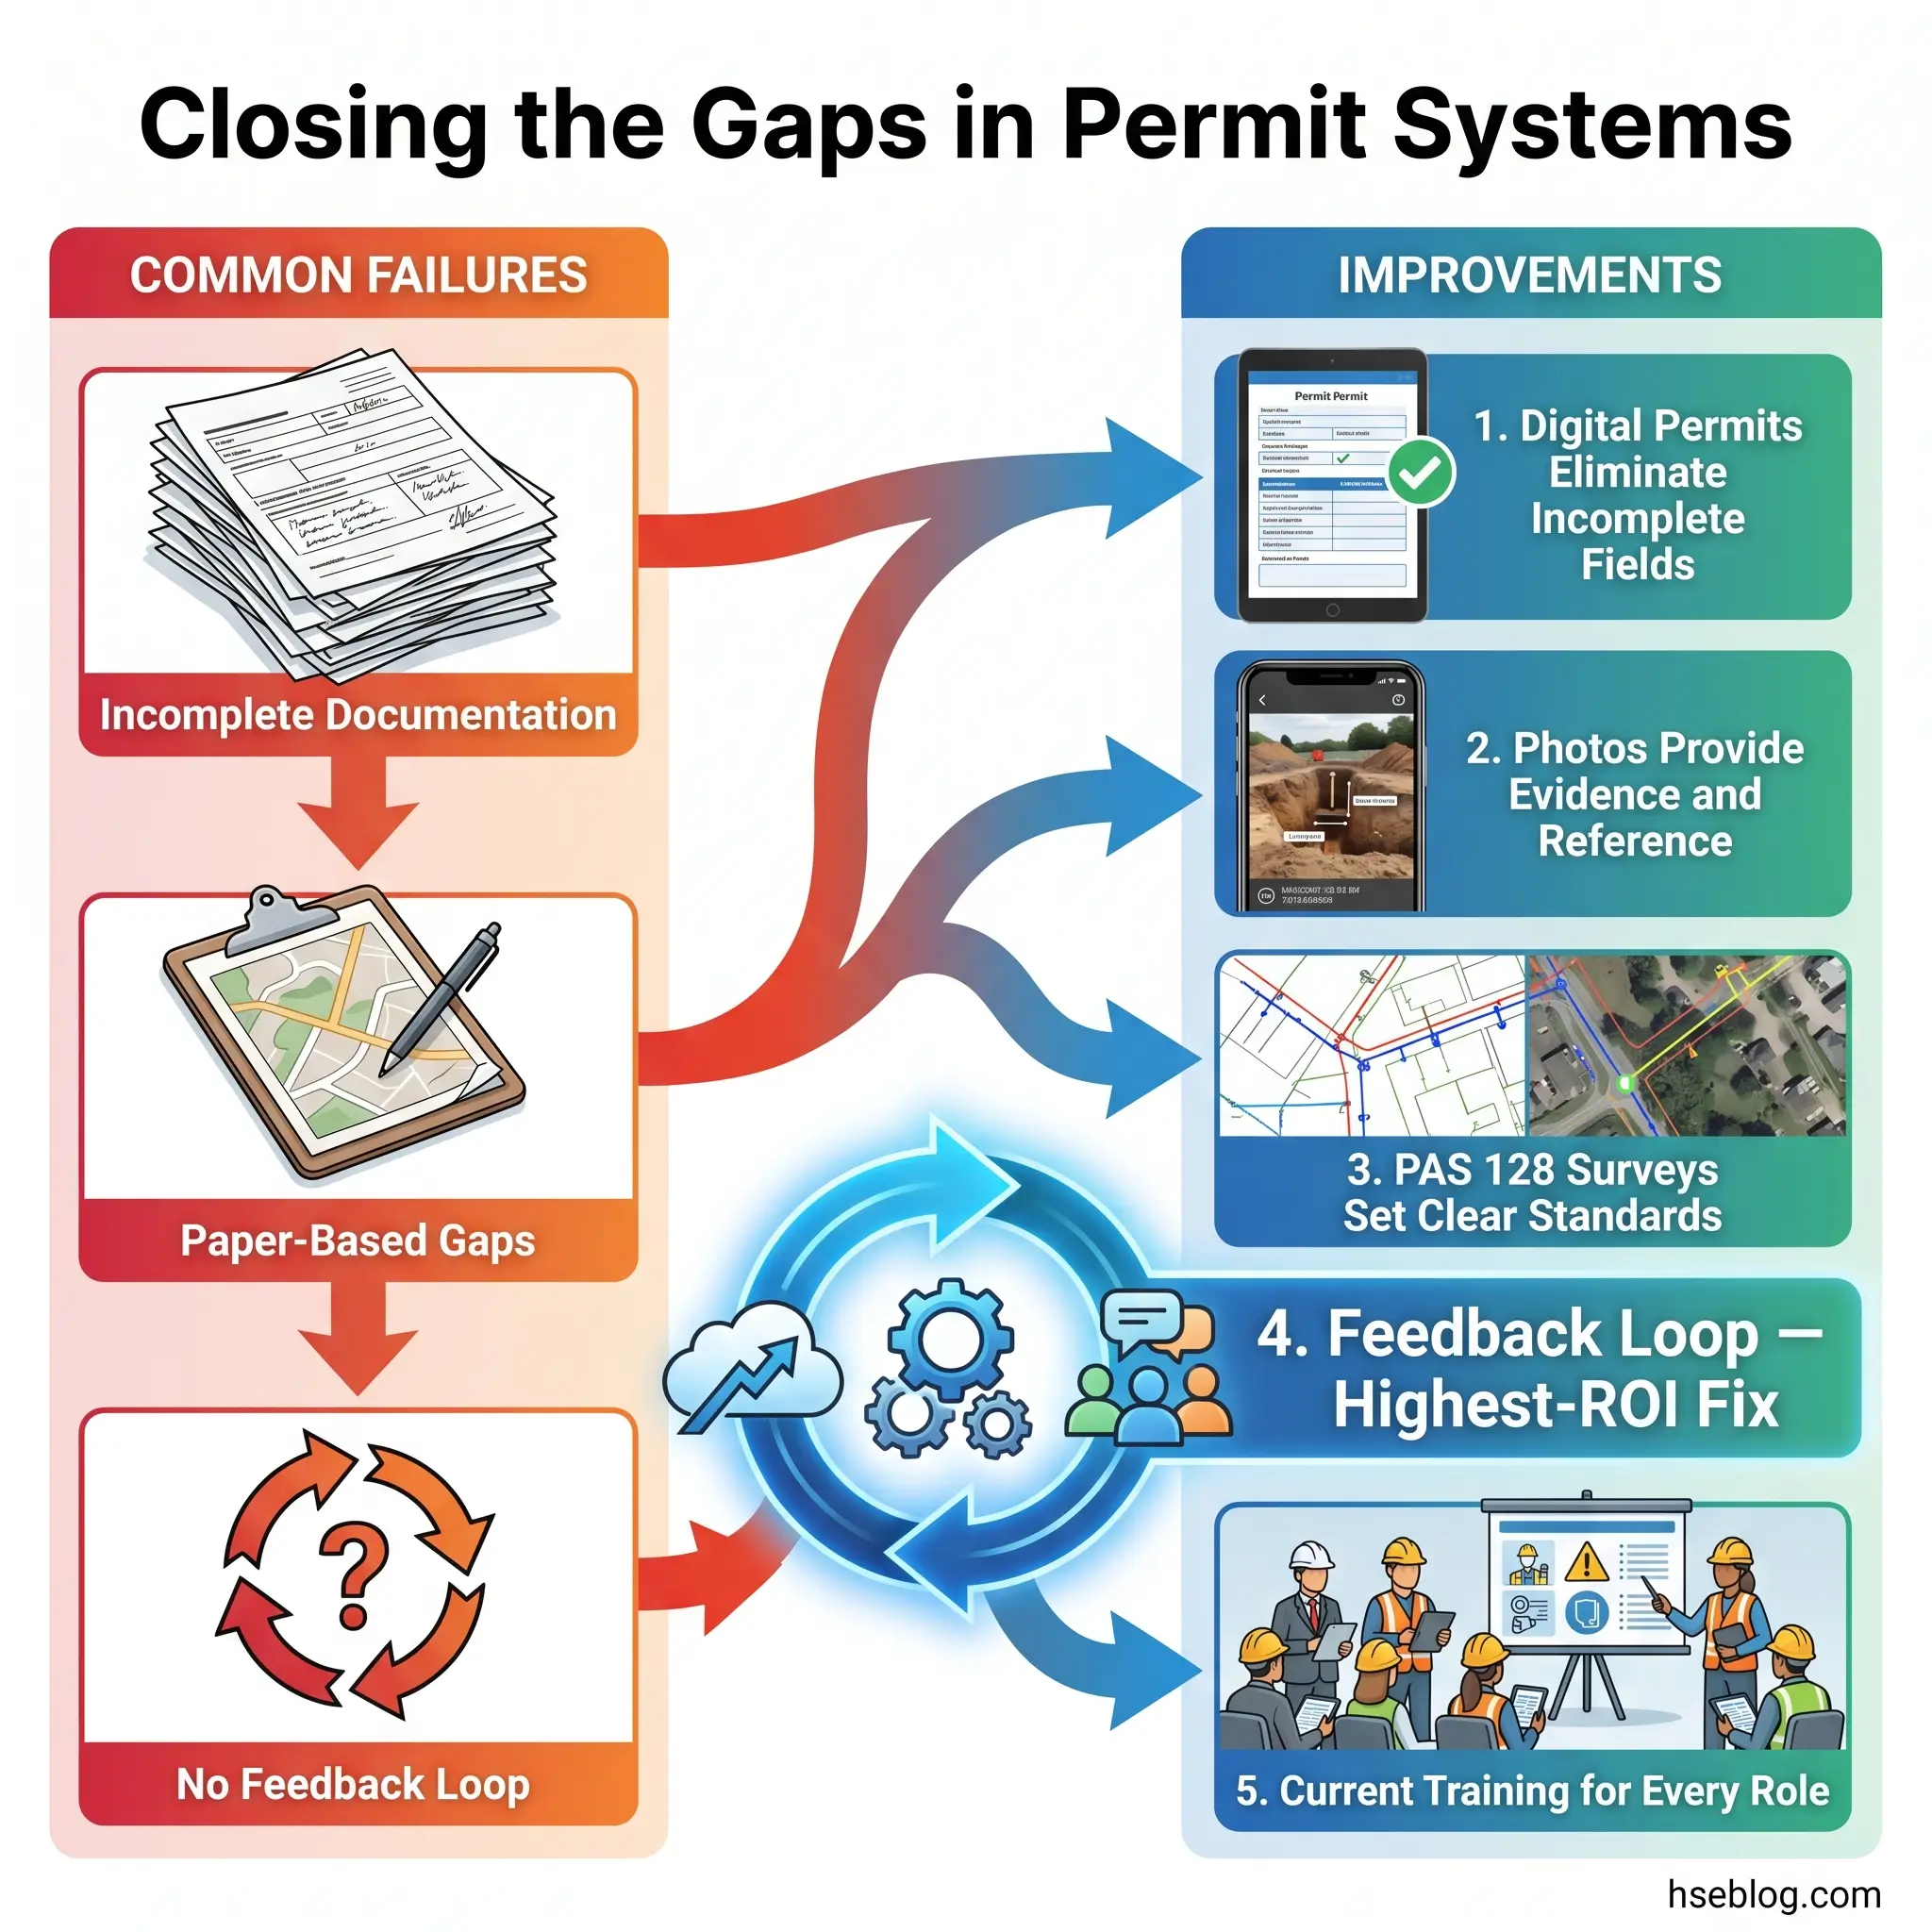
How to Improve Your Permit to Dig System
Permit-to-dig systems fail incrementally — through small erosions in compliance that compound until the gap between the documented process and the site reality becomes dangerous. Improvement is less about adding new elements than about closing the gaps in existing ones.
Digital permit systems eliminate several failure modes simultaneously. Mobile-accessible, cloud-stored permits with automated approval workflows create a real-time audit trail, prevent permits from being issued without completing all required fields, and allow supervisors to attach photographic evidence, survey data, and GPS coordinates directly to the permit record. The transition from paper to digital is not about technology preference — it is about removing the opportunity for incomplete permits to enter the system.
Photographic documentation serves dual purposes. Photos of utility markings, CAT survey positions, and excavation progress provide both a reference for operatives and an evidence base for investigations. When a service is found in a different position than expected, photographs taken before and during excavation establish whether the discrepancy was identifiable at the time the permit was issued.
PAS 128 survey specification represents a structural improvement for UK projects. Commissioning utility surveys to a defined quality level — rather than accepting whatever survey the subcontractor provides — establishes a clear standard of care. Specifying QL-B1 or QL-A surveys for high-risk areas before mobilisation is more expensive upfront but eliminates the most dangerous source of permit failure: inaccurate or incomplete service location data.
Closing the feedback loop is the single highest-return improvement most organisations can make. When a service is discovered during excavation that was not on the utility drawings, that information must flow back into the permit system, the project as-built records, and — where applicable — the utility company’s asset register. On too many projects, an unexpected service is handled as a one-off operational problem, the information stays with the crew that found it, and the next team to dig in the same area starts from the same incomplete drawings.
Training and competency assurance must be current and role-specific. CAT/Genny operators should hold current certification aligned with HSG47 requirements (UK) or equivalent qualification. Permit issuers need training not just on the form but on interpreting survey data, reading utility drawings, and making the judgment calls that determine whether a permit should be issued or withheld.
Frequently Asked Questions
Conclusion
The industry’s persistent failure with permits to dig is not a knowledge problem. The forms exist. The standards are published. Detection technology is mature and widely available. What breaks down is the connection between the document and the dig — the gap between a permit completed in the site office and an operative working in a trench who has never seen the service markings on the drawing attached to it.
Closing that gap requires three changes that cost almost nothing but demand consistent discipline. Permits must be location-specific rather than area-wide. Briefings must happen at the dig location with visual reference to service positions, not in a cabin with a clipboard. And when a service is discovered that the drawings did not show, that information must flow back into the system before the next permit is issued for the same area.
The permit to dig is not paperwork. It is the structured mechanism through which an organisation demonstrates — to its workers, to regulators, and to itself — that it has done the work necessary to prevent someone from being electrocuted, burned, or buried. When the mechanism is treated with the seriousness its purpose demands, it works. When it is treated as administrative overhead, it fails — and the consequences are measured in injuries, fatalities, prosecutions, and losses that dwarf the cost of doing it properly.